
Blogs
Our community blogs
-

- 39
entries - 102
comments - 7406
views
Recent Entries
 Latest Entry
Furnishing!!!
Hi all! I have spent quite a bit of time tidying stuff up and now I've begun to furnish the rooms! Because the kids attic bedroom is so small - despite my adding on to it, I wanted to build 'built in' beds. Well I am absolutely thrilled with how well they have turned out! I have started to work on the rest of the attic also. It's going to be Val's space for crafting and for apothecary stuff. Beginning to really enjoy this process!
- Read more...
- 0 comments
- 39
-
- 31
entries - 1
comment - 7364
views
Recent Entries
 Latest Entry
Almost finished!


Just have a little more shingling to do, some detail work in the attic, the brickwork on the foundation and I'm done. I can sure see this dollhouse decorated for all the holidays! I can see red, white and blue striped banners draped on the front porch railing; I can see youngsters climbing out the upstairs windows and making their way to sit ontop of the little dormer roofs to look up at the starry sky; pumpkins and spider webs, orange glow and black scary silhouettes in the windows for Halloween; Christmas lights all along the porch roof edge and the sight of a lighted tree in the window. Nice!
- 31
-
- 7
entries - 0
comments - 7226
views
Recent Entries
 Latest Entry
Seedlings

The soil is straight from a tea bag :whistle:
The seedlings are three strands of DMC floss in two shades of green.
I tied a knot in the middle and then snapped off the extra.

So how did I get it into the soil?

I pushed the knot in using a toothpick.
Easy peasy lemon squeezie.
- Read more...
- 0 comments
- 7
-
- 4
entries - 0
comments - 7018
views
Recent Entries
 Latest Entry
Tree Tutorial
Hi, everyone in this post I will be telling you how to make a tree.

***FYI The measurements given in this tutorial are only approximate. It's more about personal preference than accuracy. ***
Tools & Materials:
- Painters Tape or Masking Tape (Preferably white)
- Flush cutters (any tool that can cut wire are fine)
- Wire (28 gauge works well) Since we will be twisting the wire multiple times a wire with less thickness will work best.
- Brown florist tape (You can also use Paperclay [found at Hobby Lobby & other such stores] however, Paperclay isn't recommended for a bigger tree, because it gets too heavy.
- Cut several pieces of your 28 gauge wire (approx. 30 Inches)
- Twist the bundle of wire together for 6 inches
- Double your wire Twist back down to where your original wire twisting began
- If you want to make your branches with the different off-shoots, when you double your wire twist down but instead of returning to the original wire only twist about ¼ in down & then return to the original wire
- Continue to add wire and off-shoot branches until you are satisfied with the thickness of your tree branches.
- Continue adding branches until you reach your tree design. (you can have as few or as many branches as you want) once the ultimate tree design is met you can create the trunk.
- For this tutorial I used a toilet tissue roll for the trunk. Take the bundle of connected branches & place them in the toilet paper roll wrap the roll in masking tape
- *Make sure to also wrap up some of the branches to make the tree look more realistic
**There are more pictures in My Albums. They're backwards (can't figure out how to put them in the right order) so start at the end.**
Hope this is helpful

- Read more...
- 0 comments
- 4
-
- 7
entries - 5
comments - 7002
views
Recent Entries
 Latest Entry
I'm working on the Attic
I'm finally up to the attic! I plan to start putting the roof on..... I still have the doors, molding around the inside of the rooms, both top and bottom, the porch, then putting stucco on the outside and outside lights, then shingling....I'm also waiting for the bedroom furniture to arrive that I ordered! I can see a light at the end of the tunnel! I just really love doing this...

- Read more...
- 0 comments
- 7
-
- 9
entries - 6
comments - 6805
views
Recent Entries
 Latest Entry
it has been too long
It has been over a year since I have written here. So much has happened. Too much to list.
Am currently working on cretaing and organizing my laundry room so it can also be a craft room once again. I seem to have misplaced a lot of my minins and supplies in the garage soemwhere. I am sure in time they will turn up, but it is bothering me that I can not find certain things,
- Read more...
- 0 comments
- 9
-
- 7
entries - 7
comments - 6639
views
Recent Entries
 Latest Entry
Newberg Bricking
We'll I have not been doing much as of late i was waiting for som extra money to come in but that does no look like any time soon. So i decided to go a cheaper way to do the bricking in staed of the stencles and all im trying the paper clay method (LPCullen) So far I like how it looks. I also made two flower planters for the porch.
I will do some more bricking this weekend untill I run out of paper clay that is

- 7
-
- 7
entries - 2
comments - 6461
views
Recent Entries
 Latest Entry
Working on the last room - 11/6/07
Finishing up the last room on the 3rd Floor. I figure this will be like the "honeymoon suite" Installed the floor (which it the same floor I used in the living room)

and figuring out the fireplace in this room. Want to make it somewhat of a cozy and romantic setting. That is memory paper on the inside and outside of the fireplace. Was going to do the eggcrates again but think this looks pretty good.

I'll be putting a mantel on and some trim around it. Still figuring it out.
Worked on the Beacon all day today. Here is the finished fireplace. Looks nice I think

So today is Weds. 11/7/07 and I have just finished up on the trim in the last room of the house.

- 7
-
- 3
entries - 1
comment - 6437
views
Recent Entries
 Latest Entry
The Residents of Brookwood Beach House Story
Lily is the woman who lives on Brookwood Beach. She and her husband built this beach house right on the ocean. Her husband, George, was a fisherman, so he wanted to be close to the sea. George passed away a few years ago. Although she misses him, she manages to stay busy with family and friends. Everyone always wants to visit her at the beach. She is very fortunate to have such a lovely view.
Her favorite visitors are her two granddaughters, Rose and Lavender. They are visiting today. Unfortunately it is a bit cold to go out and play on the beach which is really Lily’s front yard. But the girls are playing their favorite activity with Gram, dress-up. They all have to dress up in an outfit from the dress-up trunk and then they will go down to high tea, well actually lemonade and cookies, but they pretend it is high tea. Today Rose wants to wear the Kimono, and Lavender wants to be a bride. Rose is checking out the other outfits to make sure she is in the one she really wants.
The fire is burning while they play. They had gone for a long walk on the beach and came in from the cold. Lily started the fire to warm them all up. The three fireplaces always seem to heat the house well enough even in the winter.
This visit is extra special because the girls are sleeping over. The girls are very excited to be spending the night. Their parents are away at a wedding so Lily gets to enjoy them a little longer than usual. Their mother, Pansy, is Lily’s only child. It is a family tradition to name all the girls after flowers. The tradition began with Lily’s grandmother, Iris.
- 3
-
- 9
entries - 3
comments - 6434
views
Recent Entries
Latest Entry
Little hallway almost done
I have been working on this almost every day, but the photos just wouldn't tell much of a story! I am working on the exterior, but I am having trouble getting some pieces to fit, but the rest is coming along well.
Here are photos of the hall on the second floor. The chair belongs to another house, but I like the Chrysnbon ones so much, I think I will have to get some for this house. It looks good here.

Next pic shows the other wall with a little bedside I painted (actually it has been painted 3 different times!). The accessories won't stay, and I need to hang pics, but it is looking really good.

- Read more...
- 0 comments
- 9
-
 Latest Entry
Spring Fling
I bought a house for the spring fling contest!

I can't wait to get started on it. It should be here really soon! I have a great idea for it. =)
asherah
-
- 13
entries - 2
comments - 6246
views
Recent Entries
 Latest Entry
Old plaster and lath
 Water-damaged plaster and lath wall section. Master craftsmen working on old houses around 1900 and earlier used plaster and lath to construct all interior walls. Lath was painstakingly nailed horizontally to vertical studs to grab the first plaster coat and hold it securely. Plaster walls were smooth and silky, and when cured were paintable. Plasterers were skilled craftsmen who worked long hours perfecting interior walls. Dampness and wetness will cause the plaster to crumble, although fresh plaster may be used to repair water damage and render it new again. Plaster was made and built to last more than a lifetime. Plaster and lath walls took 30 days to cure, although craftsmen advised waiting a period of a year before painting. For this reason, many homeowners chose to wallpaper their walls so as not to ruin the plaster work by painting too early. Plasterers were expensive 100 years ago; now they are extremely expensive and hard to find. Many new residents decide to tear down the old plaster and simply put drywall in its place as a cheap fix to save time and money. Plastering involved placing three layers on top of the other. The first coat stuck to the oak strips and was called scratch coat, which was troweled carefully into the lath to form a bond. The second coat was called brown coat, then a finish coat was applied thickly and pressed firmly to form a half-inch wall of silky-smooth lime plaster. Benefits of plastered walls include soundproofing not present with regular drywall. Plaster walls have durability not seen these days with gypsum or drywall, with plastered walls outlasting their owner and beyond. It's also easy to paint, wallpaper or repair minor damage.
- Read more...
- 0 comments
- 13
-
- 2
entries - 7
comments - 5941
views
Recent Entries
 Latest Entry
Half scale nonworking light fixture from a fish hook
I saw this idea in an old Nutshell news magazine. There were no instructions, so I just figured out my own way to do it. Sorry my pics are a little blurry, it's very hard to get clear pics of small items.
Materials:

Two small buttons, different sizes (canopy)
small piece chain
wire ( to make rings to connect chain)
3 beads
3 jewelry spacers
a triple fish hook ( be very careful with the hook, you can cut the tips off, please wear safety glasses. I didn't cut mine off)
gold paint
E6000 glue
jewelry pliers

Glue the beads to the bead spacers. make a ring of wire to connect the fish hook to the chain and then use a small piece of wire to connect the chain to the buttons (Stack the buttons and use the holes for the wire to go thru). Make sure to get the wire as flat as possible on the top of the buttons so that it will lay flat against ceiling.

I used gold paint to paint the buttons, chain and fish hook, since they were all different colors.

Now glue a bead assembly to each hook prong ( I didn't cut the points off since they were going to be covered anyway)

Here is my finished light fixture glued to the ceiling with E-6000 glue.
I would love to learn how to make these electric, but that is for another time!
Some more ideas:
All of these are in my Michael's puzzle house, which is my current project.


- 2
-
- 3
entries - 4
comments - 5929
views
Recent Entries
 Latest Entry
Fairy Houses
I haven't been on here in a while- not because I haven't been doing any mini work, but mostly b/c I haven't even had time to breathe, let alone type a nice leisurely blog entry.
I've been incredibly busy because I now have 3 jobs: a day job (school librarian), a night job (writing instructor at local community college) and also a weekend job (local history museum).
I was working this past Sunday at the museum (which is really a small historical village) when they had the Fairy House tour. Here's the link from the event, direct from author Tracy Kane's website: http://www.fairyhous...smouth-nh-2013/
Towards the end of the day, I happened to meet the lady who arranged these Fairy House events. She told me that every year, there are a few houses that never get claimed, and they end up in the dumpster. I thought that was apalling! Not just the idea of the wasted materials, but also the idea that these beautiful little houses don't get a chance to be seen again!
I told her that I am a dollhouse/fairy house builder myself, and that I also work in a school library. Our school has a little courtyard that the library windows look down into, and I told her I'd be happy to take any unclaimed fairy houses to display in the school's courtyard. She told me to come back on Monday (yesterday) and just take any houses that were left b/c Sunday night was the deadline to pick them up. So I went yesterday, and ended up taking 3 fairy houses back with me!

Not to mention- they also inspired me to make some more of my own! I made 2 little ones last night from these little wooden, decorative birdcages that I picked up at a thrift store last year. And now I am working on a 3rd one in a larger, metal decorative birdcage that was also bought at Goodwill.
I cannot wait to set them up in the courtyard, and then casually tell teachers/students to go out because "I think some fairies have taken up residence in our courtyard!"

- Read more...
- 0 comments
- 3
-
- 7
entries - 0
comments - 5802
views
Recent Entries
 Latest Entry
Let's finish up!
16. Do I have to say it? Set the bag aside and let the glue dry! Go grab a cup of tea or coffee. Clean up your hands and the work area. Decide on which jewelery findings you want to use, and how many straps you want. If you use a quick grab, thick tacky glue like I do, the wait time is less, but still please wait.
17. While you are wiating, cut the remaing trim into 1/8" widths. This will become your staps for closures etc. They only need to be 1 1/2" to 2" long, but can be longer if you like.
18. If your finding has a hole, run the strap through it and glue the end over so it stays on. If you have no hole then glue the finding to the strap, again wait for the glue to dry. You can add them later, when they are on the bag, but I find it less messy to do them now.
19. Cut your now dry handle piece in half. You may want long handles or shorter ones. With the 3" you have that option. I generally go for smaller ones 1 1/2" being a good average size.
Note: I have indicated on the paper pattern where you can place the handles. Please use that as a guide, I eyeball it and just attach them when it is time, where I think they look best.
****Check to see if your glue is dry on the bag*********Be carefull********
20. When the glue has dried, you want to repeat the process of applying the trim, just to the inside of the bag. Run glue along the inside edge of the bag, again work in small stages and fold the trim to the inside of the bag. Remember you have to press hard to make it stick. You will note that when you do this, any small ripples you may have had on the outside, smooth out and it looks wonderfull now. Sometimes at this point I have to reglue a spot or two on the front, but not to worry It all looks good in the end. See picture of this step below.
21. Glue on handles and your straps, press firmly for them to attach. LET IT DRY!!! Pictures below of the front, side and back of my finished sample bag.
I leave the bags open so they can be filled later for scenes, but you can glue them shut at this point. Heck the inside may be so scary you want to hide it, IDK. But they choice is yours!
WELL I hope this was clear enough for you all to follow along. If you do get stuck, or don't understand a part, then please PM me I will help you. I don't blog, this is my first, so I won't think to come here often and check for messages or additions. Happy Bagging!!!!!!!!! Dawn
- Read more...
- 0 comments
- 7
-
- 3
entries - 0
comments - 5776
views
Recent Entries
 Latest Entry
Start the Countdown
For the first time in my life, I decided to buy something that I had intended to make. I had planned to make the actual boxes for my mother and aunt's Quilt Shop roomboxes. I even made a "first attempt" (as you can see in my gallery photos) to make sure that I could actually make it; it came out cute, but a bit small. So I have ordered 2 roombox shells that I will paint and decorate myself.
I almost never do that...whether it be pants or a quilt or a shelf, whatever, if I could possibly make it, then I won't buy it from a store or online. When I told this to my friend Juli, she damned near had heart failure. During our conversation, she kept saying things like, "Now wait, tell me again - you're BUYING something that you could MAKE, but you're not going to MAKE it. You're going to BUY it. Do I have this right?" If we hadn't been on the phone, I would have kicked her!
But the best part about ordering them is that I paid less for two of them, precut and with shipping and handling, than I would have if I made them myself - gas to drive to Home Depot and back home, cost of MDF, cost of glue and then there's measuring and the time and effort and the screwing up and the remeasuring...and the swearing, don't forget the swearing!
Last year, I was working on Christmas gifts right up to Christmas and realized that I didn’t relax and just enjoy the holiday season. So this year, I've made a conscious decision to finish the Christmas present shopping/making early and spend time stress-free. Come December 22, I will be done with everything; done with gifts, done with baking, done with decorating, done with wrapping said gifts. I just want to sit back and relax, eat some sugar cookies, drink a cup a tea, read a book and watch Christmas shows. For those four days (from the 22nd, when I leave for Mum & Dad's till Christmas), there will be no lists, no pressing matters, no worries, no thoughts other than enjoying those 4 days (then it's back to work, to a totally empty office, on 26th). The house will be cleaned before I leave, the laundry will be done and ironed for work. It's not a goal or an intention...it's a plan, set in stone, that I will bust my butt to make happen!
So far, I'm getting it done! The shopping is down to 1 person left. The making is down to last minute touches on quilts. And I just recently received the room boxes and started painting them (one is already together, save for gluing the top on). I'm really loving the ease of these room boxes! They go together soooo fast! But now I can see what will and won't fit for mini's and how much more I need to make, like fabric bolt shelves and a ton of fabric bolts, a sewing machine, curtains, another few rulers, some quilt patterns another rotary cutter. With all this in mind, I'm starting to wonder if I will get them finished by Christmas!
As soon as I have pictures, I will be sure to share them with the forum.
- Read more...
- 0 comments
- 3
-
- 9
entries - 4
comments - 5596
views
Recent Entries
 Latest Entry
Added a Picture!
I undid all the taping on my bay window after I got home from classes today and took a picture. I'm going to need to touch things up a bit in places, but I don't think it looks, too bad, does it?
I'm going to have to paint the interior of the cabinet at some point too, because it just looks bad for it to be unfinished in there, even if it is just where the occupant will probably keep her potatoes and turnips

Anyway here's a picture!

I figure that I probably ought to see if I can find a scrapbooking paper that I like well enough during the 6 for 96 cent scrapbook paper sale that JoAnn has going on right now. I've decided that half my problem was that none of the stuff that I like even a bit, is old enough looking for me, and then I realized that I can just tea stain it, duh! So, I'm hoping to be able to spend less than $6 for the majority of what I still need to finish the cottage.
- Read more...
- 0 comments
- 9
-
- 7
entries - 3
comments - 5511
views
Recent Entries
 Latest Entry
Library Doors
For some time I have been trying to figure out how to create the two doors shown in the movie FOTR. One is just to the left of the set and is surrounded by a wooden door frame. The other is located in the center area of the set below the Narsil statue and is observed during the council scene when Merry and Pippin are spying on the council and spring out to demand to accompany Frodo on the Fellowship trek. It is surrounded by a stone framework.
My final approach was to layer a cut out frame over an inner inscribed sheet. This is my final effort.
- Read more...
- 0 comments
- 7
-
 Latest Entry
Short and Sweet - Using Paint.....
1. Open the file in paint. In this one, I use the inch setting to see how big the design is of the paper: almost 6 inches x 8 inches - so it is way too big.
2. I use the resize function in the home tab to reduce the size. I chose 30% - that should reduce the sample to 1 3/4 inches by 2 1/4 inches - that translates to 1 3/4ft by 2 1/4 ft - looks about right.
3. Use "select all" function and copy function.
4. Change the paper size - I use 17x11 - legal - that's what I print on
5. Go to the View tab - and zoom in until the original design appears pixelated and paste. Then move the copied part into position - you can use the arrow keys to move it and match the pixels.
6. Repeat until the full length of you paper size is filled.
7. Use the select all - copy function and repeat the pattern across the paper
8,. On this one, the pattern is offset - so I had to add to the bottom of the second column. After the second column, I can copy and paste until the end of my paper.
9. Zoom out and make sure it looks correct to you in terms of pattern size and try to imagine if you could see that on your wall. If it seems too large - reduce the size in 10% increments until the pattern has a size that looks correct.
What helps me:
Zooming in until you see pixels as little squares helps with matching offset patterns - you can line up better and use the arrow keys to move the copied design one pixel in any needed direction.


-
 Latest Entry
A Prodigal's Return..I"m baaack!
I'm baaaack!
Shame on me for not pursuing this blog. But as it so happens, GL revamped their site, and I had trouble settling in, so I got frustrated and gave up. Now I'm back, and determined to learn our new format.
I've gotten a lot done since I last posted here. Most of the rooms in Moggie Manor (RGT's EastSide Townhouse ) are wallpapered, and I've managed to come up with some very nice furnishings, although many of them are not permanent. Still it does my heart good to see the rooms with furniture in them.
My latest furniture purchase is a Bespaq Chambre de la Luna vanity. I love Bespaq, and although I can't afford to buy many pieces, I'm going to try to eventually have one piece in each room.
I've also gotten ahead of myself in another way..I've made a Christmas tree! Yup, I bought one of the simple, 'bottlebrush' trees, and using Lycopodium, fleshed the skeleton form out with lovely green branches. It now sits, waiting for ornamentation.
Getting the tree actually made was an obsession of mine. I had great fears that I'd leave it to the last minute, be unhappy with the results, and give up on decorating Moggie Manor for this Christmas.
Yep, in J.K.Rowling's world, Harry and his friends do celebrate Christmas. Those who love HP know that the witches and wizards in this world, aren't in league with the devil. Rather, they have been given extra gifts by the Divine..in the same manner that many other natural talents are given. And of course, it's how those talents are used, that makes them good or evil traits.
I like to believe that wizarding skills and talent are just one more example of a Divine Plan concerning human evolution..an adaptation to the world at large, due to mutations within our DNA. Wouldn't it be fun if such mutations really came to pass, and magic was really real?
OH well, I can dream, can't I? In any event, HP's Wizarding world is fun to play in.
More later. Have a great day!
- Read more...
- 0 comments
-
- 4
entries - 0
comments - 5280
views
Recent Entries
Latest Entry
Coventry Cottage - Day 7
So yesterday I started putting the first coat of paint onto the house. I listened to my husband this time, (instead of trusting my gut) and painted the house green...(well bad idea)...
The green that I painted it, looked more like grass, baby peas or maybe even something that comes out of my infant's diaper...it looks AWFUL!!!
I moved away from that and started priming the rest of the house pieces, I used plastering compound to fill in the holes on the porch roof where the kit porch posts should go also. After they were dry I assembled the rest of the first floor, the porch roof, the bay window and the kitchen bay window. I used tacky glue and then some of the plastering compound into the holes and grooves to make it look nice and flat/even.
I also worked a little bit more on my furniture kits. After placing them into the house I realized that I needed to make some adjustments. I took the two cabinets apart so I can cut them down and thinner so they will fit into placement better. I also put a varnish on the dining room table, the wing chair, and the couch. I have some more adjusting in the kitchen to make everything fit the right way, but I'm pretty happy with the results so far.
The next thing to do is more sanding!!!
- Read more...
- 0 comments
- 4
-
 Latest Entry
Braided Rug Tutorial
By request, I have been asked to create a tutorial for how to make a braided dh rug. The basis of the rug is from a book by Reader's Digest called "Complete Guide to Needlework", I just adapted it to what I thought would be dh proportions.
First of all, decide what shape of rug you would like and the approximate dimensions. What follows is for an oval rug, but I'll add a note about circular rugs at the bottom.
Start with three colours of embroidery thread, the usual 6 strands each that it comes in. Cut a piece of each colour to about the length from fingertip to fingertip. Don't worry if this turns out to not be enough, because it is easy to add more.
Make a knot at the end of the threads.

Attach ends to a firm surface in order to provide some tension.

Start braiding (left over centre, right over centre, left over centre, etc.), trying to maintain an even tension.

Continue braiding until you have a lenght of braid just longer than (lenght-width) of the final size.
Then do three 'round turns' as shown in the attached diagram.
 Note that the turn may not be very visible since the thread is so thin.
Continue braiding until you are back to the location of the knot, then do 3 more round turns.
Then continue braiding until you have at least 6" of braid done. At this point, you can start to sew the braid into a rug, or just continue braiding until you reach the ends of the threads.
To start sewing the rug together, start from the knot, then gently bend the braid where you did your 3 turns. Taking a needle and thread, start sewing the two sides together with small stitches, making sure to keep the braid flat. (If done properly, you will not see the thread from the front side.)

Before going very far, we will have to deal with the knot. I put a small amount of white glue on my finger and rub it over the knot and the beginning of the braid, then leave it to dry.
 Once dry, cut the knot off and the end threads should remain together.
 If you are worried about the ends unravelling, you can always add another dot of white glue once you have sewn more of the rug together.
Continue sewing the sides together, bending around the end where you did your second set of 3 turns.
 Then just continue sewing around and around, making sure to keep the braid flat.
  The right side will look like the next photo (note that the yellow thread should not show - I was doing this quickly and didn't notice it until after I had taken the picture.)
Continue braiding and sewing until you have a rug of the desired size. When finished, just make a knot, add some glue, and cut off the knot once the glue dries, then sew in or tuck the ends under the rug.
Here are pictures of the front and back of the first rug I did.

 Note that the shape may not be perfect, but you can get it to the right shape with a bit of tugging.
If you run out of thread before you reach the size you want, or just want to change to another colour, just use a dab of white glue to join the two ends together, making the smallest bump possible. If you have to add more thread to all three strands, just stagger them so that the bumps are not all at the same place. They will not be very noticable anyway.
Note, if you want a thicker rug, just use three strands of something a bit thicker than 6-thread embroidery thread.
For a circular rug, although I have not done one myself yet, start the same way with the knot, then do enough 'round turns' so that the braid turns in on itself to form a small circle (the book suggests 6-12, depending on the thickness of the strands). Glue and cut at the knot, then continue with the normal straight braid until the desired size is achieved, sewing in a circular form instead of an oval.
Good luck and happy braiding! ;)
-
- 15
entries - 3
comments - 5089
views
Recent Entries
 Latest Entry
A Caveat!
I take no credit for the basic idea for this project!
When I was working on my Heart Arbor Project, I came across the August 1993 issue of Nutshell News which had one of Joann Swanson's Do-It-Yourself columns. In "Heidi's Grandfather's Chalet" she made the "boulder" stonework for the building & fireplace from foamcore. After using her technique to make the back of Louis' Shamrocks & Shillaghs, I simply decided to adapt it to make a brick foundation for my Willowcrest. So, credit for the technique is all hers!
You should also know that I've entered the steps to this project "backwards" so that they can be read in order, rather than from the bottom up.
- Read more...
- 0 comments
- 15
-
 Latest Entry
Building the Vineyard Cottage
I've decided to build the Vineyard Cottage. It's a very pretty house. I can't decide if I want to put it in the diningroom in Charlotte or the Guestroom here in Maiden, but either way the colors I want to use will work in either room.


As usual, I have started with staining my floors. I've gone with a darker stain because I want to use bold colors on this house.

Believe it or not, I actually dry fitted this house to see how things went, which is something I don't usually do.

Then I started gluing the house together. I still like using wood glue, but I've borrowed a little trick that I picked up from Rik Pierce's classes. I use a bit of superglue on the wood glue to get an instant bond while waiting for the wood glue to dry. And I also used my handy dandy special weights--which is anything that I can lay my hands on, LOL! Oh, BTW, I got reminded the hard way that I need to be sure and let glue dry COMPLETELY before running into the house....

I went ahead and painted that inner staircase and railing, since I don't want to get paint on my floors. Once that was dry, I glued in that interior wall and the staircase.


Then I glued the bay side of the house on. I'm amazed at how well this house is going together.


Now the bay side is all nice and dry, and this is how that looks, along with the front wall.
Got the back wall glued on too.

Did a bit of wood putting and glued in the bay window. I had to go ahead and paint where that bay was going because I knew that once the bay was in I wouldn't be able to access it too well.

Then I installed the front porch and the other porch side.

And here's where we are tonight.


I'm thinking about doing siding on the house. Not quite sure. I'm still debating wiring it, and I think I may not do that after all. One thing at a time. Perhaps next house I build I'll wire it.
What do you think so far?
------------------------------------------
Let's see, where were we? Oh yes, I remember now! We're working on SIDING. Which takes FOREVER!!!!! I started with the side of the house, and I have to do it in sections. I also went ahead and put on the window trim, and then vividly remembered why I hate doing it that way, LOL! Of course, I want it that way, so that's the way it's being done.


Of course, you have to put on a little bit of siding, and then let it dry, then work on the next section. Don't you just hate it when the siding curls up like that?

I'm of course using wood glue to put this on. I've discovered that if I put the glue on the siding and then take a brush and evenly distribute the glue on the siding piece, it works a lot better. For me that is. Some of you probably know a better way to do it than I do...


I know exactly how I want this house to look, and I'm just hoping I can pull it off. I'm also still debating whether or not to wire it. Maybe. We'll see.
More pix later!
-
 Latest Entry
Computer Issues
Man have I had a hard time posting this. Computer issues I guess. But I'm back and feeling very guilty for dissapearing for a large chunk of the year. I blame being a first time mom to a one year old who fears NOTHING! Its not a normal day if the kid doesn't get hurt once. I'm considering investing in one of the sumo costumes so he's got some extra padding ;) .
Anyways back to Sirius's house!
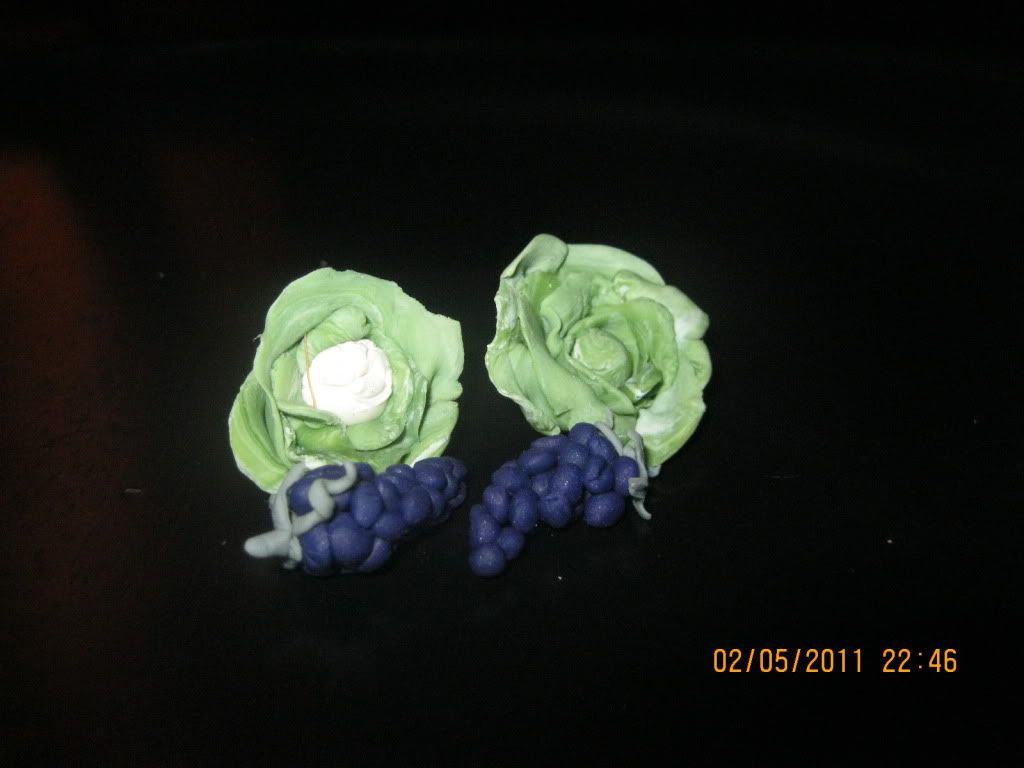
I started playing around with FIMO clay. I've made some fruits and veggies, and continued into the HP world.
The next photo is a Troll foot umbrella stand
 I'm thinking of going over it with some stain, and ploy and stipple it to make it look like skin. In the background you can see the floors, which I stained a darker color, and the wallpaper that I'm still working on.
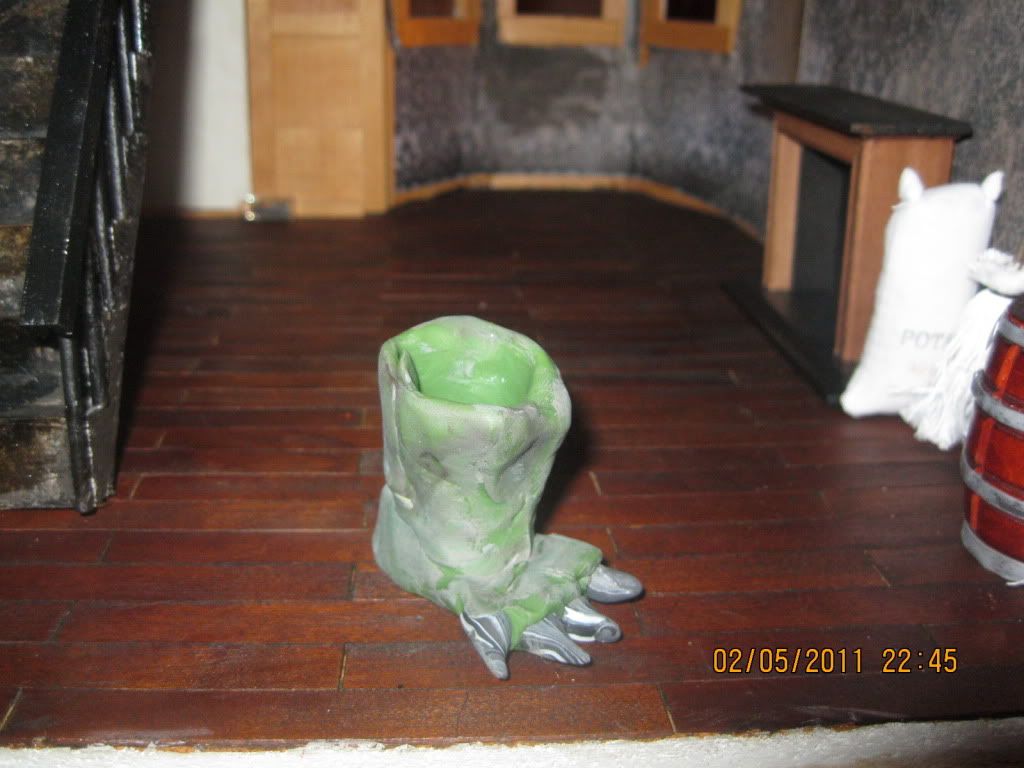
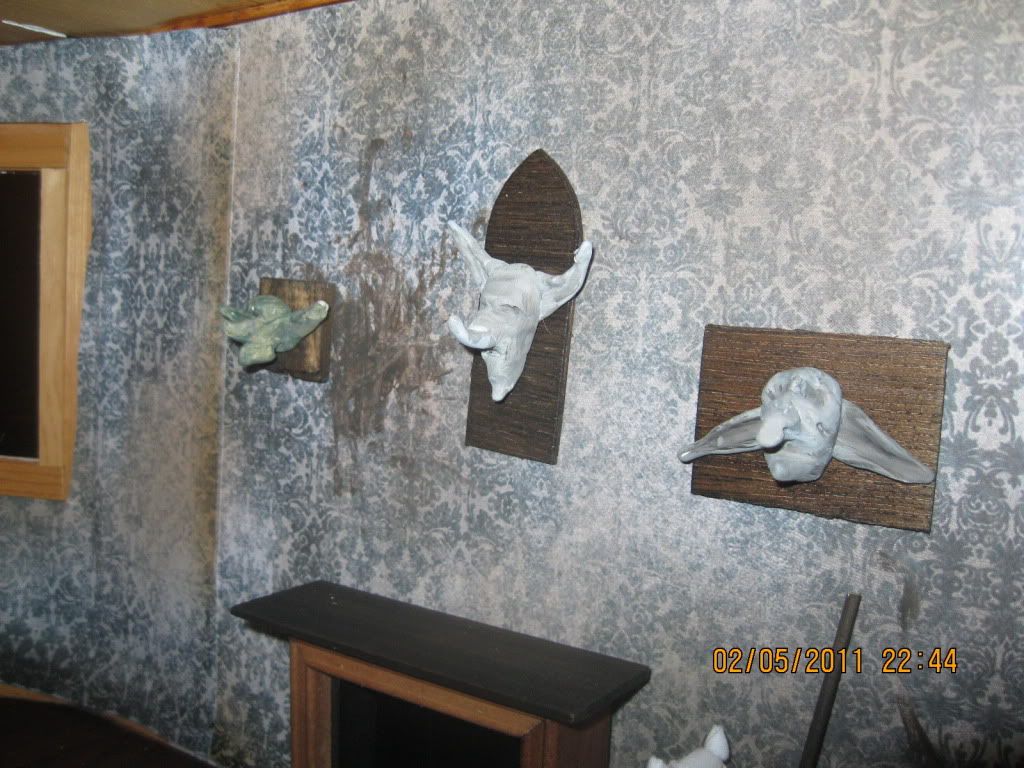
Next was probably my favorite thing I've done with clay. I made some shrunken elf heads. Its just scrap wood from a laser cut set, stained, and once I made the heads and baked them I glued them to the wood. I'm going to also eventually make little copper plaques with names of them.
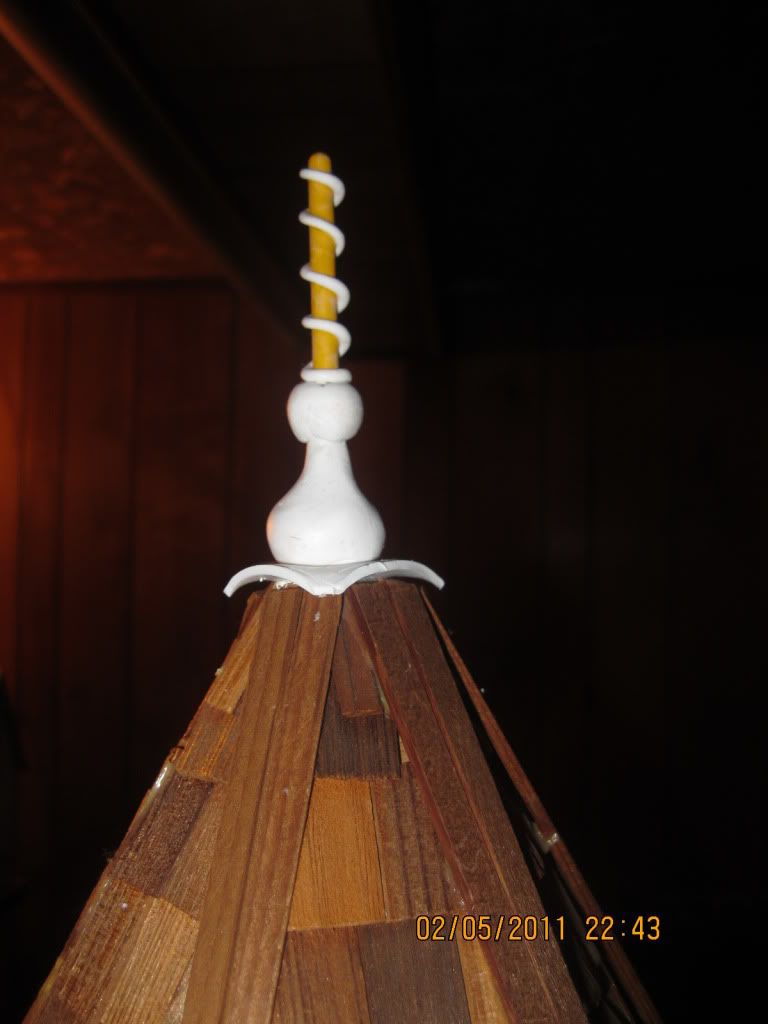
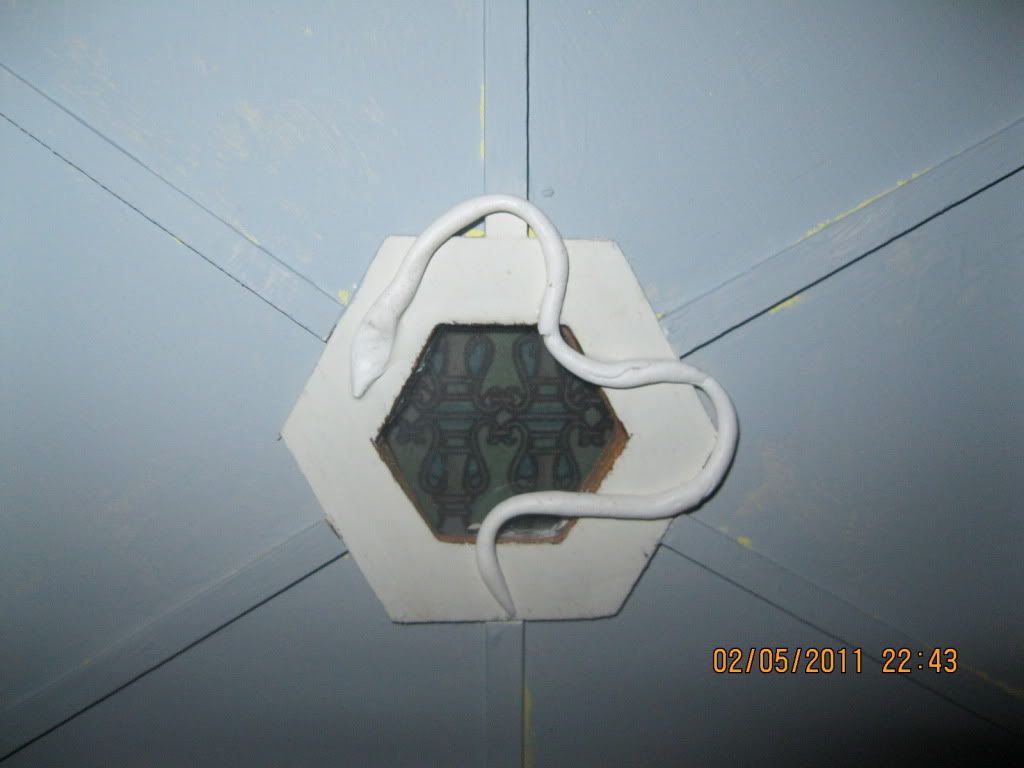
My next clay project was a totally improv. The roof of the tower had a giant hole in it so I made a fun little steeple thingy. I just added clay to a broken paintbrush handle and set it in there with a bunch of woodglue. I'm thinking of making it look like metal. Not sure which one, cooper ( greening or not) , shiny black, or silvery.
I'm going to try to make snakes a very pronounced but understated theme of the house ( Slytherin it up ). So my first snake it wrapping around the weird middle window that I hated. I'm going to do the same metal treatment as the turret. I also made some stainglass with a coloring book from Michaels. In greens of course.
Next, I took a cheap Hobby Lobby pie cabinet, took of the metal fronts and added some of the HL little bottles full of various spices and colored waters. I also attempted some clay books. Its hard to see how they turned out but I'll definatly make some more. They turned out super darling.
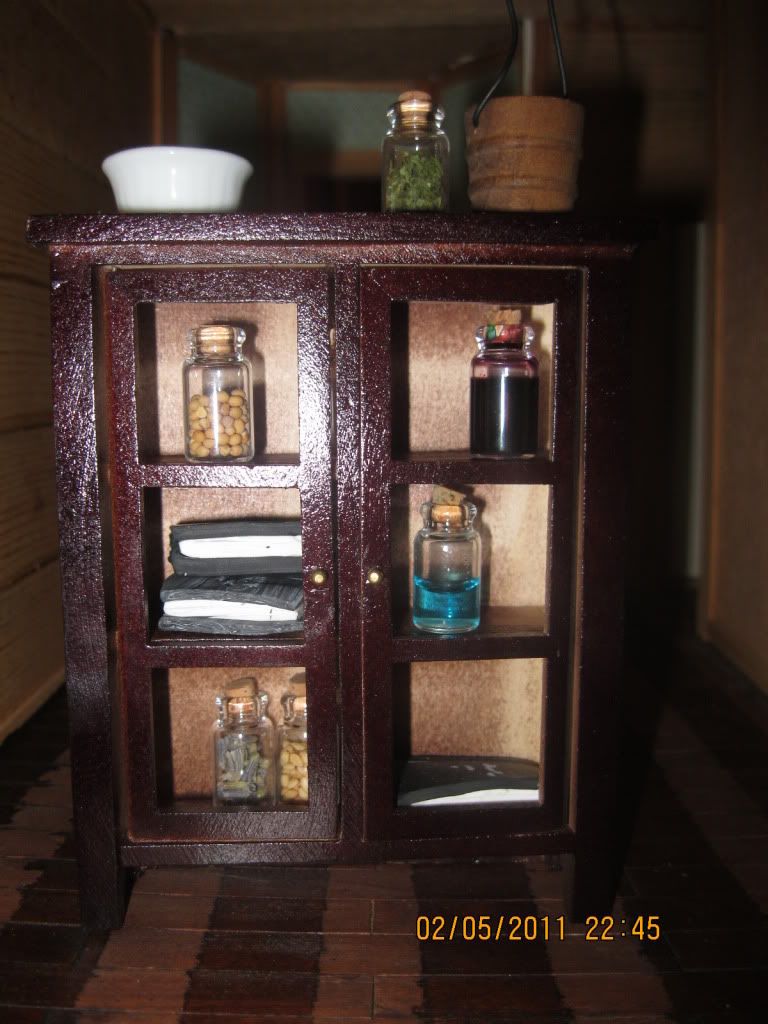
You can also see it that pic that I stained the floor in two different colors. Unfortunatley there was some bleeding but nothing intense.
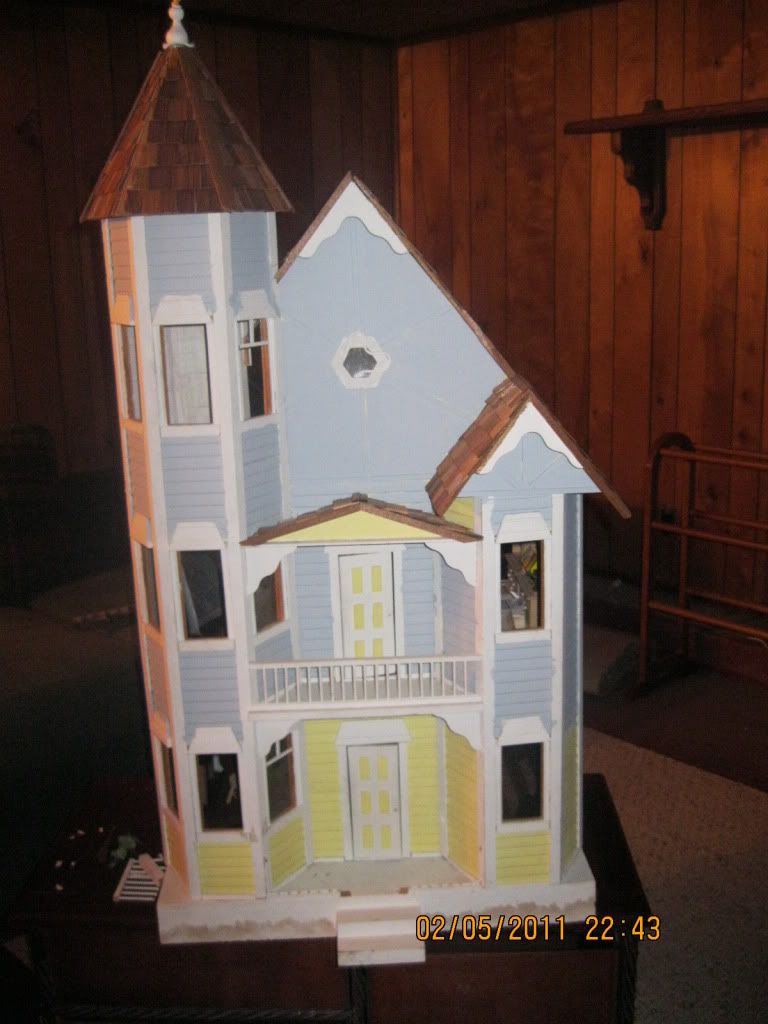
Finally is the outside's color. It seems a little blue in the pic put its grey. Whereever its still yellow is going to be paperclay brick. I'm still unsure of how I want the outside to look. I'm just playing it by ear. I'm thinking I was to distress the grey, but since I just did my base coat I have some time to think about it!
Let me know what you think. I'm really curious to see if anyone reads this haha. Have an amazing day!


