Blogs
Our community blogs
-

- 6
entries - 0
comments - 4796
views
Recent Entries
 Latest Entry
Starting out wrong!!!!
Grrrrrrrrr......I started building the Buttercup and already made a boo-boo!!! I should have painted it first, now I have to take extra pains to get the window seat painted.
 But I am really trying to do a good job. I painted the interior in vanilla and the window sills in suede, I am only using a few windows from the kit and am going to try to paint the rest with wedding themes, doves, rings, ect. I really think this was a good choice of shop to do, I can do a lil bit of everything. The dress shop is going to be on the second floor, my boyfriend said I needed stairs, I told him to use his imagination, (that there were stairs outside), he then asked me where the door was , grrrrrr.......men, lol. I love that he helps me though so I try not to get too frustrated with him.
- Read more...
- 0 comments
- 6
-
- 9
entries - 7
comments - 4719
views
Recent Entries
 Latest Entry
Working With Gables And Newspaper Wallpaper
Thursday 5/21/15
I've completed the main gable over the front of the Orchid. I had a bit of an issue figuring out the alignment of the gable because I tend to invert things and of course I don't follow direction very well but I did get it to work out.
I'm thinking of papering one attic room with newspapers, I found a free printie site with 1:12 scale newspapers and now I just need to find paper that will work as newsprint and print them out. I'm thinking of aging the paper with a weak tea solution.
I'm not progressing fast, but I'm not in a huge hurry either. Just letting the house speak to me and tell me it's tale.
- 9
-
 Latest Entry
The first week: A rough start... (sort of)
Well, so here I am with my first blog, my first dollhouse. Since I'm using this dollhouse as a learning experience, I decided to write my blog as a series of lessons. So here we go with the first lesson! :lol:
Lesson #1 - It's okay to ask for help.
I started putting this Pierce together - my very first dollhouse - on August 12, 2006. It's been almost a week of working on it and so far I am still working on the staircase.
Well, I encountered an issue from the very start with this kit - one of the sheets was missing, sheet #10, which contains a foundation part I need to complete one of the very beginning steps. I called Greenleaf the following Monday (16th) and they are sending me the missing sheet.
Well I put together just the base. Which I had a myriad of problems with. How hard is it to put two simple pieces of wood together? I discovered: very hard. The problem was I wasn't using the right glue and clamping it. With the help of my new friends in this community, I was able to figure out the best glue for me to use and learned how to use masking tape (well, I'm using that blue painter's tape) as innovative clamping method.
At first I was slightly frustrated that sheet #10 was missing, I felt like I couldn't go on. I received a very wonderful suggestion from one of the members of this great community that I could continue on to the next step. Which would be put together the staircase.
So I started the staircase, but then had a "blonde" moment (no offense to any blondes out there, I'm just using it as a cliche), on what I thought to be a very misaligned tab and slot. But, once again, the members of this community to the rescue!! :angry:
Boy, I sure would be completely lost already if it weren't for the people on here. I am so grateful!
Well, I am still working on that darn staircase (it seems so hard to put together!), and I'm just anxiously awaiting the arrival of sheet #10.
Meanwhile, in the past week in which I joined this community and started my new hobby, I've bought a dremel and many other supplies and tools and begun to learn how to use the dremel. I've decided to gather up my courage and join the October mini-swap. And I bought two more dollhouses on Joann's online store - the Harrison and the Aster Cottage which I plan to kitbash and turn into Japanese homes.
And most importantly in this past week, I've joined a wonderful community of like-minded mini-enthusiasts (or I have learned, we are all "addicts") who have warmly welcomed me and have already helped me tremendously!
-
 Latest Entry
Well, everyone, look at me NOW!!!
"I've got WINDOWS! BROWN WINDOWS!!! I'm trying so hard to keep my decorum, but it's really hard -- I've got panelling, wainscoating and BROWN WINDOWS!! Well, not the glass of course. That's all leaded...and elegant! But the frames inside are brown, and there's a brown edging between my wallpaper and the panelling, and that panelling... isn't that nice??? I so wanted brown windows, and now I've GOT them!!! " Puurrrrrrrrrrr......
Yes, the windows are in, both in the upstairs, and downstairs, except for the front. We're still working on the door, and don't want to install the windows until we put the door in...and the mirror over the bar.
Wait until Brimble sees his bar! My husband has outdone himself with the bar construction. It's all glued right now, and is drying...and looks fabulous. Walnut, with walnut panels, a lovely top. And the mirror will be framed in walnut, with a little shelf where I can put bottles of liquor for display.
We've got enough walnut left to make some tables and chairs for Brimble, too. I don't know how soon I'll get to that, Ms. Washington is waiting in the wings, and starting to clamour for attention, too. I may have to fill up Brimble with the stuff I have, and over time start building better furniture, so that Ms. Washington will be quiet.
Anyway... here's a couple of pics, and I'll put them in the gallery, too...
- Read more...
- 0 comments
-
- 4
entries - 6
comments - 4657
views
Recent Entries
 Latest Entry
The Glencroft: Day 4-5
TGIF!
Im am so happy with the progress of my Glencroft! I started yesterday by gluing some of the remaining facade pieces. The upstairs gables were glued in and I was able to finally make my sub-walls out of foam board for the upstairs! (See pictures below).
Once I finally had the front walls all tacked, I was able to start planning the Stone Portico/Porch that I will be adding to the front. I plan on making this out of 3/4 plywood to give the walls a heavy stone thickness but at first I wanted to make it out of foam board so I can get an idea how the finished product will look. Since the new porch addition covers most of the swooping roof line in the front, I was able to remove a small section on roof that comes through the living-room above the front door. Now, the room is nice and square. You can see in one of the pictures below.
Last night I picked up a few finishing supplies (Stain, varnish and paint) so I can finally start doing some detailing. I want the wood throughout the house to be a really dark rick color so I plan on mixing a cherry, walnut and a hint of ebony stain to hopefully achieve this.


- 4
-
- 3
entries - 0
comments - 4604
views
Recent Entries
 Latest Entry
Spiral Staircase Part 3
Railings and Final Assembly
Here's the cutout for the upper floor, quick specs the long flat sides are 2 3/4" long, just enough to allow the step to clear the hole.

Here's a shot of the hole, ours looks a little bit different. We had a previous hole for another staircase that just didn't fly, but it worked out in the end :angry: .

I'm sure there are many ways and out of many things to make a handrail, since we went with the old iron look we are using an old necklace we had laying around.

I'll problably use hot glue to hold it onto the spindles. Whatever you decide to use can't be to heavy or it will bow the steps.
Here is the template for the placement of the spindles on the upper floor.
 This should measure at the long side 6 1/4" and the width from the peak of the arc to flat side 3 1/8". Take the template and align the center hole on the flat edge with the point of the 'V' cutout in the floor.
Now mark all the holes along the outside curve, depending on where you have the hole for the steps you may not use all of the holes. Once marked, take the 5/64" drill bit and drill all the spots you marked.
Depending on what finish you are going to use you may want to do that before putting them in the holes with a dab of glue.
This is a rough draft of what it will look like
 (There's going to be a wall on the right so I won't need all the spindles)
Use the same template that you marked the floor spindles with for the upper railing. To make the rail, notice on the template the very inside curved line. Cut at that line and you now have the template for the railing.
Make 2 copies of the rail, on one mark the holes from the template and drill them out so you can attach the dowels(spindles) and leave the other one blank. Carefully glue them together, try not to get glue in the holes they'll be a pain to clean out.
Depending on the placement of the stairs you may need to do a little customization of the railing. (Example, like mine you may only use half of the rail or notch it for a wall, etc...)
Now for the installation into the house, assuming all the finish work is done, rails are up, handrail is on the steps and so on. Take a final measurement on the floor to ceiling and measure again the main center post including the base, trim the remaining dowel to the exact measurement. If your beads that you got have different sizes use a couple of the small ones and glue them on just to take up the rest of the dowel, if you don't have small ones you may have to cut one of the larger ones to fit, but do not go past where you trimmed it or the steps won't fit. Here's a pic of the beads that we used it has different sizes in it.

Now I know you have been wondering what the carpet tape is for well here it is. Carefully lay the steps on their side, take a 2" piece of carpet tape and place it in the middle of the bottom of the base. Now before you are ready to install the steps, peel the backing of the tape and put a dab of glue on the bead on the center post, them lean it up itno the hole and make sure you have it where you want it. Push down on the base to set the tape and wa-la you have a spiral staircase.

- Read more...
- 0 comments
- 3
-
 Latest Entry
400+
I have been doing cedar shake staining for the last two days or so and now I'm at around 400 shingles at least. Two of the cedar shake shingle sheets came with this beautiful wood that didn't need anything but a clear coat to look great. Almost half way there!
- Read more...
- 0 comments
-
- 9
entries - 11
comments - 4199
views
Recent Entries
- 9
-
- 4
entries - 1
comment - 4104
views
Recent Entries
Latest Entry
Sanding, sanding, and more sanding
September 10, 2013
Spent 4 hours today removing more paint, paper, varnish, and glue. After the last few days of disassembly and cleanup I have to say I have a renewed respect for sanding the product before assembly. As I said before, this was my first house and I knew next to nothing about finishes. Although I gave the pieces a light sanding to remove splinters and jagged edges before I put it together, I see now the benefits of doing a complete and thorough sanding.
As I took the house apart I saw close up how rough some of the glued edges were and in future I will be sure to take this step more seriously. Close examination has shown me how much better the finished product can be with careful attention to this preliminary step. I’m still deciding whether I will change the color of the house, so there may be a few more hours of sanding in my future, but at least now it has been made easy with the Multi Max.
- 4
-
- 3
entries - 4
comments - 4003
views
Recent Entries
 Latest Entry
Claudias castle and a tut idea ?
I finished the castle and obviously I have not gotten any better at the whole blog thing. I was never much for the computer and sitting and writin etc. I just want to get up and work on things but really this might be a nice place to jot thoughts down.
I haev been asked by a friend of mine to make a tutorial on aging techniques I have learned from the forum, reading and just playing. I am nervous about that, plus I have been working on miniatures for only three years , sooo what do I have to teach anyone ? lol
I guess my ideas come from reading old books on miniatures from the 60's and 70's because I don't always have a lot of money so what I can't make I have to figure out HOW to make ....how ever says war is the mother of invention !! I think poverty is lol.
Here is Claudia's castle :
and the aged Gris Gris house
- 3
-
- 10
entries - 1
comment - 3989
views
Recent Entries
 Latest Entry
and life goes on and on!!
Well I swear I haven't dropped off the planet...well...the real one maybe...I have been engrossed in minis!!!! YEAH...My little girl has been away visiting family so I had a bunch of free time

I got more of my roof done and boy is it taking FOREVER!!!! I have tweeked the dragorse idea and added spikes down the horses back and thinking about adding a main and letting the spikes peek through on that guy...He is actually going to be used for minis, his very large self !!! My mother and I are working on the RV Trailer kit for the competition and we are doing a fantasy gypsy trailer... And my dragorse will be the lovely steed used to pull it!! I have also been working on the Gypsy to go in it...And of course since the dragorse is def. fantasy she has to be very "creative". Work in progress...:lol:
I have been working on a dragon for a swap I'm participating in...and he is just too cool...along with working on getting that website done so I can get my info out there and see what other kinds of work I can get!!
My mother and I have decided to join forces on alot of (now) OUR work...she is great at costumes and betwixed and between us the scenery gets done and rather interestingly! So...that being said...the troll has a home...she finished building the cave now I have to paint it...NO IDEA how I'm gonna do that...I did order some really realistic fake snow and water stuff..and had a thought...We have a fireplace for the cave and why not have the cave be at the edge of the freeze line...My Uncle used to have a house like that and if you went out the front door you had grass but out the back door and you had snow...really really cool...so thought about incorporating the snow into this scene some how...and of course add to my list I'm gonna make a really twisted funky tree that I may add some ice cycles to...not sure on that...just an idea..I do have the sketch of the tree though...I orded some more clay...gonna try a new kind I found called ProSculpt...
Then lets see...have a seminar going on soon about making a baby, and a horse (really gonna be the dragorse :o ) Ohhhh...and a photography class so I can get all these processes documented ,hopefully after the class documented well:unsure:
Ohhh..almost forgot...I got my mother a gift certificate for some dollhouse stuff and bless he heart..I have mentioned wanting the primrose (my thought being smaller...could keep it
 ) And she actually got it with part of her GC..Needless to say she is going to build the house...and WE will decorate it!!!!! Can't wait till she gets it...
Ok...enough for now...Miss Savannah is coming home tonight so as much as I've enjoyed the minis I really really miss her so off to finish work and go play with miss savannah!!!
Namaste,
Kristen
- Read more...
- 0 comments
- 10
-
 Latest Entry
Kit Ordered. Paint Purchased.
Alright, I ordered my kit yesterday, and they shipped it yesterday. I expect it to arrive hopefully Monday or Tuesday. In the meantime, I have gathered copious amounts of sandpaper, my paint, wood filler, and glue. I also got some wallpaper. I'm probably jumping the gun on that one, but hey, that's okay!
 So, I am all ready to be scared, intimidated, frightened, and ready to pee myself when it gets here.
 Here is a picture of the actual Victorian home's color scheme that I plan to use on my pint-sized property!


-
Latest Entry
Upholstering
Upholstering a chair.
The same method works for the sofa.
I used Pellon WonderUnder to attach the fabric to my chair. For those of you who do not know what this is, it's a paper backed adhesive web that turns any fabric into fusible fabric. I bought mine at Walmart for $1.27 a yard and it is about 18" wide.
After making the sofa I decided that it was to deep, so for the chair I took 1/2" off the depth. I think it looks a lot better.

The room is 10" deep and 12" wide. I made that rug myself too.
Here's the chair before covering.

I guessed how much fabric I would need and ironed a piece of WonderUnder to my fabric. I cut the pieces generously to fit each area. I'm hoping that the pictures will show you how I got each piece in place. If you have any questions please ask.
I started with the end that would be the right if I were sitting in it, ironing and cutting to fit.


I then moved to side of the top (does that make sense).


Then the other end which is the same but opposite.
I promised myself I wouldn't forget to take pictures when I got to the middle, but guess what? I did. The middle is one piece of fabric starting with a little bit on the bottom back and wrapping around until it reaches under the front.

The cushion is just more of the same.
And the finished chair.

Once the general size is determined you could change the look fairly easily.

I do have wooden beads for the legs but, since I've given these pieces to my grandson's, I'm not putting them on. These sofa's and chairs are very sturdy. Other than getting them dirty I don't think the kids will do any damage to them.
- Read more...
- 0 comments
-
- 42
entries - 18
comments - 3742
views
Recent Entries
 Latest Entry
aug 2010
still at a standstill with these beauties....they are softly calling...finish us... finish us...
they will never be finished...a lifetimes work in progress but they are so pretty thought i'd share where i'm up to 
- 42
-
 Latest Entry
The Beginning
I've never done a blog and hardly know where to start. The genuine excitement I feel in working on my Fairfield is my reason for starting this blog, and to be able to share each step of the way with others who understand my enthusiasm.
- Read more...
- 0 comments
-
- 4
entries - 0
comments - 3330
views
Recent Entries
 Latest Entry
I made it to Canada!
I'm here I'm here! I made it to Canada! wow I never thought I'd ever have the opportunity to come here!
Susanne welcomed me at the door. She is such a sweetheart! I just love her!
It's snowing! Wow I've never seen snow like this before! Susanne took me out and let me play in it today
Ok I have a new favorite cat... well besides our cat Severus back at home... MISSYMEW!!! She is the coolest cat ever! I just loved snuggling and playing with her, and she has the softest fur... and so does Trinity. I love her too! She looks ALOT like my cat severus!
Susanne let me stay in her beautiful Beacon Hill. That house is incredible. I cant get over how perfect it is in everyway!
I had tea with Gramma on the balcony and it was just what i needed... And then.. I got to perform! Susanne's friends the mini-munchkins let me practice my newest ballet routine in front of them. It felt so good to streach my legs! I think they liked it.. I sure hope so

Today we had a Teddy bear picnic.. it was so nice to meet other bears my size. I just love Susanne's house.. there are so many bears that live in it! The Three Bears cottage was so much fun to visit. They had this really pretty pink dollhouse in their bedroom. I really enjoyed playing with it.
After all that tea I searched around for the bathroom. Ahh!! no where in site! oh how i miss regular bathrooms! i need to write my mommy and promise her that i will always keep my bathroom clean from now on! i never want to be without a bathroom again! haha. I climbed down the Three bears tree and found a small little bush to go behind. no outhouse this time!
Susanne took me to work! It was so exciting to see City Hall! She really took me to so many wonderful places! if I wrote them all down my little paws would fall right off! So lets just say i had a wonderful time. You can check out all my photos in the photo album. Teresa has done such a great job with it! I cant wait to meet her. Mom told me to take lots of pics of her willowcrest, thats my moms all time favorite house! I cant wait to see that..
opps im rambling again.. silly me. my paws are getting tired. I had such a great time at Susanne's though and made so many wonderful friends. I was very sad to go... She gave me some wonderufl gifts though. She gave me a cute little bear from her toy store, a picture book of edmonton and a tiny teddies book!
Thank you for taking such agreat care of me Susanne! Off to Vanderhoof, British Columbia I go!
Love,
Thelma
- Read more...
- 0 comments
- 4
-

 Latest Entry
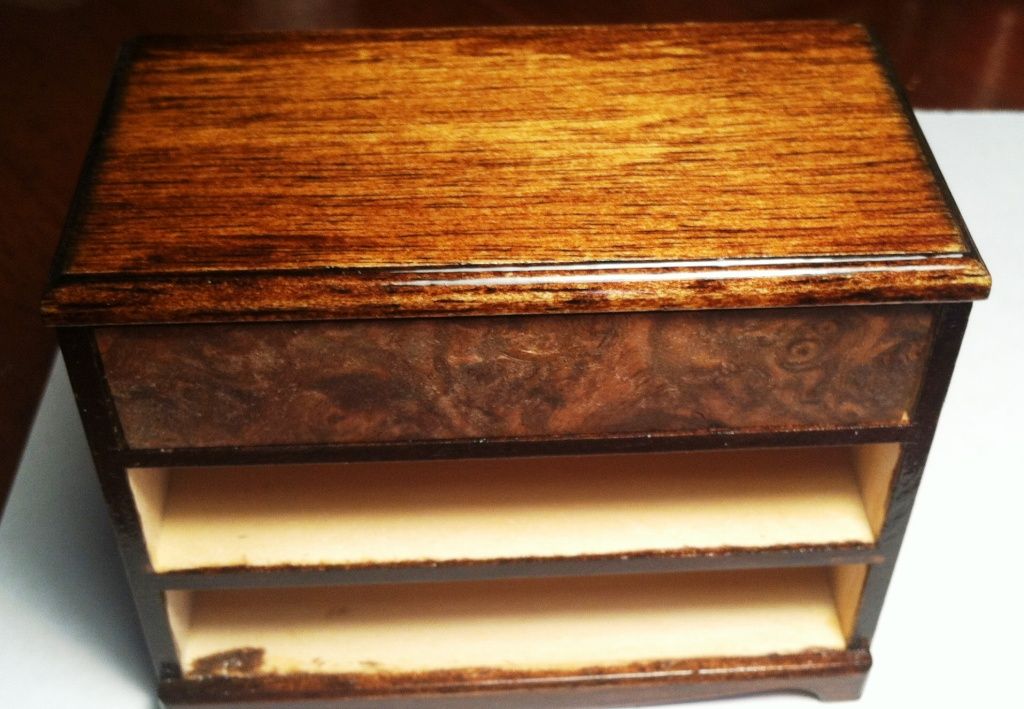
Wood carved bar scene
I bought this scene about 4 years ago from a guy who found it at an estate sale. I’m not selling it, but am wondering if anyone knows anything about it? It’s all original except a few things I put on the table and bar (not the bottles. Those are original). My husband thought it was a scene from the Great Depression. Who knows. The wood trim around the base is just positioned there. It’s meant to be the trim for the glass case which I need the glass for. Does anyone have any idea about this set? It’s not signed. It’s carved from wood. Thank you in advance!


- Read more...
- 0 comments
-
 Latest Entry
My first blog
So this isn't going to be an everyday blog, but I am going to try and write every time I make some worthwhile progress on my dollhouse projects. So where I'm at right now...I have completed my Orchid, my spring fling 2008 gardening shed, and finished renovating my Duracraft Lafayette from my childhood.- I have pictures in my gallery of these, and I will try to get some updated photos with finished products posted ASAP. Other 2 dollhouses I have completed- there was one which I did when I was 4 years old with my mom and cannot remember what is was and what has happened to it, and then the Greenleaf Brookwood...which was the first dollhouse I made on my own- needless to say I was not too happy with the outcome, so I gave that one to my little sister. Anyways, getting to my newest project- I have ordered the Greenleaf / Corona Miniature Travel Trailer!!! yay!
This is actually going to be a project I do with my 5 year old son....who has a great fascination with dollhouses. So we are supposed to get delivery tomorrow of our wonderful little treasure and he and I are so excited!!! We already have been talking about plans for our nice little camper. We both love rvs and hope one day to get a real one, but for now we will be happy with making a mini version. Not sure if we are going to do a more retro version or a modern version...but either way he wants to make sure it has all the need to haves,,,like potty, oven, sink, bed, and a small fan...haha. Well will close for now and make sure I will track our progress and post more pictures. Amanda
- Read more...
- 0 comments
-
-
- 4
entries - 4
comments - 3181
views
Recent Entries
 Latest Entry
Beginning the Primer and a near catastrophe...
Last night while working on the windows, my son refilled my tea sippy (a cup with a screw on lid and a straw) but didn't secure the lid.. I didn't notice, and went to pick up the cup to take a sip. The cup slipped out of my hands and spilled tea all over my doll house wall.
 He grabbed a towel to help mop up the mess. The majority of it wound up in this silver tray that was sitting on top of the doll house part, that held tools (tweezers of all sorts, a mirror on a telescopic stick, swabs, and face masks) needless to say it took me a bit to clean up the mess and dry off the part of the doll house. This morning I began applying primer to the doll house walls and noticed one wall developed a crack. The crack doesn't go all the way through the board, fortunately. I don't know if I need to try to repair it, or if it will be ok, my concern is that this will weaken the construction of that wall. I suppose I could try to staple it back together on that side of the wall to strengthen it. Any other ideas?
~morningstar~


- Read more...
- 0 comments
- 4
-
 Latest Entry
test blog entry
Just a test folks.. nothing to see here :angry:
- Read more...
- 0 comments
-
- 6
entries - 8
comments - 2978
views
Recent Entries
 Latest Entry
a little more
My progress is so slow I'm wondering if I should even bother to post an entry. But it's keeping me working on the build, so I'll just add a picture when I get a little more done.
- 6
-
Latest Entry
Delays...Delays...Delays
I had intended to start my Tudor build blog a week or so ago, but, alas life gets in the way. I've been busy setting up my workshop and getting the garden in the front yard ready for spring planting. I hope to get back to work on the Tudor in the next few days and get back on track.
- Read more...
- 0 comments
-
Latest Entry
drat!
dental visit with the maxillo/facial surgeon today who drilled a big hole in our bank account for the implant to come! Why do we need teeth? Can't we just live on milkshakes after age 50? They'd be a whole lot cheaper than one tiny little piece of metal screwed financially painfully in place over the course of 6 months.
- Read more...
- 0 comments
-
Latest Entry
False Front Drawer
This tutorial deals with converting a House of Miniatures drawer using thinner basswood for the front, sides, and bottom, and
dovetailing all four corners, to make a "false front" drawer. A false front drawer is one that has the drawer built as a open box
with all four sides and then the front piece is installed. This was done for two reasons:
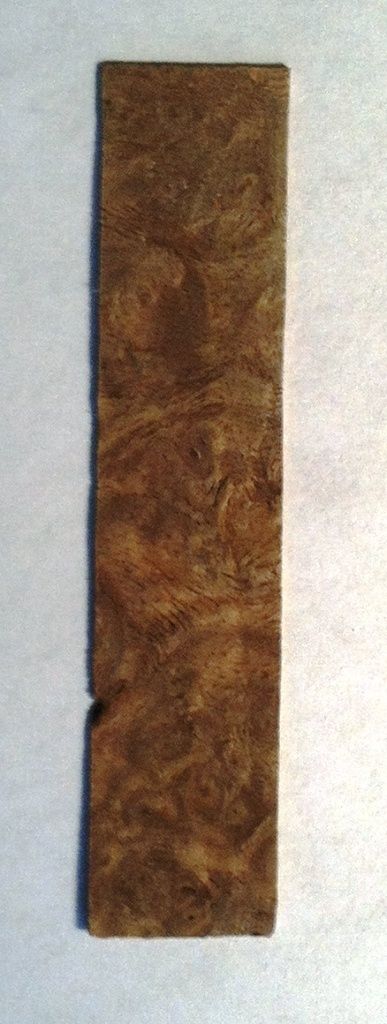
1. Some woods, especially burls, are not strong on their own and need the reinforcement
2. Veneers allow the use of very thin layers of expensive and highly figured woords that are too scarce and expensive to make a
solid drawer from
Please refer to my tutorial "Dovetails for Drawers" for details and notes on creating the dovetails
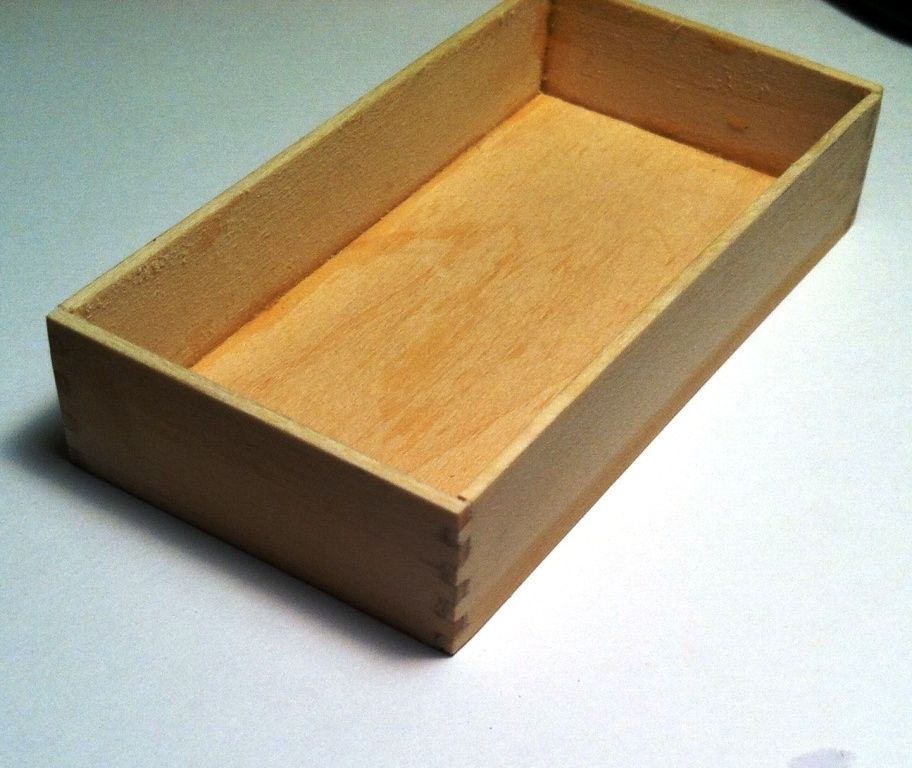
I am demonstrating using the House of Miniatures Three Drawer Chest (Kit 40011) drawer using the kit parts as the drawer front and
as measuring patterns so you can convert any kit drawer for any House of Miniatures using these instructions
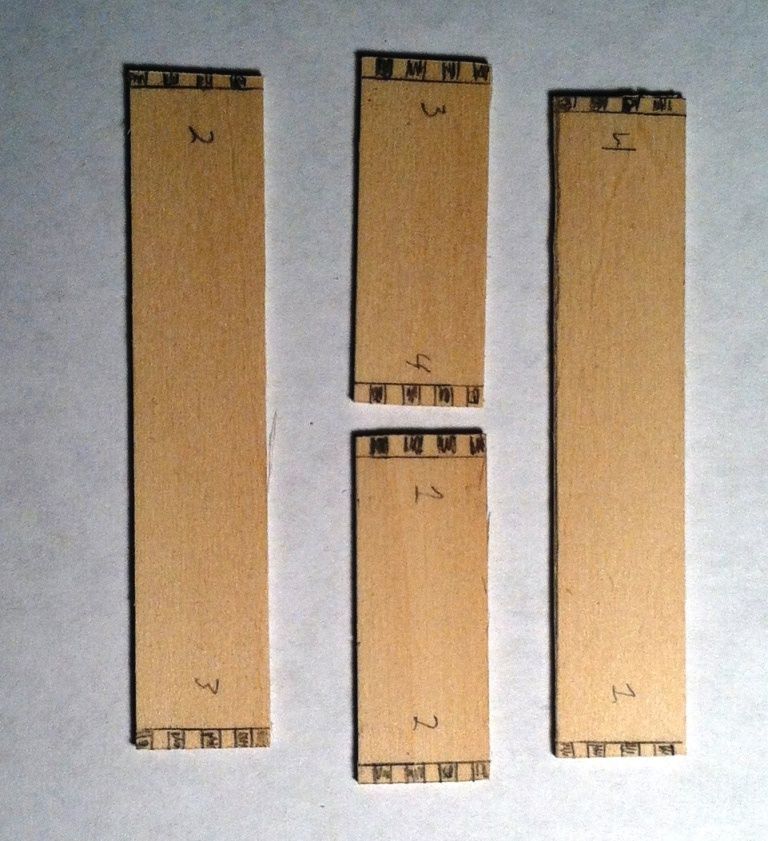
In the first part we are going to cut out the new parts using 1/16" basswood for the drawer sides and back and 1/32" basswood for
the drawer bottom
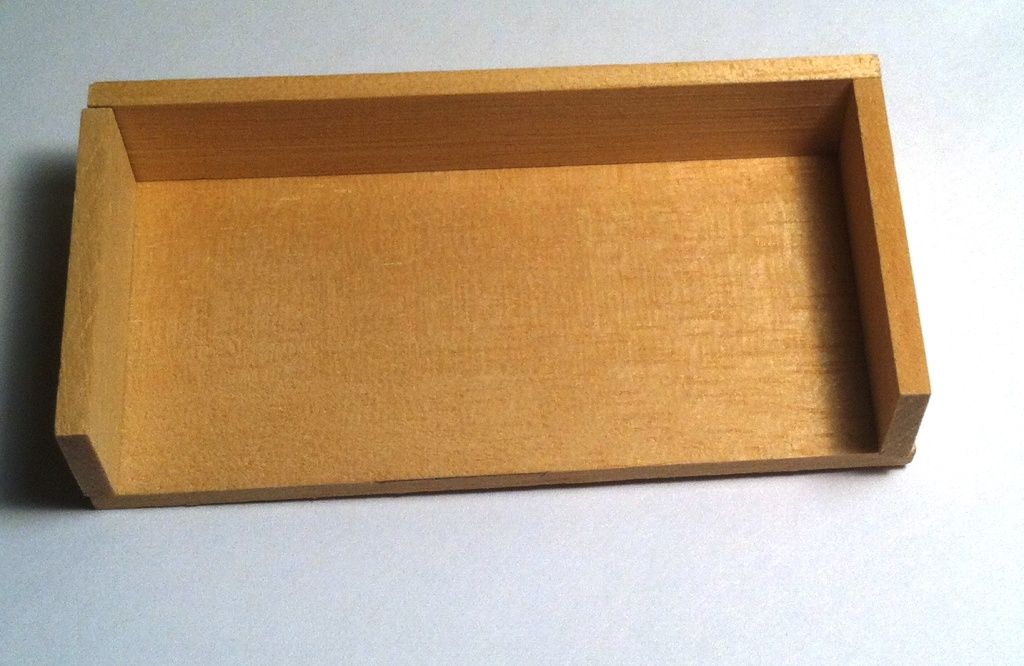
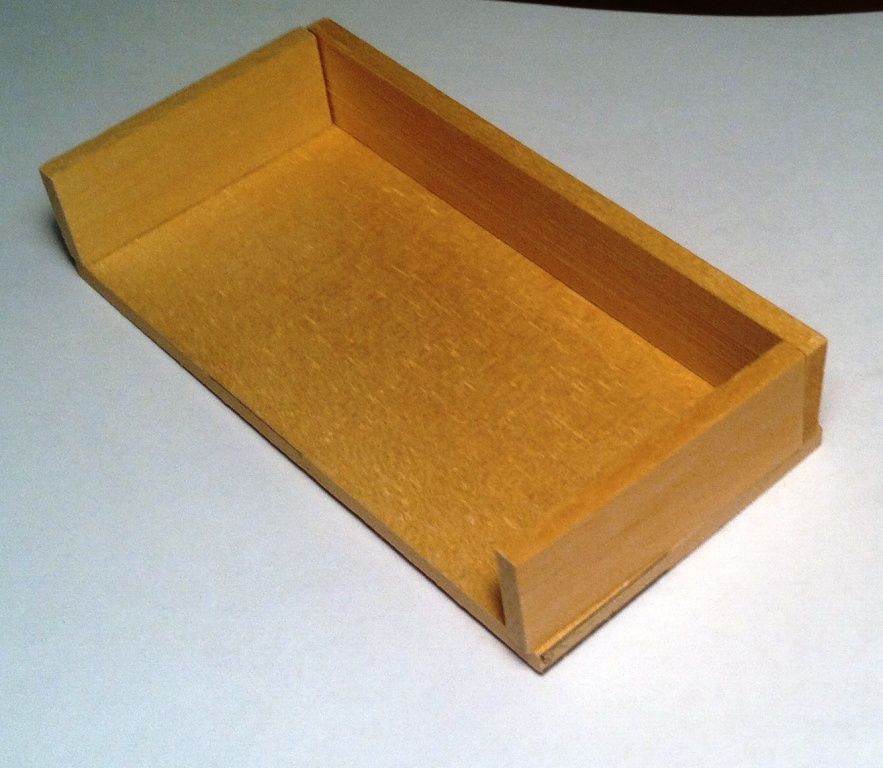
Step 1: Lay out and measure the kit parts. Here you can see the front, bottom, sides, and back. The kit uses a non prototypical
construction method where the bottom and back are the full width of the drawer and the sides rest on top of the bottom and do not
extend all the way to the back. This is something else we are going to correct
Photo 1 shows the parts and their sizes
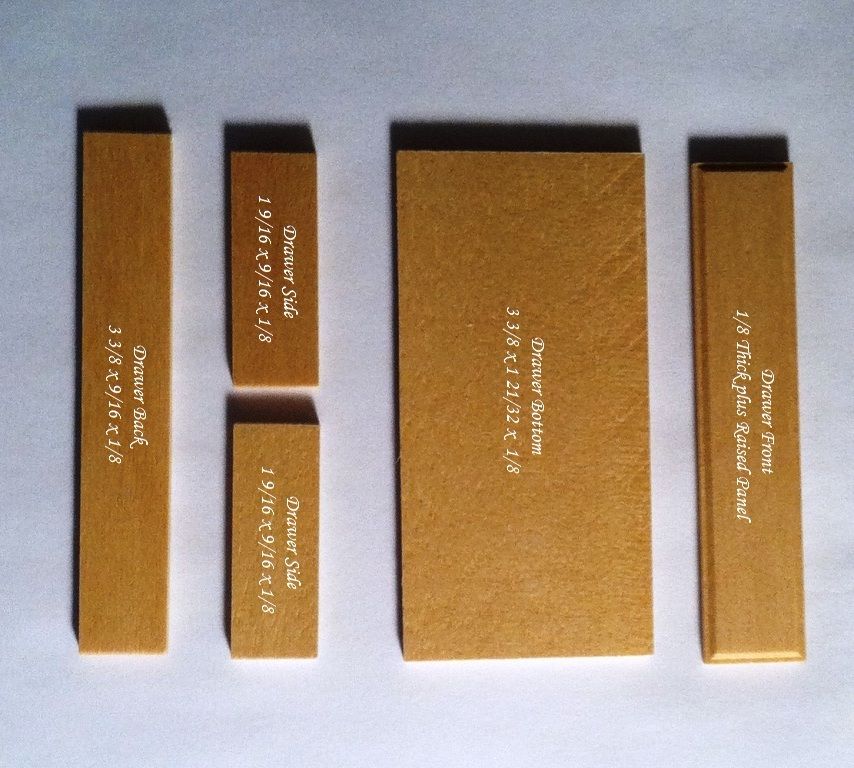
Photo's 2 & 3 shows how the sides, back, and bottom are assembled (they are just sort of propped up here)
Step 2: Cut out the new sides from 1/16" stock.
The sides are the full height of the old sides (9/16) plus the thickness of the bottom (1/8 or 2/16) or 9/16 + 2/16 = 11/16 high
The length is the full depth of the bottom (1 21/32) plus 1/8 (4/32) for the front plate, 1/32 for the front dovetail overhang,
and 1/32 for the rear dovetail overhang or 1 21/32 + 4/32 + 1/32 + 1/32 = 1 27/32 long
So the new sides are 1 27/32 x 11/16 x 1/16
Step 3: Cut out the new front and back from 1/16" stock.
The back is the full height of the old sides (9/16) plus the thickness of the bottom (1/8 or 2/16) or 9/16 + 2/16 = 11/16 high
The length is 3 3/8 (3 6/16) plus 1/32 per side overhang (1/16 total ) or 3 6/16 + 1/16 = 3 7/16 long
So the new back is 3 7/16 x 11/16 x 1/16
Step 4: The parts are marked for the dovetails (the four matching jions are lightly numbered 1 to 4 in pencil)
Step 4: Cut out the dovetails. As these are a little wider than 1/16" I found that an easy way to clean them up and "cut" the
dovetails for the front plate is to tightly wrap sandpaper around the edge of a scrap of 1/16" basswood
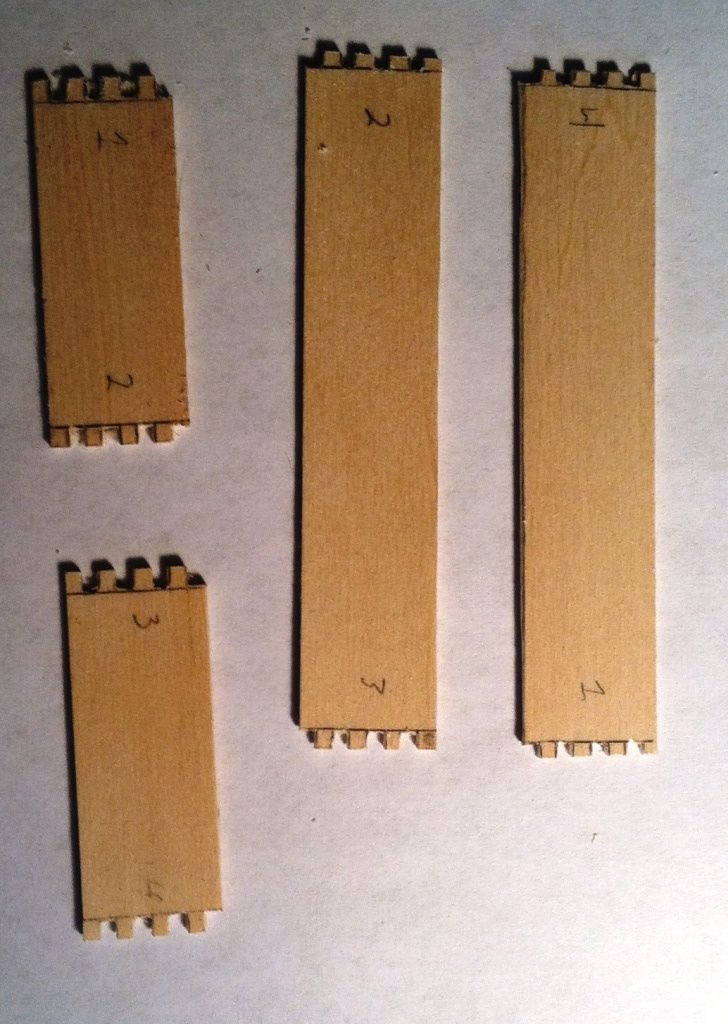
Step 5: Glue the parts together. I sand off the pencil marks just prior to gluing each side join. Sand off the projecting parts of the dovetails (see my dovetail tutorial)
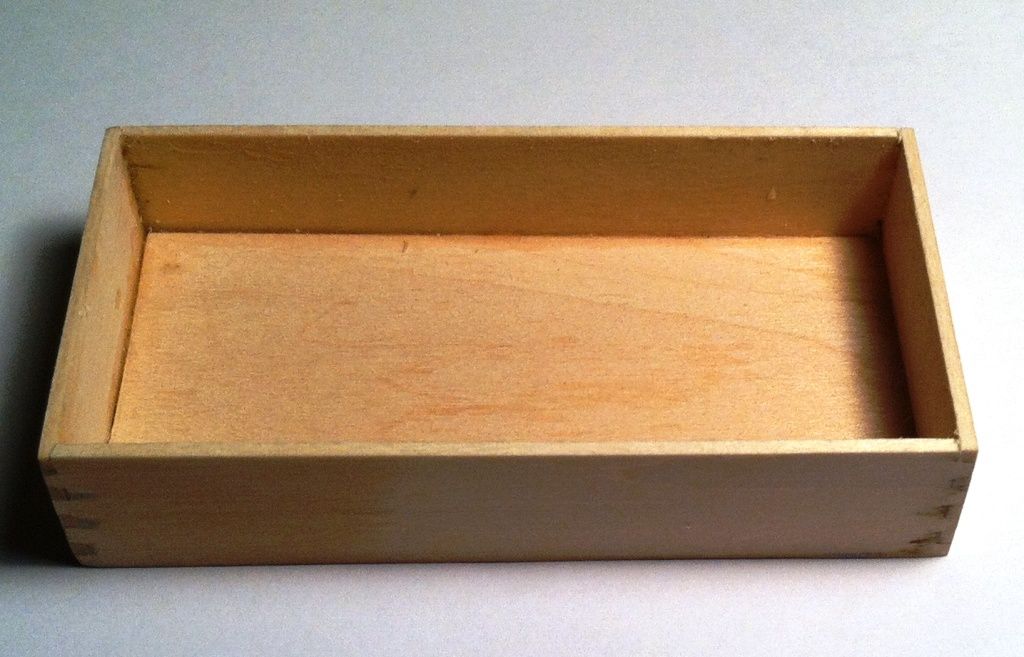
Step 6: Cut the bottom from 1/32 sheet and glue in. I found the easiest way is to put the completed drawer on the sheet and run a
pencil around the inside to mark the size to cut. I also use two scraps of 1/32 sheet to space the drawer bottom slightly up from
the base
Step 7: Cut the false front from 1/42 veneer and sand flat. I found the easiest way is to put the completed drawer on the sheet
and run a pencil around the front plate to mark the size to cut
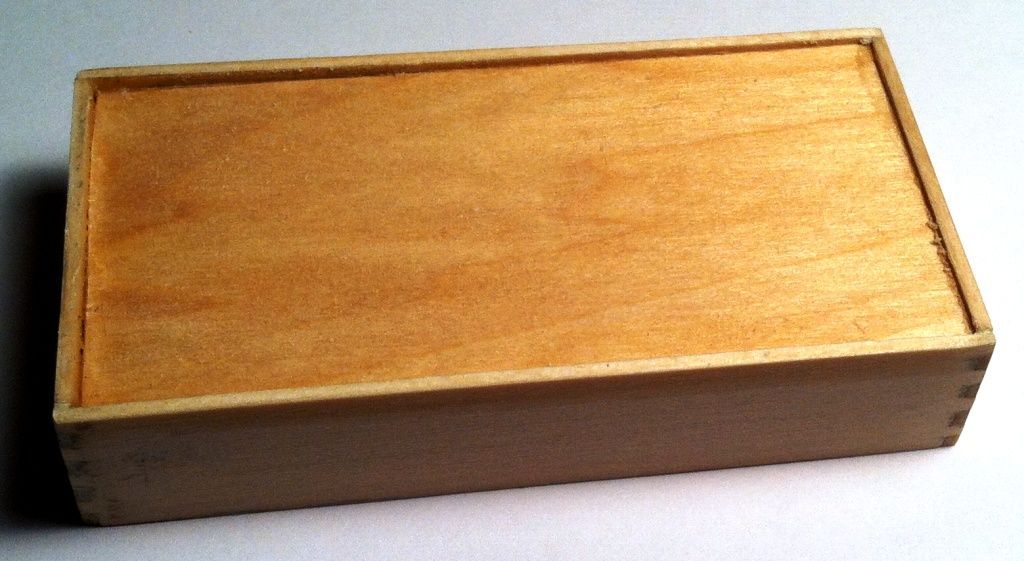
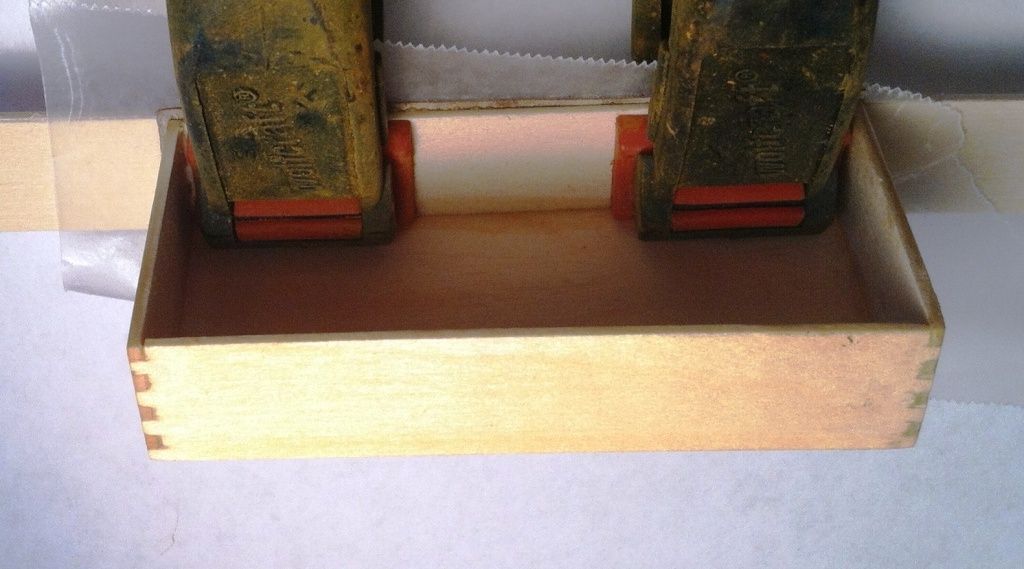
Step 8: Glue the false front to the front of the drawer. I use wax paper and a scrap of 1/16 basswood as a backing for the clamps.
Notice how the veneer slightly overhangs the drawer edge on all four sides
Step 9: I cut the plate slightly oversive and sand to fit after gluing
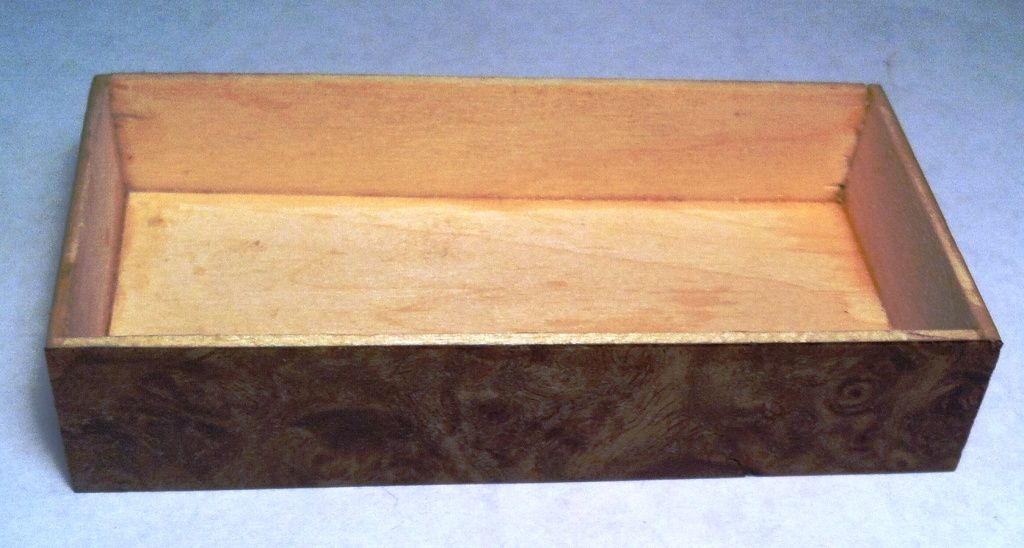
And here it is mocked up in the cabinet. I will cover the polyurethane finish and installing drawer pulls in another tutorial