
Blogs
Our community blogs
-

 Latest Entry
The Beginning
I've never done a blog and hardly know where to start. The genuine excitement I feel in working on my Fairfield is my reason for starting this blog, and to be able to share each step of the way with others who understand my enthusiasm.
- Read more...
- 0 comments
-
- 3
entries - 4
comments - 4003
views
Recent Entries
 Latest Entry
Claudias castle and a tut idea ?
I finished the castle and obviously I have not gotten any better at the whole blog thing. I was never much for the computer and sitting and writin etc. I just want to get up and work on things but really this might be a nice place to jot thoughts down.
I haev been asked by a friend of mine to make a tutorial on aging techniques I have learned from the forum, reading and just playing. I am nervous about that, plus I have been working on miniatures for only three years , sooo what do I have to teach anyone ? lol
I guess my ideas come from reading old books on miniatures from the 60's and 70's because I don't always have a lot of money so what I can't make I have to figure out HOW to make ....how ever says war is the mother of invention !! I think poverty is lol.
Here is Claudia's castle :
and the aged Gris Gris house
- 3
-
- 4
entries - 0
comments - 5278
views
Recent Entries
 Latest Entry
Coventry Cottage - Day 7
So yesterday I started putting the first coat of paint onto the house. I listened to my husband this time, (instead of trusting my gut) and painted the house green...(well bad idea)...
The green that I painted it, looked more like grass, baby peas or maybe even something that comes out of my infant's diaper...it looks AWFUL!!!
I moved away from that and started priming the rest of the house pieces, I used plastering compound to fill in the holes on the porch roof where the kit porch posts should go also. After they were dry I assembled the rest of the first floor, the porch roof, the bay window and the kitchen bay window. I used tacky glue and then some of the plastering compound into the holes and grooves to make it look nice and flat/even.
I also worked a little bit more on my furniture kits. After placing them into the house I realized that I needed to make some adjustments. I took the two cabinets apart so I can cut them down and thinner so they will fit into placement better. I also put a varnish on the dining room table, the wing chair, and the couch. I have some more adjusting in the kitchen to make everything fit the right way, but I'm pretty happy with the results so far.
The next thing to do is more sanding!!!

- Read more...
- 0 comments
- 4
-
Latest Entry
400+
I have been doing cedar shake staining for the last two days or so and now I'm at around 400 shingles at least. Two of the cedar shake shingle sheets came with this beautiful wood that didn't need anything but a clear coat to look great. Almost half way there!
- Read more...
- 0 comments
-
 Latest Entry
My first blog
So this isn't going to be an everyday blog, but I am going to try and write every time I make some worthwhile progress on my dollhouse projects. So where I'm at right now...I have completed my Orchid, my spring fling 2008 gardening shed, and finished renovating my Duracraft Lafayette from my childhood.- I have pictures in my gallery of these, and I will try to get some updated photos with finished products posted ASAP. Other 2 dollhouses I have completed- there was one which I did when I was 4 years old with my mom and cannot remember what is was and what has happened to it, and then the Greenleaf Brookwood...which was the first dollhouse I made on my own- needless to say I was not too happy with the outcome, so I gave that one to my little sister. Anyways, getting to my newest project- I have ordered the Greenleaf / Corona Miniature Travel Trailer!!! yay!
 This is actually going to be a project I do with my 5 year old son....who has a great fascination with dollhouses. So we are supposed to get delivery tomorrow of our wonderful little treasure and he and I are so excited!!! We already have been talking about plans for our nice little camper. We both love rvs and hope one day to get a real one, but for now we will be happy with making a mini version. Not sure if we are going to do a more retro version or a modern version...but either way he wants to make sure it has all the need to haves,,,like potty, oven, sink, bed, and a small fan...haha. Well will close for now and make sure I will track our progress and post more pictures.
 Amanda
- Read more...
- 0 comments
-
- 32
entries - 60
comments - 18241
views
Recent Entries
 Latest Entry
Long time between posts me thinks :D
Well well well i finally did something on the half scale house ;)
I stuck the roof on...put on the battons and did the first coat of paint.....yay me


Linda

- 32
-
 Latest Entry
Kit Ordered. Paint Purchased.
Alright, I ordered my kit yesterday, and they shipped it yesterday. I expect it to arrive hopefully Monday or Tuesday. In the meantime, I have gathered copious amounts of sandpaper, my paint, wood filler, and glue. I also got some wallpaper. I'm probably jumping the gun on that one, but hey, that's okay!
So, I am all ready to be scared, intimidated, frightened, and ready to pee myself when it gets here. Here is a picture of the actual Victorian home's color scheme that I plan to use on my pint-sized property!

-
 Latest Entry
Computer Issues
Man have I had a hard time posting this. Computer issues I guess. But I'm back and feeling very guilty for dissapearing for a large chunk of the year. I blame being a first time mom to a one year old who fears NOTHING! Its not a normal day if the kid doesn't get hurt once. I'm considering investing in one of the sumo costumes so he's got some extra padding ;) .
Anyways back to Sirius's house!
I started playing around with FIMO clay. I've made some fruits and veggies, and continued into the HP world.

The next photo is a Troll foot umbrella stand
I'm thinking of going over it with some stain, and ploy and stipple it to make it look like skin. In the background you can see the floors, which I stained a darker color, and the wallpaper that I'm still working on.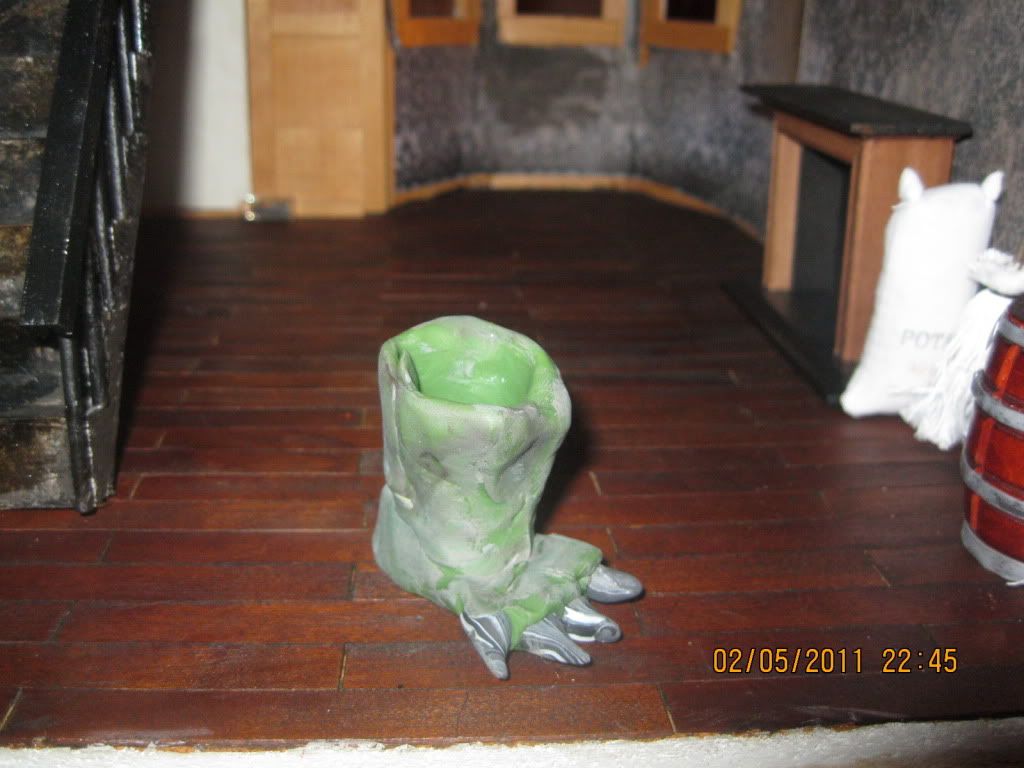
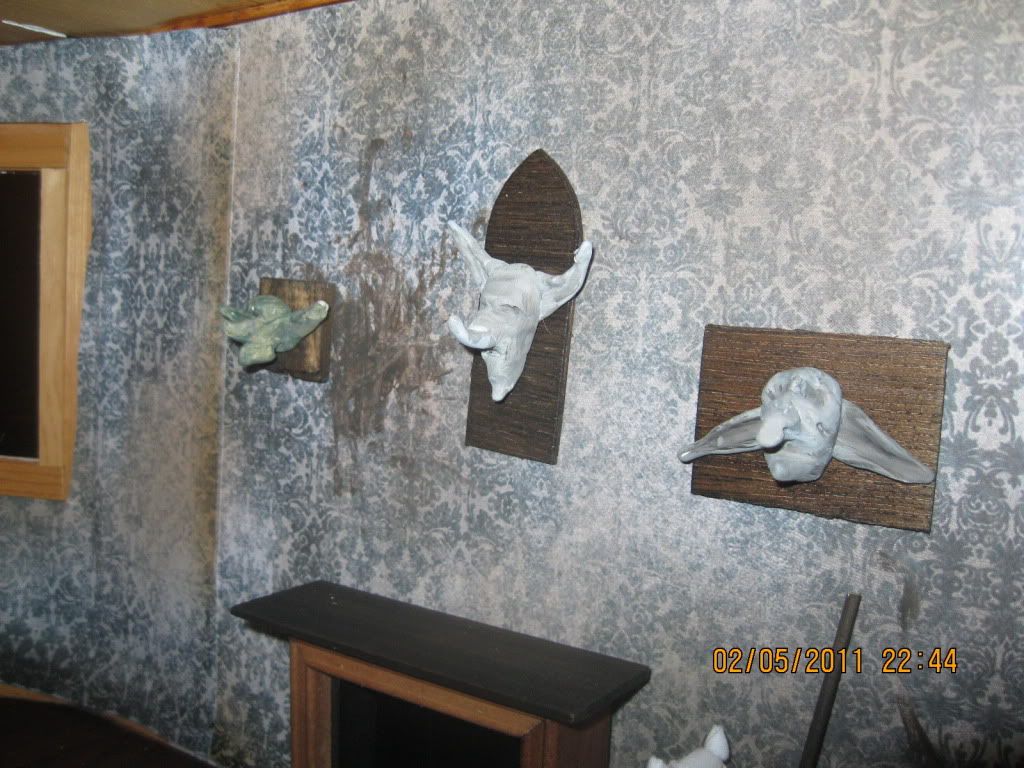
Next was probably my favorite thing I've done with clay. I made some shrunken elf heads. Its just scrap wood from a laser cut set, stained, and once I made the heads and baked them I glued them to the wood. I'm going to also eventually make little copper plaques with names of them.
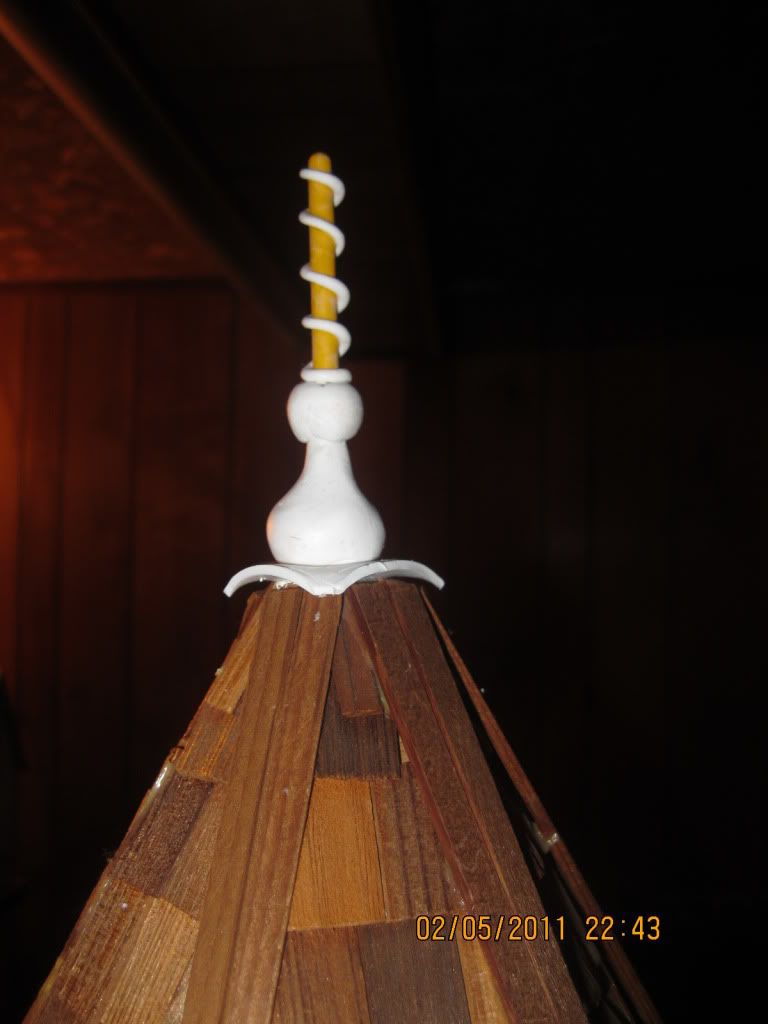
My next clay project was a totally improv. The roof of the tower had a giant hole in it so I made a fun little steeple thingy. I just added clay to a broken paintbrush handle and set it in there with a bunch of woodglue. I'm thinking of making it look like metal. Not sure which one, cooper ( greening or not) , shiny black, or silvery.
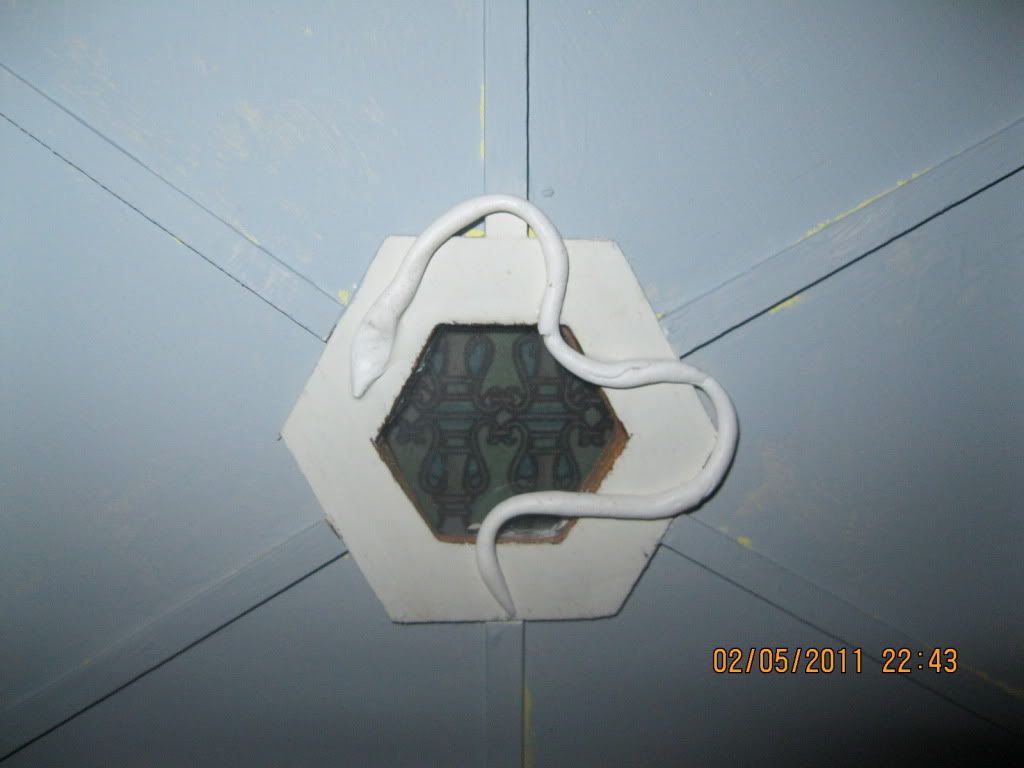
I'm going to try to make snakes a very pronounced but understated theme of the house ( Slytherin it up ). So my first snake it wrapping around the weird middle window that I hated. I'm going to do the same metal treatment as the turret. I also made some stainglass with a coloring book from Michaels. In greens of course.
Next, I took a cheap Hobby Lobby pie cabinet, took of the metal fronts and added some of the HL little bottles full of various spices and colored waters. I also attempted some clay books. Its hard to see how they turned out but I'll definatly make some more. They turned out super darling.
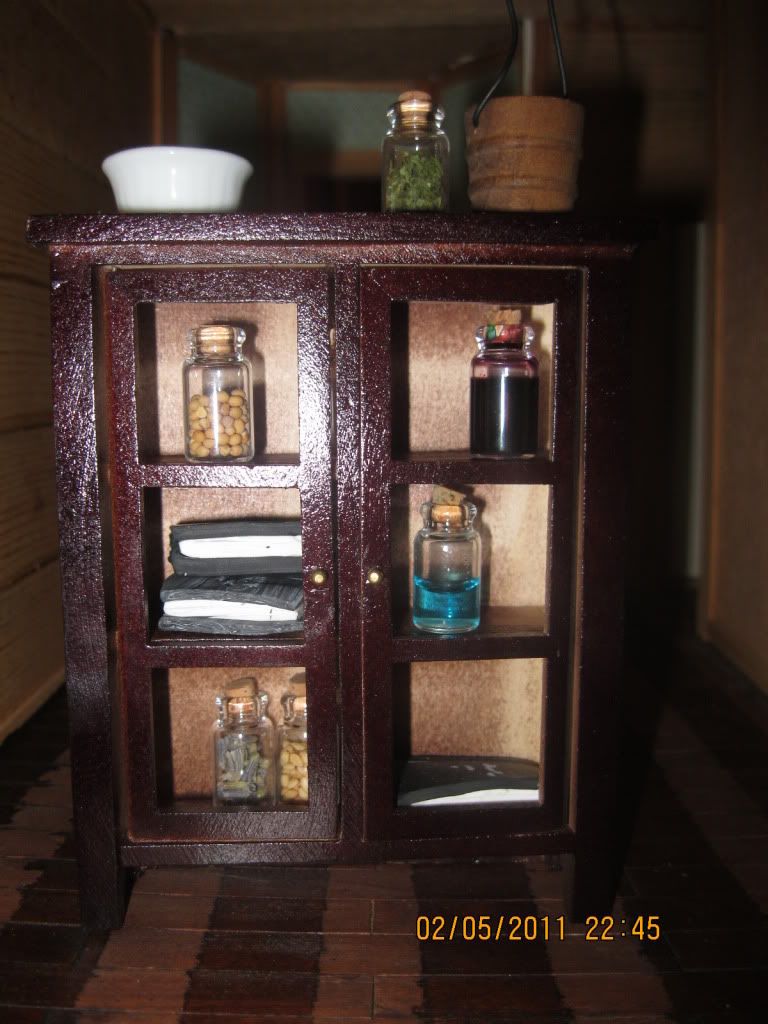
You can also see it that pic that I stained the floor in two different colors. Unfortunatley there was some bleeding but nothing intense.
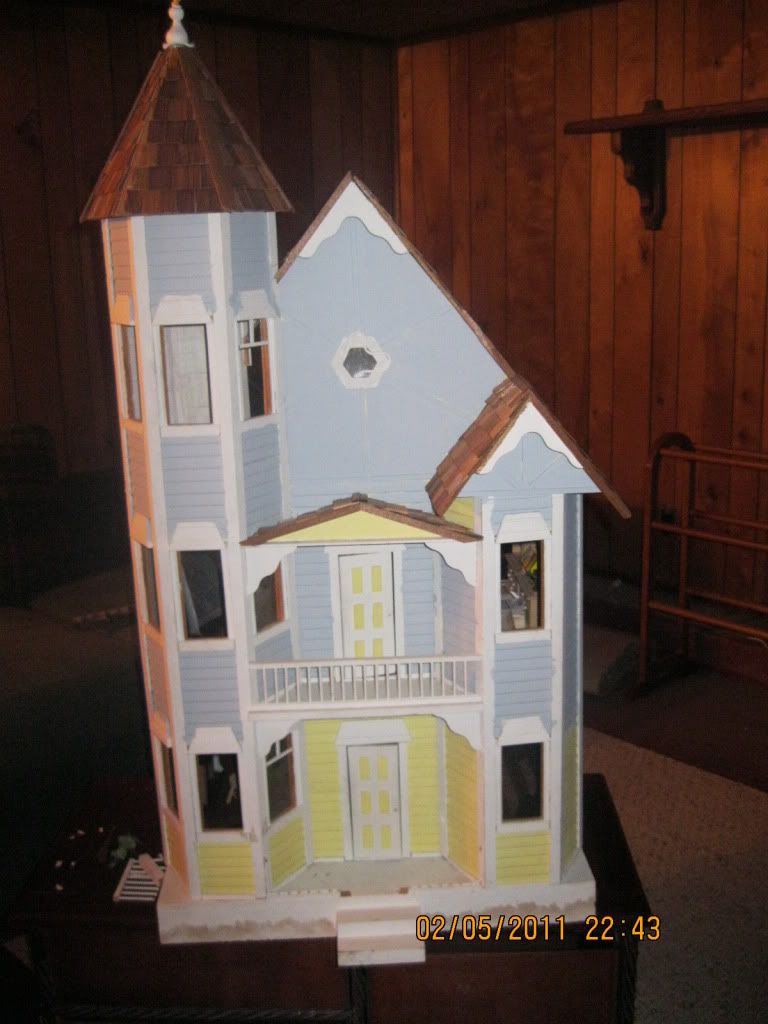
Finally is the outside's color. It seems a little blue in the pic put its grey. Whereever its still yellow is going to be paperclay brick. I'm still unsure of how I want the outside to look. I'm just playing it by ear. I'm thinking I was to distress the grey, but since I just did my base coat I have some time to think about it!
Let me know what you think. I'm really curious to see if anyone reads this haha. Have an amazing day!
-
- 2
entries - 7
comments - 5940
views
Recent Entries
 Latest Entry
Half scale nonworking light fixture from a fish hook
I saw this idea in an old Nutshell news magazine. There were no instructions, so I just figured out my own way to do it. Sorry my pics are a little blurry, it's very hard to get clear pics of small items.
Materials:

Two small buttons, different sizes (canopy)
small piece chain
wire ( to make rings to connect chain)
3 beads
3 jewelry spacers
a triple fish hook ( be very careful with the hook, you can cut the tips off, please wear safety glasses. I didn't cut mine off)
gold paint
E6000 glue
jewelry pliers

Glue the beads to the bead spacers. make a ring of wire to connect the fish hook to the chain and then use a small piece of wire to connect the chain to the buttons (Stack the buttons and use the holes for the wire to go thru). Make sure to get the wire as flat as possible on the top of the buttons so that it will lay flat against ceiling.

I used gold paint to paint the buttons, chain and fish hook, since they were all different colors.

Now glue a bead assembly to each hook prong ( I didn't cut the points off since they were going to be covered anyway)

Here is my finished light fixture glued to the ceiling with E-6000 glue.
I would love to learn how to make these electric, but that is for another time!
Some more ideas:
All of these are in my Michael's puzzle house, which is my current project.


- 2
-
 Latest Entry
A Prodigal's Return..I"m baaack!
I'm baaaack!
Shame on me for not pursuing this blog. But as it so happens, GL revamped their site, and I had trouble settling in, so I got frustrated and gave up. Now I'm back, and determined to learn our new format.
I've gotten a lot done since I last posted here. Most of the rooms in Moggie Manor (RGT's EastSide Townhouse ) are wallpapered, and I've managed to come up with some very nice furnishings, although many of them are not permanent. Still it does my heart good to see the rooms with furniture in them.
My latest furniture purchase is a Bespaq Chambre de la Luna vanity. I love Bespaq, and although I can't afford to buy many pieces, I'm going to try to eventually have one piece in each room.
I've also gotten ahead of myself in another way..I've made a Christmas tree! Yup, I bought one of the simple, 'bottlebrush' trees, and using Lycopodium, fleshed the skeleton form out with lovely green branches. It now sits, waiting for ornamentation.
Getting the tree actually made was an obsession of mine. I had great fears that I'd leave it to the last minute, be unhappy with the results, and give up on decorating Moggie Manor for this Christmas.
Yep, in J.K.Rowling's world, Harry and his friends do celebrate Christmas. Those who love HP know that the witches and wizards in this world, aren't in league with the devil. Rather, they have been given extra gifts by the Divine..in the same manner that many other natural talents are given. And of course, it's how those talents are used, that makes them good or evil traits.
I like to believe that wizarding skills and talent are just one more example of a Divine Plan concerning human evolution..an adaptation to the world at large, due to mutations within our DNA. Wouldn't it be fun if such mutations really came to pass, and magic was really real?
OH well, I can dream, can't I? In any event, HP's Wizarding world is fun to play in.
More later. Have a great day!
- Read more...
- 0 comments
-
- 5
entries - 2
comments - 7953
views
Recent Entries
 Latest Entry
Met Today's Goal
I had just about given up hope that I would be able to stain the doors, windows, beams, and timber framing today, as I didn't think I would have enough time to finish all of the fussy sanding needed in preparation for the staining. As it turned out, I was able to finish the sanding yesterday so it was staining day! For the exterior timber framing, I mixed an earthy green, brown, and sienna oil paints and thinned them down with turpentine to make a mossy green. For the beams and mantle I made up a batch of walnut colored stain using my oils and turp. I wanted something that looked like stain but moving toward a purply mahogany for the interior window framing and was very pleased with the color I mixed using brown, red, blue, yellow, and white with the turp. I plan to make curtains using medical gauze that I dye with mulberries which should look good with the framing color.
Now I just have to wait for the stain to dry and I can put the windows together. I can't wait!
- Read more...
- 0 comments
- 5
-
 Latest Entry
Scratch build castle inside first section
Fitting for fireplace to set in the wall. And starting to glue down floor tile. This part of the tile is grouted now and ready for the next part to finish this floor area.
Nothing new will be up untill next week,around march 5th. The castle is dismanteled right now. Putting in the beams on ceilings and cutting out for the staircases. And the outside walls are being painted,while waiting on the stone for the outside, and rest of the stone for the floors to be delivered.
- Read more...
- 0 comments
-
- 3
entries - 4
comments - 5926
views
Recent Entries
 Latest Entry
Fairy Houses
I haven't been on here in a while- not because I haven't been doing any mini work, but mostly b/c I haven't even had time to breathe, let alone type a nice leisurely blog entry.
I've been incredibly busy because I now have 3 jobs: a day job (school librarian), a night job (writing instructor at local community college) and also a weekend job (local history museum).
I was working this past Sunday at the museum (which is really a small historical village) when they had the Fairy House tour. Here's the link from the event, direct from author Tracy Kane's website: http://www.fairyhous...smouth-nh-2013/
Towards the end of the day, I happened to meet the lady who arranged these Fairy House events. She told me that every year, there are a few houses that never get claimed, and they end up in the dumpster. I thought that was apalling! Not just the idea of the wasted materials, but also the idea that these beautiful little houses don't get a chance to be seen again!
I told her that I am a dollhouse/fairy house builder myself, and that I also work in a school library. Our school has a little courtyard that the library windows look down into, and I told her I'd be happy to take any unclaimed fairy houses to display in the school's courtyard. She told me to come back on Monday (yesterday) and just take any houses that were left b/c Sunday night was the deadline to pick them up. So I went yesterday, and ended up taking 3 fairy houses back with me!

Not to mention- they also inspired me to make some more of my own! I made 2 little ones last night from these little wooden, decorative birdcages that I picked up at a thrift store last year. And now I am working on a 3rd one in a larger, metal decorative birdcage that was also bought at Goodwill.
I cannot wait to set them up in the courtyard, and then casually tell teachers/students to go out because "I think some fairies have taken up residence in our courtyard!"

- Read more...
- 0 comments
- 3
-
- 6
entries - 3
comments - 8224
views
Recent Entries
 Latest Entry
New Project
Well, I guess it isn't actually "new", but It hasn't been posted here yet- I'm working on a 2D art piece, currently.
About 18 months ago, I started to plan a new pen and ink/stipple piece. My little ones do so much damage to my minis, thanks to the lack of a separate workroom, that I have had to leave it dormant for at least another year or so. A drawing, on the other hand, I can lock in a closet or someplace else that the kids shouldn't get into. So, I started planning on the new piece. During the first week of April, 2017, I spent the week in the hospital for a scan to detect seizures (I don't have them, it turns out), and I knew I would have endless hours of nothing to do and not many distractions, so I started plotting and inking in a massive 30 inch by 40 inch drawing of a Union Pacific Railroad Big Boy. At 120 ft long, over 1.2 million pounds and with sixteen drive wheels and a firebox bigger than my first two apartments combined, they were the largest steam locomotives ever built. I worked on the picture the entire week I was there, but did little after I returned home. After my motorcycle accident this past February, I had time again to work on it in the rehab hospital, so I did. I have been working on it at least a few hours a week since then. If I can get some free time, I hope to have it done by early 2019.
I'm also posting a few more photos of the accident. After a couple of near-death experiences from it, I'm finally riding again, but not as much. While I was still on a lot of pain meds, I was able to borrow a sharpie marker from one of the nurses and marked up my cast. I was really out of it, but I think it turned out well.


- Read more...
- 0 comments
- 6
-
- 16
entries - 2
comments - 9441
views
Recent Entries
Latest Entry
Moving Right Along
August 12, 2013
I’ve been trying to get my hands to cooperate with me so I can cut the hay bales on the mini saw and finish off the coop. Unfortunately carpel tunnel is relentless and my hands are just too weak and shaky to confidently power up that saw. The CP is bad enough, cutting off a finger – not in the game plan, so I’ve set that aside for now and moved on to something more manageable – building a needlepoint stand and creating a mini needlepoint piece for the Bronte House. I was so excited when I got the little kit in the mail that I couldn’t wait to put it together and in my haste I forgot to take pictures of the unassembled kit. So, Yankee ingenuity in tow I scanned photos from the instruction sheet to give you an idea of what it looked like before. So here are pictures of the notched bottom, the decorative stand, and the frame. Simple pieces that were quickly done.


And here are the pictures of the completed assembly.


This is the pattern for the needlepoint piece.

- Read more...
- 0 comments
- 16
-
 Latest Entry
Walls
I have started on the walls, the wallpaper just flakes off,except where the glue is. So I had to sand it off. I spackled the walls, let them sit overnight and gave them a good sanding the next day. I am starting to prime the walls now and they are sucking up the primer. !!! Even after a coat of spackle. I'm still working on the foundation, still have a few pieces to prime. Then to decide how I am finishing that. I am thinking of cement blocks, gotta go measure them on my real house before I start though. The porch will probably be painted gray. That is as far as I have planned so far. I have no ideas for the exterior color or finish.
- Read more...
- 0 comments
-

 Latest Entry
Welcome to my blog
It has been a while since I've worked on anything to do with dollshouses. This is mainly due to not really having the room to work on my 12th scale projects, so I am going to turn my attention to working on half scale and quarter scale projects instead. I live in the UK, so I have never built nor will I likely have the oppertunity to work on any Greenleaf houses. Most of the houses I have bought have been the small Dollshouse Emporium ones which they manufactured for their creative competion pieces, but I never had the chance to build them to enter them. I prefer small houses to large ones because they allow me to be more creative as there are lots of different styles of miniatures that you can use.
I do have an old Lundby house which I bought off e-bay for a project involving Sylvanian Families which I am updating. (Hopefully, I'll be able to do more of that next summer when I've organised our flat a bit.)
One of my favourite UK companies to buy dollshouses from is Petite Properties as they speacilise in quarter scale and other small scales. They are more ideal for my living condictions at the moment and I have built three of their houses and I have an half-scale tudor cottage which I hope to resume work on over the winter months.
I do other crafts, mainly cross stitching and sewing projects which I will feature in this blog from time to time.
- Read more...
- 0 comments
-
- 4
entries - 0
comments - 2115
views
Recent Entries
 Latest Entry
Some pictures of the house as it is, now...
I've been having "issues" with loading pictures...trying to figure out how to adjust the resolution on my camera to make them the proper size to post here. So we'll see if this works:
The house has had as many cracks as I can reach -- filled in with wood putty. Some of the rooms have been painted. I'll be painting the rest in the next day or so. The hardest area to paint is the area along the staircase. This should have been painted (or papered) before the house was built! I didn't attempt to take all that apart.. it was pretty well-built, only one major seam along the staircase that needed putty. But it also is a very cramped space, so it's going to be a challenge to paint.
Then wallpaper. I intend to wallpaper the upstairs and the smaller room downstairs, which will be a kitchen. The Great Room will be painted white. I think I'm going to make a stone fireplace there too, and cover up the original one, and perhaps do the same for the one upstairs....I may have to send my husband out for more pebbles! (We live in sand country...sand, pebbles, rocks, boulders, are all around us!
") )
)
Let's see if I can post these latest pictures.. Ah, that worked!
you'll also see the windows I made, using pieces of old "lumber" from previous houses, scraps from the Greenleaf houses so they're the right dimensions, right thickness. I'll paint them the same color brown as the outside of the house, and the beams in the ceilings on the first floor.


- Read more...
- 0 comments
- 4
-
- 14
entries - 4
comments - 1977
views
Recent Entries
 Latest Entry
stump fairy house, still sanding!
Been doing more sanding when weather permits, kind of cold out there sometimes, and way too much dust for in the house. Doing more of the fine sanding now, getting the wood very smooth. I figured out where I want doors and windows, at least part of them but haven't had the courage to cut yet, cutting is so final. I think I am going to work on the bed, I can do lathe work in the house on the tiny lathe and it is not very messy, at least no dust and I can do it on newspaper to cleanup fast. The bed spread is done now, I finished it last night. The final act was sewing on the ruffle, I started matching the two pieces but quickly realized that wasn't going to work because it buckled the ruffle up making it look awful. I had to pull the ruffle a little to get it right, the bad part of that was undoing about 4" of hard won ruffle because stretching the top part made it way too long. It is not the easiest part to undo because of all the rows that only knit part of the row and turn, plus the yarn overs and knit two together make it easier to lose a stitch while taking it apart on such tiny work. I think my next knitting project will be a blanket or maybe more then one, I do have a blanket chest to but in the bedroom. I am going to work on designing the bed first then start in. Since my iPad battery is dead I have no way of putting pictures on there so I will if I get the battery fixed.
- Read more...
- 0 comments
- 14
-
- 5
entries - 11
comments - 2776
views
Recent Entries
 Latest Entry
Tiny Houses, No, Really
So, I live in a tiny house. Like, literally. It's 280 square feet. It's a vintage travel trailer from the 50s. I do have my old trailer, which I use mainly for storage, where I'm currently purging, with the goal of eventually getting everything down so that eventually, life can be lived in under 700 square feet.
But it brings up interesting issues when you're working with dollhouses. What takes up not much room in the world of tiny, can take up a ton of space in the world of tiny houses. And I'm building an apartment ;)
The majority of the build took place in my tiny house, but the house itself, will live in the other space, at least until I have a new home.
So yesterday, after the last of the beams had been fixed in place, I took the shops up to my big place to live. The other apartments will be built out in what I lovingly call my tiny house "the minty turd".
What would I do if I didn't have the big place? Probably make the apartment building weatherproof ;) but I'd prove that when it comes to dollhouses, space constraints shouldn't constrain your dreams.

- 5
-
 Latest Entry
Short and Sweet - Using Paint.....
1. Open the file in paint. In this one, I use the inch setting to see how big the design is of the paper: almost 6 inches x 8 inches - so it is way too big.
2. I use the resize function in the home tab to reduce the size. I chose 30% - that should reduce the sample to 1 3/4 inches by 2 1/4 inches - that translates to 1 3/4ft by 2 1/4 ft - looks about right.
3. Use "select all" function and copy function.
4. Change the paper size - I use 17x11 - legal - that's what I print on
5. Go to the View tab - and zoom in until the original design appears pixelated and paste. Then move the copied part into position - you can use the arrow keys to move it and match the pixels.
6. Repeat until the full length of you paper size is filled.
7. Use the select all - copy function and repeat the pattern across the paper
8,. On this one, the pattern is offset - so I had to add to the bottom of the second column. After the second column, I can copy and paste until the end of my paper.
9. Zoom out and make sure it looks correct to you in terms of pattern size and try to imagine if you could see that on your wall. If it seems too large - reduce the size in 10% increments until the pattern has a size that looks correct.
What helps me:
Zooming in until you see pixels as little squares helps with matching offset patterns - you can line up better and use the arrow keys to move the copied design one pixel in any needed direction.


-

 Latest Entry
Wood carved bar scene
I bought this scene about 4 years ago from a guy who found it at an estate sale. I’m not selling it, but am wondering if anyone knows anything about it? It’s all original except a few things I put on the table and bar (not the bottles. Those are original). My husband thought it was a scene from the Great Depression. Who knows. The wood trim around the base is just positioned there. It’s meant to be the trim for the glass case which I need the glass for. Does anyone have any idea about this set? It’s not signed. It’s carved from wood. Thank you in advance!


- Read more...
- 0 comments
-

- 2
entries - 0
comments - 2742
views
Recent Entries
 Latest Entry
Here Are The BEFORE Pictures
Here is the front:

The tan shingles & the exterior of the roof:

The interior:

The inside foyer with broken and various pieces:

- Read more...
- 0 comments
- 2
-

- 0
entries - 0
comments - 54
views
No blog entries yet
- 0
-
- 20
entries - 24
comments - 18648
views
Recent Entries
 Latest Entry
Forum Upgrade
We are working on a long over due update to our forum. This update is necessary and as with previous updates, it's sure to bring new features that you may come to love or hate. Along with these new feature should come an increase speed and stability. I appreciate everyone's patience during this transition and request that you do not email customer support about any forum issues as they won't be addressed.
Mostly, I just wanted to see how the blogs are functioning prior to the upgrade which the main reason for this post. Posting images using the "insert existing attachment" feature is something I hope members will consider when adding an image to a post. Our upload directory is getting oversize and uploading an image to a post that is already in the gallery is redundant.

We can also link to any image using the URL feature.

You can also embed a gallery into your post which I'm attempting to do here.
- 20


