|
Dollhouse Wainscoting Tutorial
By Christine Hardy
While building a Colonial dollhouse, I was unable to find the kind of period wainscoting I wanted, so I decided to try making my own.
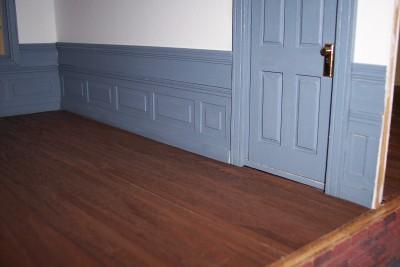
I was pleased to discover that you can achieve impressive results using stripwood from your local hobby store and a few pieces of Houseworks molding.
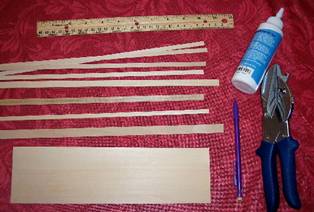
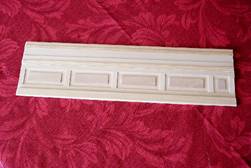
For each length of 3" high wainscot, you will need the following:
1 piece of 3"x 1/32" basswood
4 pieces of 1/4" x 1/32" basswood
1 piece of 1/2" x 1/32" basswood
1 piece of 3/8" x 1/8" basswood
1 piece of Houseworks 3-step door and window casing
1 piece of Houseworks flat chair rail
White glue
1. Cut the 3" wide base and the 3/8" wide strip to the correct length for your wall. If you are fitting the wainscoting into a corner where it will meet another section of wainscot, then miter the end of the 3/8" strip.
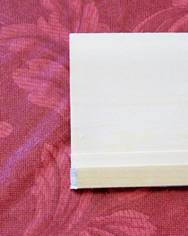
2. Glue the 3/8" strip along one edge of the base, lining it up carefully. This will be the baseboard, or the bottom edge of the wainscoting.
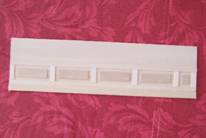
3. Next, cut two pieces of 1/4" wide basswood to the length of the wall. These will be the top and bottom of the "panels". Glue one strip next to the baseboard.
4. Now, cut several pieces of 1/2" wide basswood into 1-3/4" sections. These will be the horizontal centers of your "panels." Roughly space them out to see how many you will need. You will likely have to cut a shorter panel at the end to make it fit, but don't do that just yet.
5. Cut more 1/4" wide pieces that are 7/8" long. These are the vertical sides of the "panels". There should be 1 more than the number of 1/2" segments.
6. Carefully arrange the vertical 1/4"-wide pieces and the horizontal 1/2" wide pieces to form the pattern for the panels. Place the other long piece of 1/4" wide basswood across the top of the pattern to complete the rectangle shape. There should be about 3/16" of space around each center panel of 1/2" wide basswood.

7. Cut the last piece of 1/2" wide center panel to custom fit to the length of the wall. There should be a vertical piece at both ends of the length of wainscoting. In other words, no incomplete panels. If there is not enough room for 3/6" of an inch around the entire center panel, then omit the center panel and just leave it with a depressed space in the middle.
8. Now that you have custom fit everything, glue all the pieces down. Spread the glue evenly with your finger to avoid warping and be sure to wipe off any excess. Small clamps are useful at this stage, or put the entire thing between sheets of waxed paper and under a heavy book to dry. (Don't worry if there are tiny gaps in the woodwork. They will fill up with paint when you paint it.)
9. When the panel section is dry, cut the chair rail, window casing and another strip of 1/4" wide basswood to the length of the wall. Miter the window casing and chair rail if you are fitting it into a corner.
10. Glue the chair rail above the top edge of the panels, putting the thicker part at the top. Then glue the 1/4" wide strip above that. Make sure all of the edges are touching and wipe off any excess glue.
11. Now glue the window casing to the top edge of the wainscoting. Make sure the thicker part of the casing is on the top edge and that the top of the casing forms a flat surface with the base piece. Again, press it under a book to dry. You are done!
Installation tip for corners: If you are painting the wainscoting a contrasting color to the wall, as I did, paint the corner of the wall where the pieces will meet in the same color as the wainscoting before you install it. That way, if there is a tiny gap where the two pieces meet, it won't be noticeable.
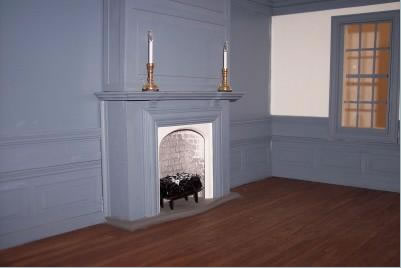
*(Editor’s note: Join us next month when Christine shares her secrets for creating the fireplace in her Blue Room)
Back to the February Newsletter... |