|
Parquet Dollhouse Floors
By Gayle Taylor
First I would like to thank Deb for giving me the opportunity to tell you about the floors in Chantilly Manor and to thank her again for being the inspiration behind my endeavor. Her beautiful ballroom floor in the Willowcrest started me to thinking of doing something special. Please don't think of this as a tutorial but rather a talk on how I achieved the results.
Deciding on a pattern is probably the hardest part of the project. There are many web site that offer quilt patterns but the one I selected offered a free quilt pattern coloring book page. This gave me the opportunity to choose my own colors without interference of someone else's opinion of how it should look. The pattern did include a colored quilt block that I used for reference.
I had the foresight to make templates of each room since Chantilly Manor had not discussed her preference with me. Our houses do have a mind of their own and the basic construction was complete before she told me how she wanted her floors to look.
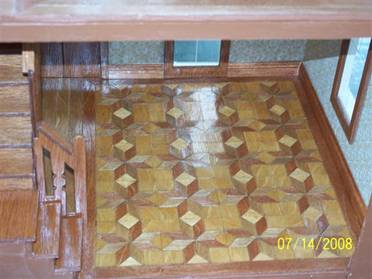
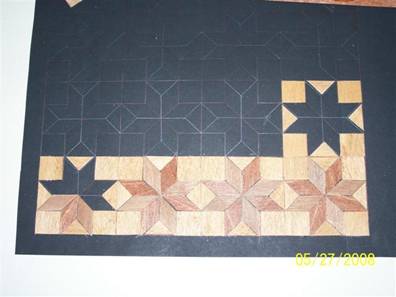
After choosing the pattern, I enlarged it to fit the template of the living room. Each time I enlarged it, I measured the corner block and the star points for width and length. The corner block was slightly larger than I wanted but is wasn't the focal point of the flooring, The star point measuring 7/16" x 7/16" was the most important part. I did have to print a second pattern and piece it together since my printer only gave me part of the overall pattern. If the decorative bands around the pattern don't bother you, just ignore them, otherwise, trim them off.
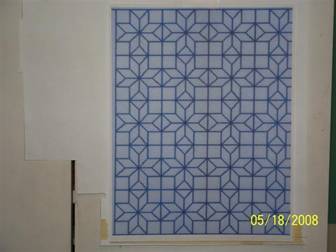
Find the center of the pattern and the center of the room area to be floored. Lay the pattern on the template/floor matching the centers. Take a measurement from the edge of the pattern to the edge of the floor. Mine was 1/2" all around. I chose to transfer the pattern to the template to cut down on the bulk. Using a ruler, pencil and an art gum eraser, I marked the places and drew the lines lightly so that when I connected the marks, I wouldn't have indents in the paper until I was sure the placing was correct. Erase any marks that don't belong in the pattern. They will only make it harder to make any sense of the pattern later. They might be necessary to make a mark for another angle but can be confusing if not erased. After finishing, I went back over the patter with a ball point pen.
Mark the color sequence on the pattern, this will keep you from putting the wrong color block into the pattern. Count the number of pieces needed for each color. I had 3 different colors for this particular floor which equaled about 80 star points for each color plus 40 corner blocks and 40 triangles.
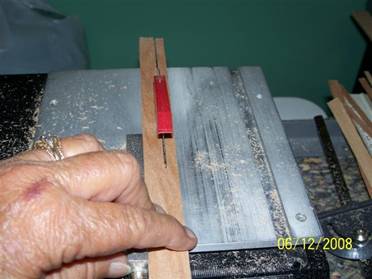
The wood for the flooring was siding that I didn't use on another project. It is thin and easily cut. Starting with the widest pieces, I ripped (cut lengthwise) the wood to 5/8" for the corner blocks, reset the guard and cut the 1/2" width for trim around the room and then the 7/16" width for the rest. Stain the strips at this time.
Cutting the wood was easier than I thought it would be. The corner blocks were cut first, 5/8" x 5/8" square. The 1/2" strips were put to one side to use later. I measured the 7/16" strips and marked them on both sides. Setting the miter saw on 45 degrees, (sorry, I don't have an EZ Cutter) make the first cut with the stain side up, turn the piece over and cut the next one. The angles will be correct when they are turned over. The triangles were cut in the same manner, one face up, the next was face down. Work with one color at a time and keep them in separate containers.
When you start to lay the wood on the template, start with the corner blocks and triangles, making one enclosed block and work from one side to the other of the template. Then fill in the star points, trimming as needed, I used scissors for this part. If the points go past the outside of the lines, just trim them off flush with the corner blocks and triangles.
My original template was pieced in the middle of the room. As I started laying the wood to the pattern, I noticed that it wanted to rise up in the center because the joint of the cardstock and the joints of the flooring (where one block ended and the next one started) were in the same place.
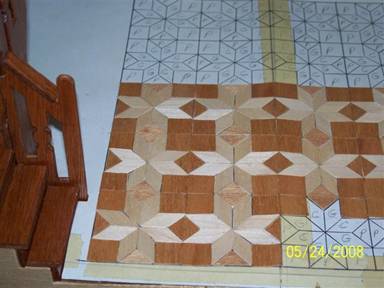
I had to make a second template but made a couple of changes. The joint in the cardstock was placed off center of the room. When the flooring was attached, solid pieces were placed over the joint and it couldn't raise up. The second change was to place the tape on the back of the cardstock instead of the top. As I progressed, I began to notice that the tiny gaps on the white cardstock seemed to scream at me. I made a third template using black cardstock. The tiny gaps weren't as noticeable and when I sanded the flooring, the gaps did fill in nicely.
Once the pattern is completed, check for any stray star points sticking out and cut them back. The 1/2" trim pieces won't fit tightly otherwise. After this all you have to do is finish the floor to your liking.
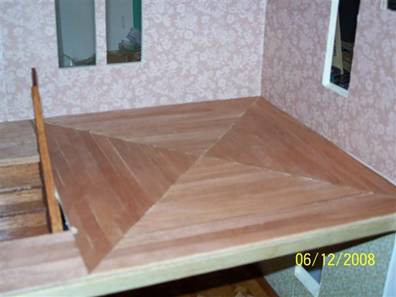
The floor design in the bedroom was drawn directly on the floor instead of using a template. There was a problem with the template and I felt this might be the better way to do the floor. It is just a large "X". The angle of the cuts were 47 degrees and done the same as the living room, one up and one down when cutting. Starting in the center, work toward the outside edges. When I started the second round and each round after that, I would cut the first angle, then lay the strip in place and mark the next cut according to the line in the X and then make the cut. That way I wasn't guessing the length of the strip. The sequence isn't important (top, bottom or sides) but do finish one round completely before starting the next.
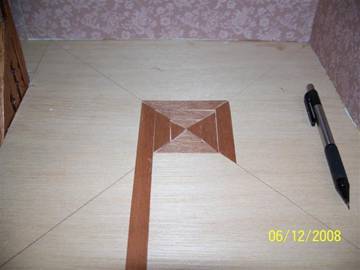
The pieces are just laid in place at the moment. The further out the pattern gets toward the edge, the harder it will be to keep the pieces in place and the first ones will need to be glued down.
This floor was the hardest to do because of the confined space.
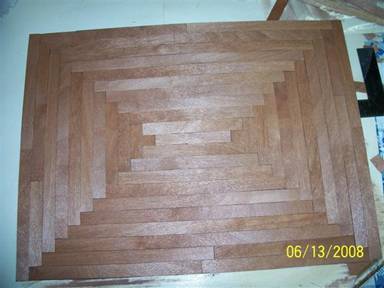
The floor in the den took only an hour to complete. Using the template for alignment, lay the top and bottom edges first. Mark and cut the side pieces to fit between the top and bottom. Repeat the sequence working toward the center of the template. When you reach the center, cut the final piece to fit the space. Finish the floor to your liking.
This isn't an exact science but you do need patience. Maybe you won't make the mistakes I did, I was just lucky. (*Editor’s note: Gayle may call it luck, but we know talent when we see it and Gayle’s parquet floors are beautiful and elegant. Our thanks to Gayle for sharing her expertise with us!)
Newsletter Home Page... |