|
Filler Books As Easy as A,B,C!
By Deb Roberts
Need to fill shelves in a library or bookstore? Wincing at the cost of pre-made filler books? Here’s the answer in an easy and inexpensive tutorial for mass producing filler books!
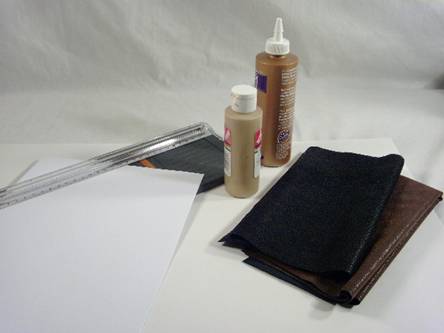
You’ll need:
Imitation leather fabric (pleather) in at least two colors (available at craft or discount stores)
Paper
Tacky glue
Gold paint
Toothpicks
Optional but very helpful:
Rotary cutter and cutting mat for fabric
Paper cutter
Before you begin, measure your bookcases or shelves so you’ll know the height of your tallest book. For a realistic look, you’ll want books in all shapes and sizes but most of your books will be the same height as your bookshelf. Plan on making a few just a wee bit taller so they can be placed in a leaning position in the bookcase and quite a few shorter books that are in varying heights. Write down a list of the different heights and the number of books you want of each height so you’ll have it handy when you start cutting fabric and paper.
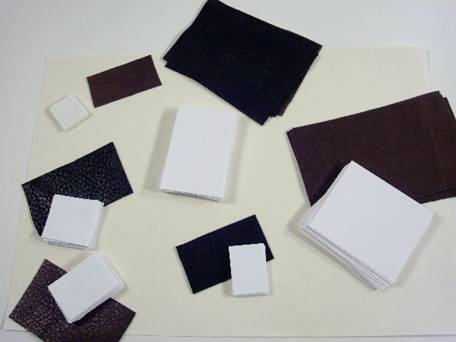
Begin with cutting the leather fabric into long, horizontal strips. Vary the height of the strips so that you’ll have several in each desired height for your books. Keep in mind that your leather covers are going to be just a tiny bit taller and wider than the pages of the books. At this stage, do not make the vertical cuts. Set the fabric aside.
Now for the time consuming part. Grab a big stack of white paper. Regular printer paper will do, or if you want to ‘think green’, recycle old paper. No one will see the pages so if the paper has been printed on already, that’s great. This is a good way of clearing out scrap paper from home or work. (Ask your boss if you can clear out the dump bin next to the printer at work!)
I strongly recommend a paper cutter for this task. You can measure out and draw lines on the paper and then cut them with scissors, but if you’re making a lot of books, that puts a lot of wear and tear on your hands. Small and inexpensive “slide” paper cutters are available at discount and craft stores and the built in rulers on paper cutters will take the guess work out of measuring, plus you’ll have a much more uniform look to the edges of your pages.
Cutting three or four sheets of paper at a time will make this go a little faster, but be prepared to spend quite a bit of time cutting. Using a lap tray and working on this step while watching tv makes it go faster and keeps the task from becoming tedious.
Time to start cutting! Consult your list of heights and start piling up “pages” for each height. How many of each do you need? Well, keep in mind that real life books all have different numbers of pages and do the same with your mini books. You’ll want a nice assortment of thick books, thin books and books somewhere in between, so cut quantities of pages to match and make sure the height of the pages are a fraction of an inch shorter than the leather covers. **Make life easier on yourself!!** Keep your pages stacked on a tray and sorted by size so that different sizes and shapes don’t become mixed up! If you keep the pages in stacks, it will be so much easier for you to grab a pile from a stack when you start assembling the books.
Several people have asked me why I don’t just use foam core or wood for the inside of the books. It is feasible to do that, but I opted for the realistic look of separate pages as well as varying thickness in each book.
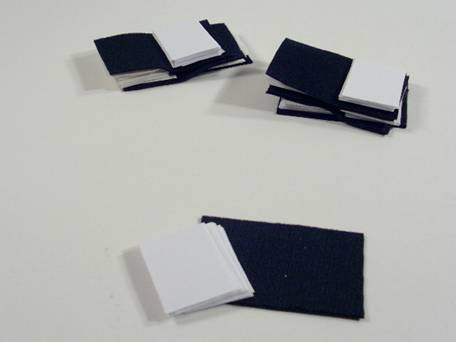
Now that you have all your pages cut, set your tray on your workspace where the cat can’t knock them over and grab the fabric strips. Take a pile of pages and lay them on the fabric just a fraction of an inch away from the edges (top, bottom and side) of the fabric. Fold the fabric in half over the pages and make your vertical cut of the fabric so that the edges match up. Since we’re mass producing, it’s a good idea to continue this step, stacking up your pages and covers together, till you have all the covers cut.
I stacked my pages and covers in this fashion so I could easily pick up the next unassembled book during the gluing process.
Next comes the messy part! Before you begin, put a rag on the table or in your lap because you will be wiping glue off your fingers on each step to avoid getting glue on the covers.
Pick up your stack of paper, holding it between your index finger and thumb of your non-dominant hand. Use a toothpick to put a thick layer of glue along the edges of the longest side facing way from your hand. Using the index finger of your dominant hand, start at the top of the edge and run your finger down the edge, applying pressure to push the glue into the pages. Wipe the excess glue off your finger. Then pinch the top edges of the pages together between your finger and thumb, and, maintaining pressure, slide your pinched fingers down the sides to the bottom. This pinching pushes the edges together and holds them in place. This glued and pinched side is the exterior edge of your book pages.
Wipe the glue from the fingers of your dominant hand before moving on.
Carefully rotate the pages in one unit till the glued edges of the pages are now facing inward and you’re still holding the pages between the index finger and thumb of your non-dominant hand. The edges now facing outward are the spine of your book. Run a thick bead of glue down the spine, then using a toothpick, smear a layer of glue over the front and back pages. (you don’t have to move your finger and thumb since there will be enough glue to hold the cover in place without covering the entire surface) Carefully set the pages onto the fabric rectangle---spine side inward, pressed-glue side facing outward. Remember to leave a fraction of an inch at the top, bottom and outward edge. Carefully fold the fabric over, pressing it smooth against the glued surfaces and spine. Trim the edges of the fabric if needed. Set your book aside.
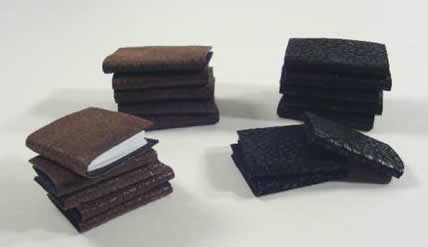
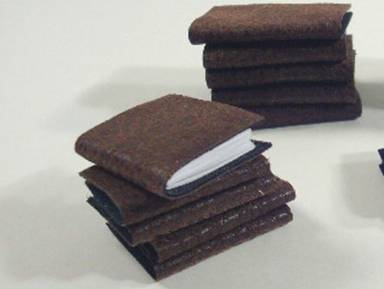
Continue this process till you have all your books assembled. With varying shapes and sizes, you’ll have a pile that looks something like this:
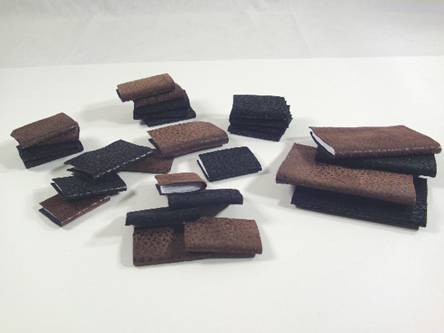
Painting the markings on the spines is the final step. Pour a small amount of gold paint into a paper plate and dip a toothpick into the paint. Gently draw the toothpick in a horizontal line across the spine of the book……..one, two or three lines each at the top and bottom. If you have a steady hand, you can also use the toothpick or a tiny paintbrush to add the title to the book to the spine of front. With this quantity of books, vary the number and positioning of the lines. Let the paint dry.
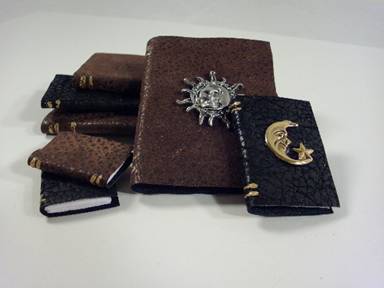
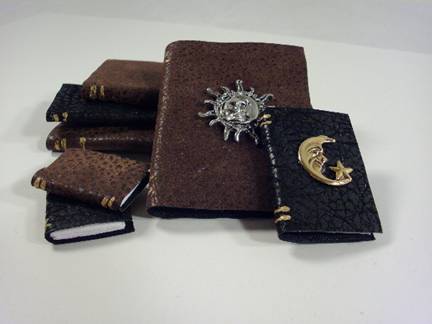
You may want to have a couple of books laying flat on a shelf or table to add interest to the scene. The filler books I made were for a witch’s supply store, so I glued charms to the front of a couple of books that will be laying flat on a table or shelf.
Your books are ready to go on the shelf now! Remember to stagger different heights and shapes on the shelf to create a realistic look, and to have a few books leaning or stacked to give life to the scene. A bright accessory such as a bookend or figurine also breaks up the heavy lines of a large number of books on a shelf. Keep in mind that in miniature, you always want to have some open spaces of light in between items.

Return no Newsletter Home...
|