|
Creating a Space (and Cost) Efficient Workspace
By Gina Lasalles
Having a good work space set up to build your dollhouse is key for a successful outcome. Dollhouses can be time consuming and messy projects. Think of all the wood scraps, splinters and dust that you will have laying around your building area for weeks if not months, to come. Not to mention all of the tools and materials that will be competing with your dollhouse for space.
You need a well organized space in order to not loose your sanity during the building process. Your mind will be occupied with plenty of other things like finishing touches, color schemes and furniture choices to worry about where your glue is or what exactly did you do with your masking tape, which has gone missing. Hunting for needed dollhouse parts under a mountain of craft supplies can frustrate even the most patient builder.
Every builder wants to find a good building area but, I have found that the majority of dollhouse builders do not know where to set up a work station. Many think they just don't have the space for a "real" building area. Others that do have a designated spot, seem to not make the most of their space because of disorganization and clutter but they don't know where to begin to organize.
I have to admit, I was there myself. I've built my dollhouses just about everywhere you can imagine. From the floor, to the dining table, to the breakfast counter and even on a bed. My townhouse is two stories so I can not tell you how many times I had to climb up and down the staircase to get needed craft supplies from my craft closet, which is upstairs, down to the area I was working in, the kitchen counter. It was a great way to get in shape but tiring on the legs. No matter how well I planned out the supplies I needed, I always ended up leaving something behind and having to go get it upstairs with my hands full of glue and wallpaper sticking to my clothing. My favorite though is still the time I actually built a dollhouse on a small folding lunch table. No easy task, I might add.
I was one of the folks that thought I just didn't have the space to set up a real craft area. At least not one large enough for a dollhouse build. It took me years to finally rearrange my computer room furniture and buy just a few inexpensive supplies to make myself a craft space. Of course, it would have been great to have done this twenty dollhouses ago but oh well, better late than never!
I have some tips on setting up a workstation and keeping it organized. It's not even as complicated as you might think. Through my years of building under less than perfect conditions, I realized that with just some strategically placed items and inexpensive supplies, you can make a fully functional craft area just about anywhere. You don't even need a special room in your home to do it either so if space is a factor then you need not worry. I had also thought at one time that I needed an extra bedroom in order to make a craft room and this persistent belief stopped me from thinking outside the box and making my "craft room" happen with the space I do have. If you’re ingenious enough to build a dollhouse on a coffee table, then you can make a craft area!
I made a workstation in the computer/guest bedroom. All I had to do was reorganize the room, move one computer, buy some inexpensive accessories and I finally got a craft room.
Place your work station preferably out of the way of your living area. A dining room table, for example, would not be a good work station because you will most likely need to use it causing you to have to temporarily relocate your materials and tools often. Dollhouse parts can easily be misplaced and lost in the process. It's better to designate an area that can be kept messy for an extended period of time. That way you avoid interruption and you won’t rush through your build just to get your home back. Ideal areas can often be found in second bedrooms. You do not have to give up the function of the bedroom either. You just need one wall to set up a good area. In my case, I used half a wall to allow space for some of my completed and displayed dollhouses. The good thing about setting up an area in a second bedroom is that you can always close the door on the mess and not have to look at it constantly.
Garages and basements are fine if you have them but keep in mind two very important things if you choose these areas to build your dollhouse.
1. Doorways:
You have to make sure your finished dollhouse will fit through the garage or basement doorway that leads into your home. These doorways are often times narrower than normal and you can end up with a beautifully finished dollhouse, literally stuck in your garage or basement, forever, with no way out. I’ve heard of this horror story happening to quite a few people. Always know what dimensions your dollhouse will have once built and measure your doorways accordingly. Take into account any additions you plan on adding to your dollhouse as well. You really do not want to have to break down a doorway to release your dollhouse. That takes kit bashing into a whole other level and turns it into actual home bashing!
2. Climate:
Climate is another concern. Hot and muggy garages and damp and humid basements might not allow for adhesives to dry correctly. This can cause wrinkly and buckling wallpaper or walls and floors that pull apart after you remove your clamps. Paint might also not dry appropriately causing streaking or peeling. Humidity can also affect your dollhouses wood making it warp, which can cause difficulty in assembly. Wood that has soaked up moisture is also very difficult to paint or glue together. The low ventilation that is found in basements and garages can be dangerous when working with certain chemicals that release fumes, like paint thinners, stains and adhesives. Not to mention all of the dust caused by sanding. Always make sure you have adequate ventilation and a controlled climate when choosing your work space.
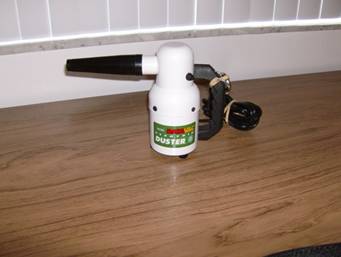
If you choose to set up your work space in a room with a computer, you need to buy an electric air blower. You should blow out your computer after every build with it. Sanding dust will damage your computer if left to accumulate. This blower will not only work for your computer but its really fantastic for blowing sanding dust off of curtains, bedding and displayed dollhouses that may be around your work area. It keeps everything clean and dust free.
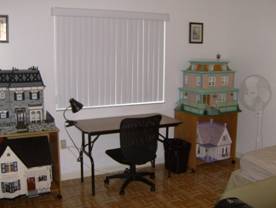
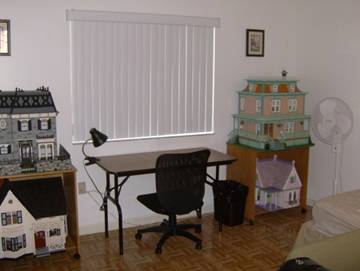
Once your area has been found, you need to begin making it look like it’s a work station. Folding tables are cost effective and strong enough to hold even the largest of dollhouses. They are available in several sizes. I got a six foot, which is the smallest, because of space issues but you can certainly find them much larger. You can also put two of them side by side and make an even larger area if needed. Preferably you would want two of these tables in your room. One for building and the other one for painting parts. You can also use the second one to position your newly built dollhouse while you work on assembling components on the other. But you can certainly get away with one table, like I did, if space is very limited.
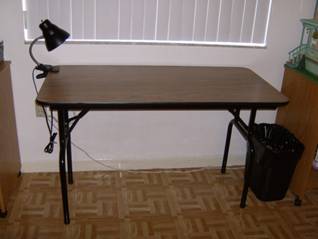
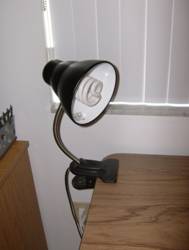
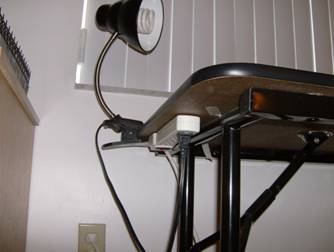
Positioning your table near a window will allow plenty of natural light to illuminate your work space and also give you easy access to ventilation if needed. A good clip on spotlight lamp helps you see better when working on smaller and more detailed work. These lamps can be swiveled in any direction for more precise lighting. Energy efficient light bulbs will keep your work space cooler and allow you do get nearer to the build for more light.
Mounting tape can be used to fasten a power strip to the underside of your desk. This will make outlets easily available to you without the need to hunt for extension chords or unused outlets on the walls. You also will be able to take all of the outlets you need with you, if you decide to reposition your table elsewhere in the future.
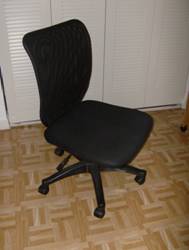
A wheeled office chair is essential because it allows you free movement in different directions without having to get up and adjust the chair or drag it on your floor. I like black office chairs because they are easier to clean if I happen to make a mess. A black permanent marker can hide just about anything on them.
I find that shower curtains work best as table covers. They are water proof, thicker than some table covers and big enough to cover large areas. They are also very inexpensive, at a fraction of the cost of most table covers. I find them for a dollar at the dollar store versus up to seven dollars at other stores.
One shower curtain can cover two large tables. If you’re just using one table, then you can save the other curtain half for a future project or to clean up and change it during the build.
I use masking tape to attach my table cover to the table. This keeps it from sliding and moving while I’m working. It's also easily removed when no longer needed.
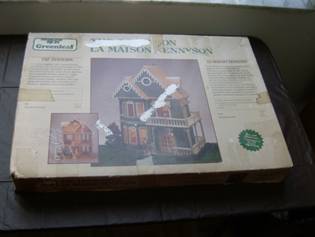
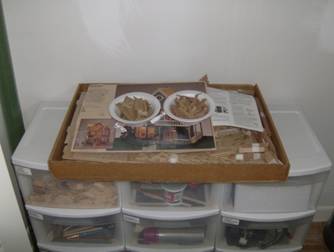
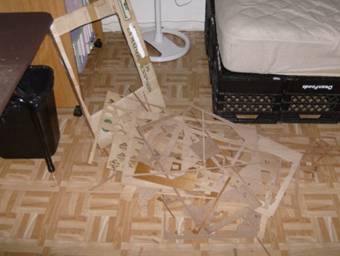
You can see the brown shower curtain I used for the Tennyson Dollhouse build under the kit box in this picture.
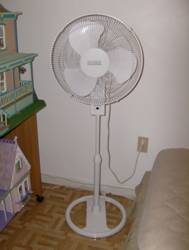
A fan is essential to have by your work area. Not only will it keep dust out of your face but it cuts drying time for glue and paint by half.
They sell metal turn tables that will easily allow you to turn your dollhouse around for easy access to all sides while you’re working on it. They are relatively inexpensive but I've found that a piece of cardboard from your own dollhouse kit box is just as effective when placed under your dollhouse. It will easily turn your dollhouse on your table’s surface without scratching it or breaking your table cover.
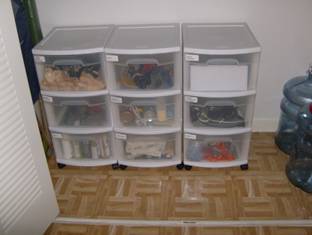
In order to conserve space I place my materials near my work area but not on it. I only keep the tools I'm currently working with on my table. The rest are in plastic drawer containers. They are sturdy and durable and the best thing of all is that they are on casters so you can roll them to your work station and have everything handy without anything being in the way. They are also cheap and you all know how much I love cheap. You can stick labels to the front of each drawer so you never forget where anything’s stored. They are easily rolled them back into a closet when you’re not working, to keep your work area tidy and clutter free.
Aside from these plastic drawers I have also seen turntable paint caddies and small drawer bins for smaller items.
Another good way to keep your work station clutter free is to label all of your parts according to the schematics while still on the sheets and then pop them all out. Group them by components (ex: all chimney parts) and place them in plastic zipper bags or containers. Large trim pieces can be held together with masking tape. Label the bags and containers so you need what component the pieces belong to.
You can even sand them as you remove them from the sheets as well and save even more time during your build by having the parts ready and waiting for you rather then you waiting to sand them first. This also helps clean up because you remove all of the dust at once and you don’t have to live with it for weeks or months.
Removing all of the parts from they're sheets will allow you to throw out all of the sheet scraps in one trip instead of on a daily basis.
You can stand the larger pieces like walls and floors and lean them in a small area where you can easily flip through them until you find the pieces you’re looking for.
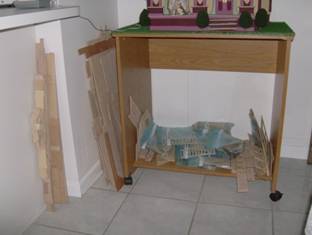
As you can see by the picture below, one dollhouse kit can bring a lot of scraps.
One of the things that no one likes to do but is really an essential part of keeping your work area organized is decluttering! There are two types of clutter bugs, the scrap hoarder and the tool collector. The scrap hoarders will never throw out even the smallest of wood scraps for fear that they will one day need it for..well...something. The tool collector will never build a dollhouse without having every tool imaginable handy because you never know if maybe one day they will need it for...well....something. All of this is fine but if you have limited space then that mind set will not allow you to maximize the use of a small craft area. My rule of thumb is that if I haven't used it in three months, out it goes. I try to only keep the essentials on hand.
Every builder has a list of must have tools and mine is rather small. I can not build without:
masking tape (the best clamp in the world)
wood glue
tacky glue
wallpaper paste
scissors
ruler
pencils
hot melt glue (for shingles only)
dust mask
safety glasses (the chips will fly)
lightweight spackle
stainable wood filler (for shingle touch ups or repairs)
mallet (you always have to bang something in)
sanding block with sandpaper
fingernail files (to sand very small parts)
plastic clamps (these cheap ones work as well as the expensive ones)
binder clips (will clamp any laminated parts)
wax paper (great for painting small parts on)
disposable plates or bowls (great as paint palettes and for mixing stains)
Aside from these materials I have the regular paints, stains and brushes on hand. I like keeping multiple types and sizes of brushes handy and I always buy them cheap, by the bag, because they tend to wear down with use anyways.
Also, have plenty of towels that you can use just for crafts. I like to keep a wet one and a dry one handy for easy clean ups and to keep your hands free of adhesives and paint. Baby wipes also work for this but the towels can be reused and are of course, cheap!
I tend to not use many power tools for my builds and I've built dollhouses without a single power tool. They can be expensive, messy and they also take up a lot of space. One of the things that I love so much about Greenleaf Dollhouses and just tab and slot dollhouses in general, is that there isn't much that can't be done with them using just your hands, some elbow grease and simple everyday hand held tools. You do not need to set up a wood working shop to build or kit bash these dollhouses. Less need for different and elaborate tools, helps keep your work station tidy, simple and requiring less space.
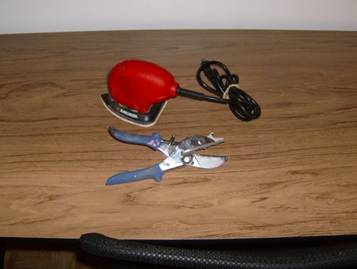
There are some tools that do make building a lot easier. You can certainly arm your arsenal with many different kinds but I've found three which are essential and get the job done. A power sander which fits in your hand, hand held wood shears and a power rotary tool.
A small power palm or mouse sander is great for sanding down stubborn doors so they fit in their openings and the wood shears are fantastic for cutting through small scale lumber. Rotary tools have attachments that can sand, cut and drill all in one. I do not own a rotary tool but I certainly agree with the builders that have pointed out their usefulness and swear by them.
Rubber bands help keep chords tidy and they are reusable.
As far as wood scraps go, I like keeping some balsawood strips, dowels, wooden skewers and small pegs on hand. They come in very handy as architectural touch ups.
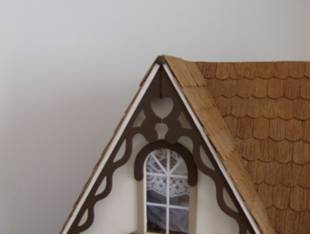
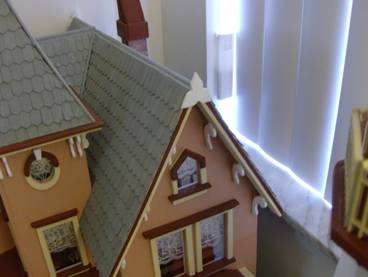
I often use he small pegs to finish the peaks of roofs. You can see how I did that with my Emerson Row Dollhouse.
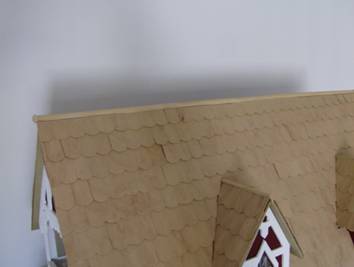
I sometimes use dowels to trim exterior roof joints like I did on my Vineyard Cottage Dollhouse.
Sometimes a kit will come with very nicely shaped scrap punch outs that can be used as architectural details. If they are exceptionally unique, I do tend to place them in zipper bags and reuse them on other dollhouses. I used some for the gable peaks of my Fairfield Dollhouse and to make nice details on my Arthur Dollhouse exterior door.
Wood scraps can also be used to embellish interior doors and fireplaces. So, yes, these wood scraps can become handy for future builds but remember everything in moderation. You don't want to end up with an entire drawer full of baggies and no where to place your clamps.
Also, one last thing. Please, get a painters apron. I've had my share of paint and glue stiffened clothing in my closet and I'm sure every other builder has too. :)
Return to Newsletter Home...
|