|
Aging and Distressing the Adams Dollhouse (Part 1)
By Brandaen Jones
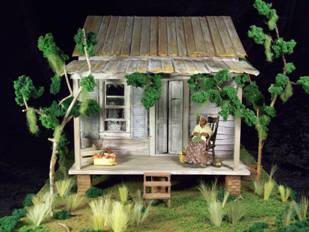
I had never tried to weather or age a doll house before I attempted this house. Throughout the entire project I was just astonished how much I could do cheaply and make it look realistic at the same time. The concept for the Gris-Gris house was a bayou house that was built from the boards of boats they used to go back and forth on the river. Often times the boats could not be brought back up river so they would tear them apart and use them for the houses that they built on the banks. Gris-Gris house was built for my sad voodoo priestess who was very down on her luck and just tried to stay alive and keep a roof over her head. A great deal of details went into this house and I will go over each step in articles in future Gazette issues.
Part of what this house so special for me is the framing that went into the interior if the house.
Originally I only wanted to come up with a way to use standard windows and doors in a Greenleaf house . For me all houses have “happy accidents” and this house was no exception. I used 3/8 inch wood strips of wood and framed the house as you would every real life house . The object was to give me the depth that I needed to place standard windows and doors. I even placed “studs” between the vertical lengths to create a real framed home.
Before I went any further, every layer that was done was hand painted with the "juice" concoction of rubbing alcohol and India ink and a tad of burnt sienna acrylic paint. So before I put the beam across the little studs I painted them with as well. The beams running across the inside and out are the dollhouse siding that Greenleaf sells. The really cool thing about them was that they are thin enough that I could break them in places to let the "studs" show through in the walls . Each piece of siding was also sanded and shaved here and there to make them appear rough hewn. The rubbing alcohol solution is very toxic to your nose so please wear protection so that you do not get one heck of a headache like I did. Always make sure that you have a fan blowing on you and that the area you are working is well ventilated.
To achieve the color of aging that you desire, experiment! There is no right or wrong with any of this, I applied four or five layers of the solution to finally achieve the colour that I desired. Finally, after covering the inside top to bottom with the siding pieces and breaking them in places to let my handy work show through, I dyed that part of the wood as well with my solution. Each piece of siding was laid end to end and not overlapped to create the appearance of wood layered to create the walls.
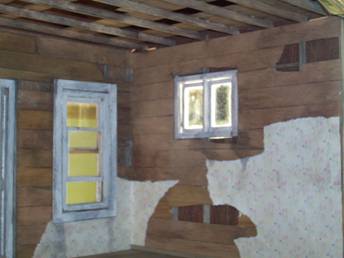
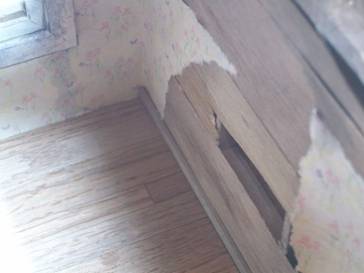
Wallpapering was the next part of my house. I wanted the walls to appear as if this house used to be perfect and wallpapered with pretty turn of the century paper and that once upon a time it was just beautiful. But used to be is the word, I tore my wallpaper sheet into little pieces and soaked them in tea water . After letting the paper dry, the pieces had curled and were down right sad looking . Using your best eye, place the wallpaper pieces against different walls and glue them in place as you see fit. Again, part of the fun for me was that there is no such thing as right or wrong when aging. Just let it flow and have fun .
You may also notice that I created the same framing for the ceiling. I decided to carry the concept through the entire way, but I placed the siding pieces on the tops instead of the bottom of the ceiling. And of course the same solution technique was applied to the floor boards as well as the ceiling.
Outside
I began by painting the outside with bark acrylic paint and then covered the outside of the house with the greenleaf siding strips as well, overlapping them this time as you would normal siding. The differences being that I would let them drop here and there so that they were not even as in newer kept homes. As I placed the strips over each other I would also chip off corners and strip away whole sections so that they appeared as worse for wear as I could make them. Caution! Be careful at chipping away too much because you don't want to see too much of the actual kit wall. After gluing all the strips in place, I received my second happy accident when I painted over the strips I had not glued them completely in place. As the paint dried the (first layer of bark paint on the siding as well) the siding warped! I was so scared and upset I thought I had ruined the entire thing ! But it made the outside look great ! The warping was just perfect and gave the outside that even older look that I had no idea I could achieve. Of course the one problem you might have is warping in places that you don't wish to be warped just glue them carefully back down.
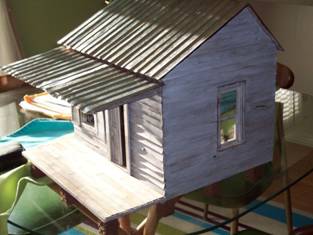
The outside was then completely covered in the crackling material of your choice and allowed to dry. For the coat of paint on the outside I used a slightly watered down white acrylic paint and allowed the cracks to show through. After the outside was finished I still was not happy with the results so I took my india ink solution and lightly covered the walls until I achieved my effects. The other thing to consider is water lines . A house in a flood zone …..hmm needs dry brushed water lines using some acrylic olive and lime green mixed together lightly. Moss and algae would grow on a sad house that had been flooded so I created light water lines across the bottom of the house. Don't go crazy with the colour though, use sparingly.
Return to Newsletter Home...
|