|
Crumbling Plaster Walls and Aged Ceilings
By Deb Roberts
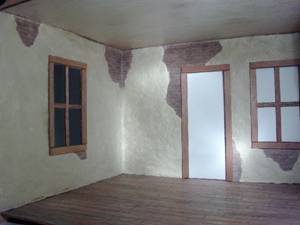
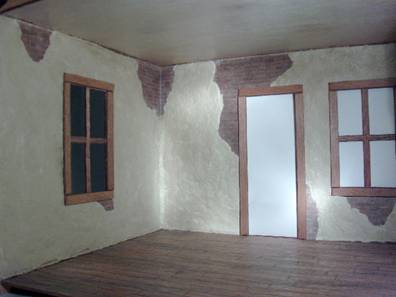
A fantastic look for aged houses is a crumbling plaster wall exposing the bricks underneath. Topping this look is a distressed and watermarked ceiling that gives the overall look of an old, distressed room. In this tutorial, we’ll learn how to distress a ceiling and created aged walls.
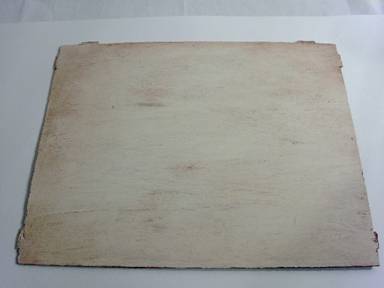
We’ll begin with the ceiling since the walls will be blended up into the ceiling. To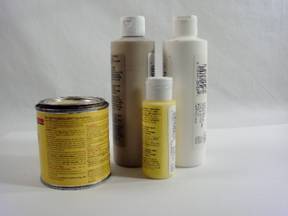 make an aged white paint for ceilings, you’ll need white, tan and yellow paint and a can of wood stain. In a paper plate, pour the white paint first, then add a few drops of tan and yellow. Loosely mix the paints together, just to the point of being blended. If there are some subtle streaks in the paint when you apply it, that’s great. It gives the paint a more realistic look. make an aged white paint for ceilings, you’ll need white, tan and yellow paint and a can of wood stain. In a paper plate, pour the white paint first, then add a few drops of tan and yellow. Loosely mix the paints together, just to the point of being blended. If there are some subtle streaks in the paint when you apply it, that’s great. It gives the paint a more realistic look.
Paint the ceiling with a large, stiff bristle brush. Apply the paint unevenly. You don’t want brush strokes in the paint, but you do want to have areas where the paint is thinner than others.
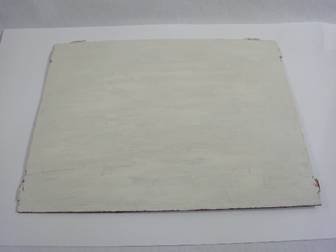
Let the paint dry till it’s past the tacky stage but not completely set. To apply the stain that ages the ceiling, you’ll need a brush and a soft rag. Using the brush, dab a little stain in the rear corner of the ceiling and then use the rag to lightly rub it into the paint. Rub along with the grain so that the stain blends into the wood grain and paint without leaving any abrupt stops and starts. Blending is the key to perfecting the aging technique.
Continue along the edges and corners of the ceiling. These areas usually show dirt and aging more than the middle of the ceiling just as floors do. Continue lightly rubbing your rag across the whole ceiling to blend the stain across the entire surface.
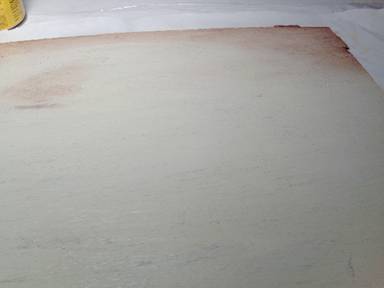
Any distressed ceiling needs water spots for realism and those are easy to add. Simply dip your brush into the stain, then let it drip onto the ceiling in random spots.
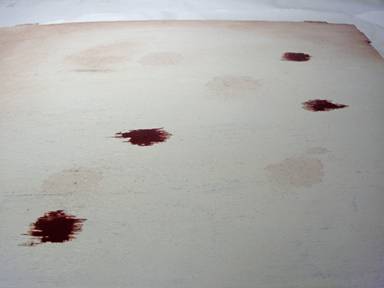
Give the stain just about 10 seconds to lightly sink in, then gently dab the spot with your rag to soak up the excess. Repeat this on all water spots.
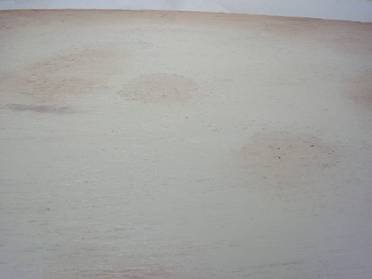
At this point, your water spots are going to stand out just a little too much, so take your rag and again lightly rub across the entire surface, going with the grain, one last time. That’s all that’s needed to create the perfect aged and distressed ceiling.
Time to move onto the walls! This process is based on a technique used by Tracy Topps to create a crumbling plaster and brick interior. Tracy has graciously allowed me to imitate her technique in this house. I’ll be using paperclay for my version but Tracy tells me she uses spackle with excellent results. You can see pictures of Tracy’s houses in her gallery and see how fabulous her work is!
Supplies needed:
Paperclay
Carpenter’s glue
Brick Wallpaper
Wallpaper paste
Paint: Ivory mix as used for the ceiling; two shades of grey
Cotton swabs
Wood stain
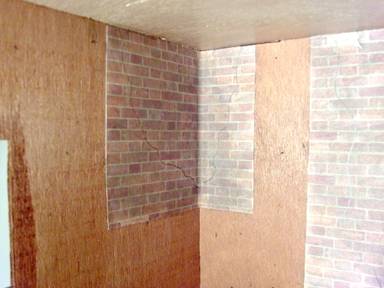
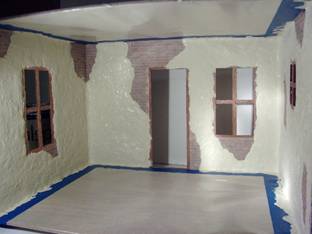
Begin with marking the walls to designate the position for the bricks that will be showing thru the plaster. Cut wallpaper pieces that are slightly larger than the area you’ve marked off. Apply the wallpaper paste evenly to the back of the paper and position it on the walls. If the piece is going around the window or door, be sure to place it just a tiny bit back from the edge of the window or door cut out so it won’t show between the frame and the wall.
I’ve made a large piece to go in the back corner of the room. Gently position this piece so that it fits snugly into the corner crease.

Allow the wallpaper to dry completely. Our next step will be to age the bricks so the wallpaper needs to be very dry or it will wrinkle.
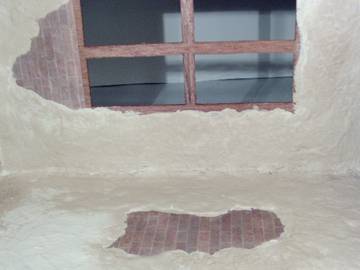
To age the bricks, dip a cotton swab into a light grey paint and rub off as much paint as possible. The swab should be almost completely dry. Using a light touch, gently smudge the bricks with the swab, focusing on the edges of the bricks. You may need to use another clean cotton swap to rub the paint till it has a soft, natural look. Using another swab, apply a dark grey paint in the same way. Touch this paint a little harder, but in smaller amounts over the lighter grey. This gives the bricks texture and realism.
We need to mark the lines on the brick where the plaster will end. Using a pencil, draw lines on the bricks to use as guidelines.
Time to add the plaster! We’ll be using paperclay for this house, but spackling compound can be used instead.
We’ll be working in sections of the walls so don’t worry about doing it all at once, but we will be working at a fairly rapid pace. Before you begin, put a small bowl of water close at hand so you can dip your fingers into it as you smooth the clay.
Pinch off a lump of paperclay about the size of a large marble. Pressing it between your fingers and thumb, flatten the piece out to about the thickness of pie crust.
Smear a section of the wall with carpenters glue, being sure to get an even coverage.
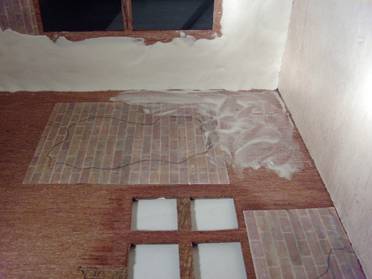
Lay the paperclay down onto the glue and press it into place. On the edges that are covering the brick wallpaper, use your fingers to tear the paperclay to match the shape you’ve drawn on the bricks. Press the paperclay smooth onto the wood, then repeat the process with another piece, slightly overlapping the previous piece. User your fingers to push and press the clay into place for full coverage.
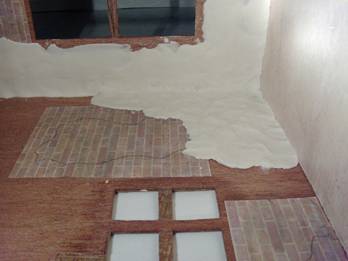
When you’ve completed that section, dip your fingers into the water and smooth the clay so the joins don’t show. Use your fingers to press down on the edges of the clay around your window and door frame guidelines, giving it a gentle taper so the plaster will extend under the frame and thin enough so the frame can sit firmly on the wall.
Dip your fingers into the water and press the clay into a plaster-like appearance. Bear in mind that this is old plaster so there will be bumps and dips as well as some swirls and smears. When adding these character aspects to the plaster, always visualize the 1:12 scale so your texturing doesn’t go out of proportion.
When you’re finished, give the room one last look to be sure you’re satisfied with the texturing. Give a final check to the corners and top and bottom edges to make sure the corners are sealed and the clay meets the ceiling and floor without gaps. Test the window and door frames to be sure the paperclay will edge up underneath them when they’re installed. Allow the paperclay to dry overnight.
If you discover cracks in your paperclay the next morning, don’t despair! In fact, the cracks may be just perfect for the aged look! If the cracks aren’t deep, leave them as they are, especially in corners or under the windows. If the cracks are large enough to see the wall thru them, simply dip your fingers in water and moisten the crack and the area around it. Knead a small amount of paperclay between your fingers and ‘patch’ the crack. Dip your fingers in water again and smooth the patch around the edges. Allow to dry overnight.
Before we paint the walls, we want to cover the floor and ceiling to protect them from paint. Use waxed paper and masking tape to cover both completely.
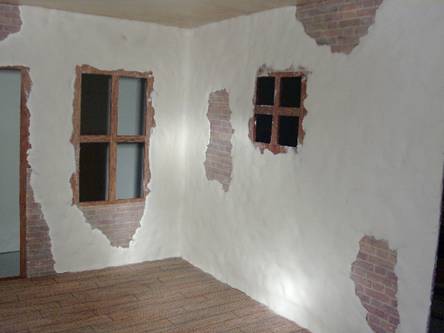
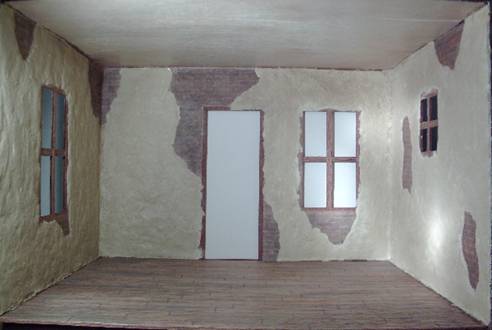
We’re going to be giving the walls the same distressing technique as the ceiling. Mix your paint as you did for the ceiling and paint the paperclay uniformly. (I mixed a little Greenleaf stucco into the paint for some additional texturing) Allow the paint to dry.
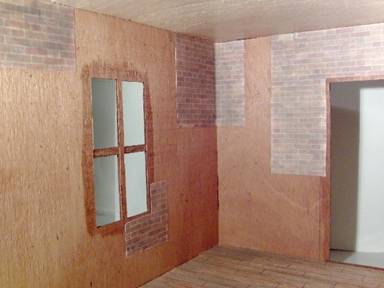
After the paint has dried, it’s time to antique the walls. Just as we did with the ceiling, dip a rag into a dark color stain and blot off the excess. Gently rub the rag over the walls avoiding any specific direction. Alternate vertical, horizontal and circular movements so there aren’t any streaks in the antiquing. Leave the stain darker at the tops and corners and lighter in the middle of the walls. The stain will sit on top of the high spots of the “plaster”, giving a natural aged look. Rub the rag over the bricks as well.
Remove the masking tape from around the edges. Take a small paint brush and lightly apply stain to any white spots as well as brushing in extra “dirt” along the ceiling and floor edges.
Now we’re ready to install the door and window frames. Check to be sure that the edge of the window frame is even with the edge of the window cut out. Hold in place till the glue sets.
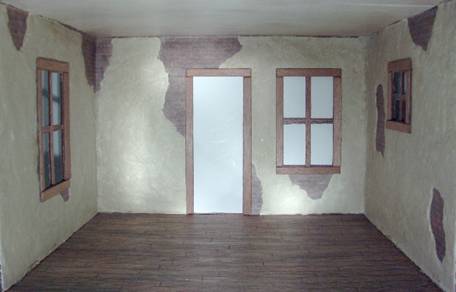
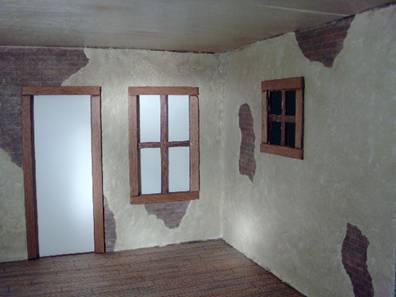
Sit back and admire the results of your work!
Return to newsletter home page...
|