|
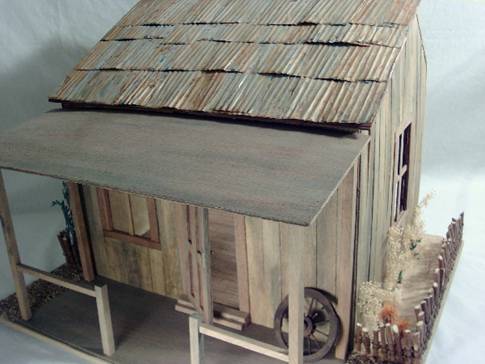
Build a Rusty Roof for your Dollhouse
By Deb Roberts
A different approach to roofing is the tin roof. This style is wonderfully realistic for sheds, abandoned houses, themed houses or rural buildings. It’s also very, very easy to make.
You’ll need a roll of aluminum foil, a fabric pleater or piece of corrugated cardboard and paint in grey, orange and brown.
Cut the aluminum foil into varied sizes of rectangles. Keep in mind that tin roofs were usually made of scrap tin so there are a variety of sizes and the edges may not always be even.
To achieve the ripple effect of tin, lay a rectangle of foil on top of the pleater or corrugated cardboard and gently smooth it down to create ridges in the foil. Lift the foil by the edges and set it to one side. Continue with this process with each piece of foil. Handle the foil carefully so you don’t flatten the ridges. Don’t worry if you end up with some flat spots or wrinkles since that adds to the realistic look of the tin.
Spray glue works best for attaching the foil to the roof since you don’t want to flatten out the ripples. Give the backside of the foil an even spray of glue and lay it down on the roof. The first piece should be on the bottom of the roof, flush with both the side edge and the bottom edge. Continue this process, staggering the size of the foil. The second row should be offset from the first row just as you do with regular shingles. Intermittently place another piece of foil over two others as if the roof had been patched. To give a realistic look, randomly turn some of the pieces of foil over so the dull side is up instead of the shiny side.
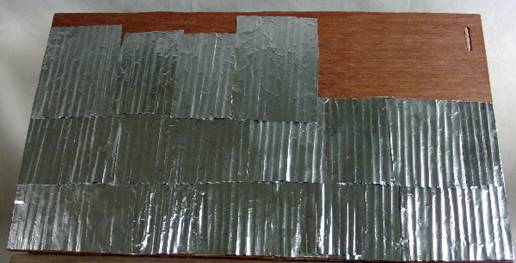
Continue until the entire roof is covered.

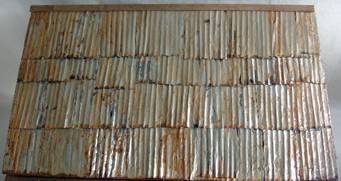
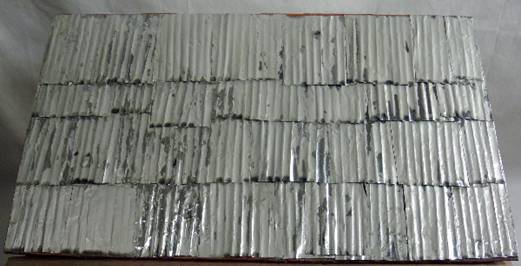
After the foil has been glued to the roof, it’s time to start the aging process. Paint washes work best for this. Mix your paint with water in a 2:1 ratio. With a soft brush, go over the entire roof, coating each piece of foil and applying the wash unevenly.
Allow the grey wash to dry, then mix a “rust” wash using brown and orange paint blended well and diluted with water in a 2:1 ratio. Apply a dirty wash with the rust mixture, again applying it intermittently.
When applying the rust wash, consider that the roof will have rusted naturally in the rain so there will be streaks and areas where the rust pools at the bottom of the tin sheet.
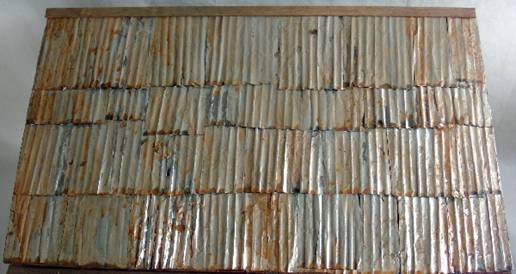
Allow the rust wash to dry, then cap the roof with a roof ridge made of corner moulding that has been stained and aged with a grey dirty wash.
That’s all there is to it! The end result is a delightfully rusty tin roof!
Return to Newsletter Home Page...
|