Dollhouse Wiring 101 - The basics of electrifying and troubleshooting wiring for your dollhouse
By Deb Roberts (picture below by Wenlaine)

Anyone who has ever wired a dollhouse will be the first to tell you that Thomas Edison had it easy because he never worked in miniature. Adding lights to a dollhouse is probably one of the most admired, yet dreaded aspect of dollhouse building. However, the magic of lights in a dollhouse is an allure too strong to resist and sooner or later most of us will give it a try. When the novice makes the decision to wire a house, there are a lot of questions about ‘What hardware will I need?’ and ‘What do these terms means?’ In this article, we’ll provide the basic information you need before you start wiring your dollhouse.
There are three ‘standard’ ways to wire a dollhouse. The following are general definitions of those methods.
Round (or Hard) Wiring:
Round wiring is a ‘plug and play’ way of wiring a dollhouse. Miniature light fixtures with attached cords are placed in the house and the cords are plugged into a power strip (the power strip is usually hidden underneath the house). The power strip is connected to a transformer that plugs into an electrical outlet.
Tape Wiring:
Tape wiring uses thin, flat copper tape encased in plastic to supply the electrical current to the light fixtures. The tape is adhesive on one side so it installs directly to the wood of your dollhouse. The wires of the light fixtures are connected to the tape wire using either solder or by inserting outlets or eyelets into the tape wire for the light fixtures to plug into. The tape wire is connected to the transformer thru a junction splice that pounds directly into the tape wire and a transformer lead in wire that connects the junction splice to the transformer.
Hybrid Wiring:
Hybrid wiring combines round wiring with tape wiring using solder to attach the light fixture cords to tape wire.
Let’s take a look at the hardware needed to wire a house.
Lights - Miniature lights come in all shapes and styles, including outdoor lights, fireplace embers, chandeliers, floor lamps, table lamps, etc. All miniature lights come with wires attached just like a real lamp and on average, the wire is about 12 inches long. Unfortunately, the catalogs never actually say how long the wire is and there's no industry standard. Lights are a matter of personal choice so when you begin your lighting journey, your first step will be to determine how many lights you’ll need and choose the ones you want.
Grain of Wheat (GOW) bulb - A grain of wheat bulb is the most common lightbulb used in miniature lamps. In general, a GOW bulb is a 60ma (milliamp), 12v (volt) bulb and measures 1/8 inch diameter. GOW bulbs are considered the standard in most 1:12 scale light fixtures. You can also purchase individual GOW bulbs, usually without male plugs, to make your own light fixtures.
Grain of Rice (GOR) bulb - A grain of rice bulb has the same features as a GOW bulb, but is 3/32 of an inch diameter. GOR bulbs are the exception to the standard in fixtures as they are often used in chandeliers. GOR bulbs are also sold without male plugs so you can make your own fixtures. Variations on both GOW and GOR bulbs are flicker and flame tip bulbs.
Replaceable bulbs - Some light fixtures come with replaceable bulbs. These bulbs are called bi-pin bulbs and have two small wires connected directly to the bulb. The wires are inserted into two very small holes in the light fixture to make the electrical connection.
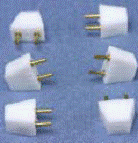
Male plugs - The male plug is the part at the end of the light cord that plugs into the power strip, just like a real lamp. Some lamps come with male plugs and some don't so it's a good idea to keep a few extra on hand. Don't stress over adding a male plug to a light fixture. Just like a real electrical cord, the cords on the light fixtures are covered with a plastic insulation that can be separated into two lines by gently pulling it apart. Then you strip off a little bit of the plastic from each copper wire inside. Pull the little brass pins out of the male plug with a pair of needlenose pliers and thread the two wires into the two holes, then put the brass pins back. Ta-da! You've added the male plug to your lamp! You'll be removing all the male plugs from your lights to run the wires so this is a process you'll do on every light. (we’ll show you how to do that in the other articles in this issue)
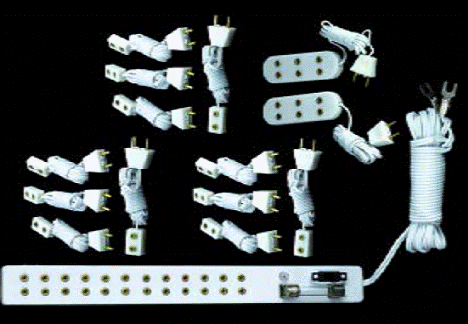
Extension cords--Just like in real life, you might need to add an extension cord to get the light cord to the power strip. (An alternative is to use extra wire and splice it to the lamp wire, covering the splice with a plastic sheath; or solder the cords together, a step that will be covered in the article on hybrid wiring in this issue.) The challenge to extension cords is hiding the extension but you can put it behind a wall, a piece of furniture, a fireplace or even a large piece of decorative trim. Hutches and armoires make great hiding places. (There is more information on hiding extension cords in the article on round wiring in this issue) Extension cords come in single plug or triple plug.
Power strip--This is what makes the connection between your lights and the transformer. The male plugs go into it just like a real lamp. Power strips can be hidden under the house. Most of them have a strip of tape on the back side to hold them in place. The light cords go thru the house to the power strip and then the cord from the power strip comes out from under the house to the transformer.
This picture shows single outlet extension cords, triple outlet extension cords and a 12 outlet power strip. You can see that the power strip has two U shaped connectors at the ends of the wire. These connectors slide under screws on the transformer and then the screws are tightened down to hold them in place.
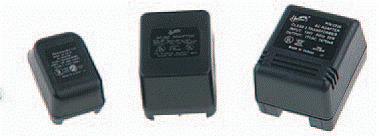
Transformer--The transformer is the connection point between the power strip or your junction splice lead-in wire and your wall outlet. Transformers come in many different voltage capacities. You need to be aware that the listings are per bulb, not per lamp. Some lamps have more than one bulb, so when you’re counting your lights, be sure to count by bulb. Check the listing on the transformer descriptions and it will tell you how many bulbs it can power. Some transformers list an MA number on the transformer itself. MA stands for milliamps. Voltage varies in other countries and specific types of transformers are needed in the UK and Europe. The follow specs are a manufacturer’s general guideline for US, Canada and Mexico and refer to standard 12v GOW bulbs.
250ma = 4 bulbs
300ma = 5 bulbs
500ma = 10 bulbs
1000ma =16 bulbs
2000ma =33 bulbs
4000ma = 64 bulbs
Some (but not all) transformers come with a built-in circuit breaker. If there is an overload or short, the breaker opens and stops the voltage till the problem is corrected. The breaker will automatically reset itself. A built-in circuit breaker is a good idea since it provides you with peace of mind about the safety concerns of wiring a dollhouse.
Additional wire - You can purchase additional wire to extend the existing wire on your lights by splicing the wires together. The most common wire used is 2-conductor, 32 ga wire, sometimes called zip wire. The wires can easily be separated by pulling them apart with your fingernail.
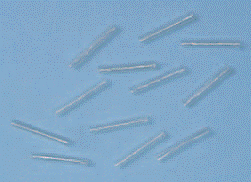
Heat Shrink Tubes - If you’re splicing wires together without soldering them, you’ll need to cover the splices to prevent shorts. Heat shrink tubes are slid over one wire and then slid back up to cover the splice when the wires are twisted together. Heat is applied to them (from a source such as a hair dryer) and the plastic contracts around the wires. Heat shrink tubes are very helpful when the wires are enclosed in small spaces since they are only a tiny bit larger than the wires themselves.
Soldering iron—A soldering iron is used if you are soldering splices together or if you solder wires directly to your tape wire. When soldering connections, the wires are first attached to one another and then the hot tip of the soldering iron is touched to soldering wire which melts in a blob over the connection.
Solder - Solder is a thin wire alloy (usually tin and copper) with a low melting point.
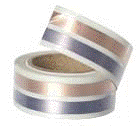
Tape wire - Tape wire is essentially double conductor tape containing copper strips encased in thin plastic. One side is covered in a strong adhesive under thin paper. Peel away the paper and press the tape wire down to the surface of your dollhouse to hold it in place. The copper strips inside conduct electricity and are color coded, making it easy to maintain the current when folding the tape around corners. Tape wire conducts electricity from your lamps to the transformer by creating a flow of energy from the lamp plugged into the tape wire thru eyelets or an outlet, to the junction splice and lead-in cord connecting the tape wire to the transformer. We’ll see more about tape wire and the color coding in the section of tape wiring in this issue.
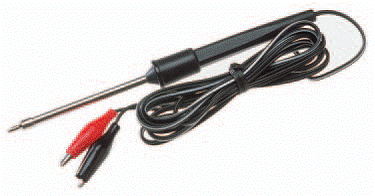
Test probe - A test probe is a must have for tape wiring! The probe has two small needle prongs that can be pressed into the plastic covering of the tape wire to touch the conductors. If an electrical current is present, the test probe will light up.
Brads - Brads are small brass nails about 1/8 to 1/4 inch long. They are primarily used to maintain the flow of current when turning corners with tape wire. The brads go thru the tape wire and into the wood underneath to hold it in place and establish the electrical connection.
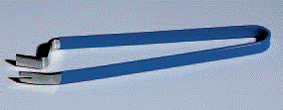
Brad setter - A brad setter is another must-have for tape wiring. Brads are so tiny that even needlenose pliers are bulky and awkward to use when pushing a brad into tape wire and the wood underneath it. A brad setter holds the brad in place in a small claw tip and when the tool is squeezed like a pair of tweezers, the flat section above pushes the brad into place.
Eyelets - Eyelets are small, hollow pieces of brass and are inserted directly into tape wire, creating an outlet for male plugs. Eyelets are helpful in stabilizing the connection from a male plug (or outlet) to the tape wire.
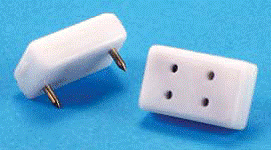
Single and double pound in outlets - Plugs can be inserted into tape wire either by using eyelets or by using an outlet. Outlets are available in single or double plug and have sharp prongs attached to the underside. The prongs are pounded into the tape wire to establish the current. Outlet covers are available for a finishing decorative touch.
Ceiling adapters - You have probably seen ceiling adapters in miniature catalogs. Ceiling adapters are used to attach ceiling fixtures such as heavy chandeliers more securely into tape wire and allow the fixture to be removed if you need to change a bulb or replace a faulty fixture. Sconce adapters work on the same principle.
Pound in ceiling globes - Also called pin-in, these are probably the easiest of ceiling fixtures to install. These lights have two prongs built in and the fixture is simply pounded into the tape wire on the ceiling.
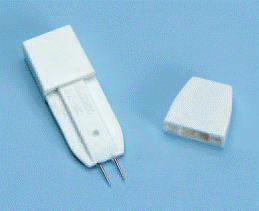
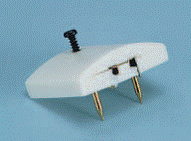
Junction splice - The junction splice is the key component for bringing tape wire to life. The junction splice has two needle prongs built in which are pounded into the tape wire. A screw in the middle holds the device in place. The junction splice has a female outlet where the transformer lead-in wire is attached.
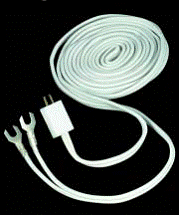
Transformer lead in wire-- Once the junction splice is in place in the tape wire, a lead-in wire is plugged into it. The other end of the lead-in wire is connected to the transformer. The transformer lead-in wire completes the flow of energy from the power source to your lights.
Tools
Some additional tools that you might find helpful with wiring your dollhouse are a fine point awl to help set eyelets or a pilot hole punch. These create the starter holes for your brads, eyelets and outlets. A mini drill or a drill attachment on a dremel are handy to have for creating pilot holes and for creating trenches for hard wire. (see the tutorial for hybrid wiring about when and how to make trenches) Needlenose pliers are almost a must have for stripping wires, pulling and replacing posts in male outlets, and setting brads. Other tools that will make your wiring job much easier are tweezers, magnifying glasses and above all, excellent lighting in your workspace. The better you can see, the easier the job will be.
Troubleshooting tips
We all know that joy of seeing a house light up when we plug it in for the first time after all the lights are in place! The opposite end of that spectrum is the extreme frustration that occurs when one light doesn’t work and we have to chase down the problem. It’s that frustration that gives dollhouse lighting such a bad reputation. But with a little proactive work and some common sense in troubleshooting, it doesn’t have to be that painful. The following tips certainly don’t cover all potential issues, but we’ll take a look at some of the most common troubleshooting steps for miniature lighting.
Test, test, test!!!
Be proactive about your lighting and take time to test each light at every step of your wiring. Yes, it takes a little bit longer to complete the job when you’re testing at each step, but when you weigh that time against the time, expense and effort of chasing down a short or faulty fixture after your house has been wallpapered, it’s well worth it! Don’t skimp on testing each fixture as you install it and using your test probe along the way.
Keep your plans!
Another proactive step is to make and keep a diagram of where your tape wire has been placed, including the location of each turn, join or splice. Since those are the usual location of shorts, keeping your diagram handy will help you troubleshoot any issues that may arise later.
When troubleshooting lighting problems, always start with the obvious.
Is one light out? If so, check the fixture first as it may be a burnt out bulb, a faulty fixture or a failed connection at the plug or outlet to that fixture. Try another known good light at that location. If it also fails, then begin chasing back thru the connection to the next working light in the connection sequence.
Not a fixture problem or there’s more than one light out in one part of the house but not all? Working upward from the last good light, test the plugs, the outlets, the connection to the tape wire, any splices, turns, etc. Use your test probe to check the connection at various locations to pinpoint the location of the short. (this is why you want to keep your wiring diagram) When your test probe doesn’t light up, you’ve found the location of your short.
Are all lights out?
Let’s start with the easiest stuff first before you tear your house apart looking for a short.
If all the lights are out, it may be the power strip has failed. First check to make sure the power strip is turned on and that there’s not a blown fuse on the power strip itself. If that’s not the problem, remove the light fixtures and/or the transformer lead-in wire from the power strip and test the power strip with a known-good light fixture plugged directly into the power strip. Check each one of the outlets on the strip to make sure that the light works on each one. There is a grey area between knowing if a power strip is faulty or if the problem is with the transformer it’s connected to. If you have another transformer to try and the power strip doesn’t work on it, then you’ve isolated the issue to the power strip.
The problem could also be with a failed transformer. Remember that some transformers have a circuit breaker that will open and stop the power flow when a short occurs in the wiring. However, the transformer will automatically reset itself when the problem is corrected so if you’re testing with a known-good power strip and a known-good light fixture and the light still doesn’t come on, the problem is probably with the transformer. Another way to determine if the transformer is faulty, is to use a voltage meter to test the current coming thru the posts where you connect the power strip wires. It’s VERY important to make sure that you connect the voltage meter correctly (ground to ground, positive to positive) so follow the instructions for your voltage meter carefully.
That takes us to the worst case scenario……all the lights are out, you know the transformer and the power strip are good and you still have no lights in the whole house. Remember that the flow of electricity is disrupted at the first bad connection or short, so start at the beginning of your wiring sequence, (the junction splice) and use your test probe to begin looking for failed connectivity. Again, this is where your wiring diagram comes into play because the short is most likely to have occurred at a splice, join or corner so be sure to test above and below those points of contact.
In Summary
That covers most of the basics of dollhouse wiring and definitions. For how-to articles on round wiring, tape wiring, hybrid wiring and wiring a front opening panel of a dollhouse, please see the other articles in this February 2009 edition of the Greenleaf Gazette.
Return to Newsletter Home... |