|
Hard Wiring a Front Opening Dollhouse
By Christine Errico
INTRODUCTION
If you have a front-opening dollhouse and want to learn how to add lights to the front panel, this tutorial is for you! I'm sure you're thinking that it may be difficult if you wanted to add a porch light or lights to the outside of the house. You're probably wondering how you attach the wires to the main wire, right? The answer lies in the hinges!
Think of the hinges acting as a bridge, carrying the electricity across the opening. It is safe to have the hinges carry the electricity. You can even paint the hinges and touch them when the lights are on!
This tutorial will show you how light your front opening dollhouse step by step.
Important Notes Before Starting!
- It is important that you know the basics of lighting a dollhouse before proceeding with this tutorial. There is a tutorial here to show you how to light a dollhouse using round wire.
- This tutorial is for round wire only. The procedure for wiring with hinges using tapewire is slightly different.
- Make sure you are using brass hinges and screws! If your hinges and screws are not brass, they will not conduct electricity. You can pick up small brass screws at your local hardware store.
- Make sure you are using two separate hinges for the front panel. If you are using one long hinge, this method will not work. It is recommended that you get two separate hinges.
- It is recommended that you only use one light on the front panel for each set of hinges. Using more then one light may short out the lights .
- It is recommended that you finish the panel to the point where you will not need to remove the hinges or panel once the lights are installed.
Step 1 - Run the Wires from the light to the hinges
It is recommended that you save the lights for the front of the house until last. This means you should plan and wire all the other lights in the house first before working on the lights for the front panel. The reason for this is you will need to have your junction splice and main wire installed and working before you install the front panel lights.

- Determine where on the front panel you want to put the light(s)
With pencil, lightly make an X marking where each light will be attached to the front panel. Then carefully look at the other side of the wall and determine where you will want to run the wires to connect to the hinges.
- Mark where the wires will go
Lightly draw a line (or use masking tape) to indicate where the wires will be run to connect to the hinges. If the wires are to go through the wall, make a mark (like a circle) to indicate a hole to be drilled and continue the line on the other side. These lines will be your guidelines for making grooves where the wires will lay.
- Determine what wires will need to be lengthened.
During the initial planning stages where you make the lines for the wires for each light, determine if the wires that come with the lights are long enough or if they will need to be lengthened. Note this on a separate piece of paper so you can work on lengthening the lights (this step is discussed in the Hybrid Lighting Tutorial found here.
- Attach the light to the front of house and feed the wire through to the other side.
Remove the plug from the light and attach the light to the front of the house using glue or the sticky pad on the light. Feed the wire through the hole you drilled. Save the plug. If you are using a socket strip, you will need the plug later.

In the picture above, a coach light is attached to the wall on the other side. A hole was drilled to run the wire through the front panel. Grooves were made and the wires were placed in the grooves.
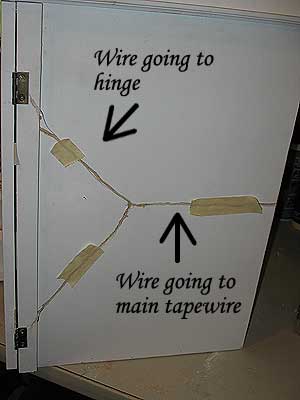
- Separate the wire and run it to the hinges
After feeding the wire through the hole, run it along the inside panel until you get near the hinges. At that point, separate the two strands of the wire and run each strand to a hinge as shown in the image above. Use tape to hold the separate wires in place.
Skip the next part and proceed to step 2 if you are using tapewire.
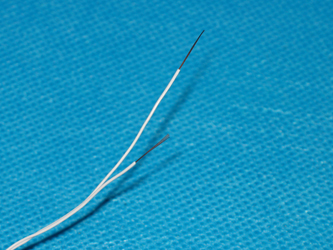
- Strip the insulation to expose the bare wires
Take one strand of wire from the light and using your thumb fingernail, pinch the white insulation over one of the strands of wire and pull. This will pull the insulation off without breaking the wires. You don't need to strip a lot of insulation from the wires, just enough for the bare wire to go under the hinge. About 1/4" to 1/2" of bare is sufficient. You will have to do this on both strands of one end of the wire from the light. With your tweezers, twist each end to make sure the fine wires are gathered up together.
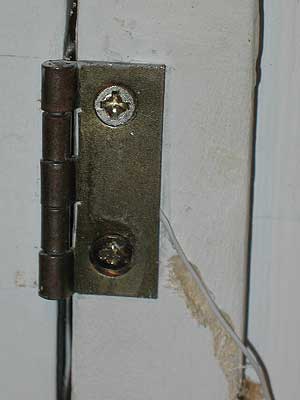
- Place the bare wire under the hinge
Take each end of the bare wire and place it under each hinge. If the hinges are already screwed into the panel, unscrew them enough to loosen the hinge and stick the wire under it. Tighten the screws. Make sure the bare wire touches the bare hinge. Repeat for the other hinge.
Make sure you do NOT screw the screws into the wire!
Step 2 - Connecting the Front Light to the Main Wire
In this step, we will attach the front light to the main wire to provide power to the light.
- Measure out a length of extra wire
Take your roll of extra wire and measure out a length that will be long enough to reach from the hinges to the main wire. In the picture below, we applied tapewire to the back of the house and soldered the wires to the tapewire. If you are using a socket strip make sure the wire with the plug is long enough to reach. You may have to lengthen the wires using the tutorial on how to lengthen the wires.

- Separate the strands and strip the insulation from one end of the wire
Just like you did before, separate the strands of wire into two strands and strip the insulation from each strand. You do not need to stagger the wires since they will not be near each other.

- Determine where you want to run the wires on the outside of the house
Look at the hinges on the body of the house. They should be on the outside of the house and on the right side of the house. The wires are going to be run from the hinges to the main feed wire. In the picture below, the main wire was run up the back of the house so the wire from the hinges was run around the side of the house and connected to the main wire in the back. Clapboard siding was applied to the exterior of the house which hid the wires.
NOTE: If you are not going to apply siding, paper clay, stucco or another finishing method to the exterior of the house, you can still run the wires along the outside. Play with the layout and see if they can be run along the trim on the side or along the top roofline or bottom of the house. You can also make grooves to lay the wires then fill the grooves with spackle, sand them down and paint over them. The layout will depend on where your main electrical wire is to attach the wires to.
- Fasten the wire under the hinges just like before.
Once you know where you want to run the wires to attach to the main feed wire, it is time to attach the wires to the hinges on the outside of the house. If your hinges are already screwed into the house, loosen the screws and slip a strand of bare wire under each hinge as shown in the picture below. Tighten the screws. This is the same process as you did for the front panel.
Make sure you do not drive the screws in to the wire and that all the wires are under the hinge and touching the hinges!
- Connect the wire to the main feed wire (Picture not available)
The final step is to connect the wire from the hinges to the main feed wire. If you are using a socket strip, attach the plug you removed from the light to the loose end of the wire. Plug the light into your socket strip and your light should work!.
If you are soldering the round wire to tapewire, once you finished soldering the wires, plug in your lead in wire and transformer and test the lights! If you attached the wires to the hinges correctly your front light should work. You can even open and close the panel with the lights on!
FINAL NOTES:
- Once the hinges are in place with the wires under them DO NOT remove the hinges. Removing the hinges could disturb or break the fine wires and the lights may not work.
- You may paint under the hinges before attaching the wires but do not put anything between the bare wires and the hinges.
- It is safe to touch the hinges with the lights on. If you wish, you can paint and wallpaper over the hinges. We recommend putting clear sealant on the hinges (like polyurethane or clear nail polish) to "seal" the hinges and prevent oxidization from the copper.
Congratulations! You now have lights on your front opening dollhouse!
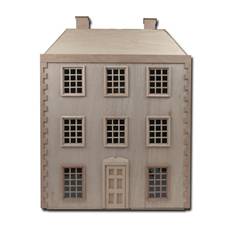
(Editor’s Note: Thank you Christine for sharing this tutorial with us just in time for the release of the Gloucester Front Opening Dollhouse! Your expertise will assist everyone who builds and lights this beautiful miniature home.)
Return to Newsletter Home...
|