|
Creating a Coordinating Fireplace
By Deb Roberts (with thanks to Tracy Topps)
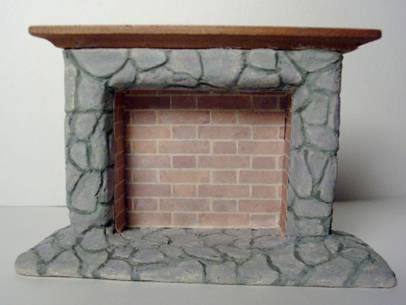
We all know that perfection in our miniature scenes is all about details. In 1:12 scale, the slightest piece out of harmony in the scene can cause discord in the whole room because that piece stands out rather than blending in with the rest of the furnishings. Fireplaces are probably one of the most challenging pieces when it comes to creating a completely coordinated room. It’s easy enough to find the right style but sometimes the color can be out of sync with the rest of the room.
This easy Paperclay project solves the problem of harmonizing fireplaces and it’s fun to do too! If you’ve never tried Paperclay, this is also a great starter project for working with that medium.
You’ll need:
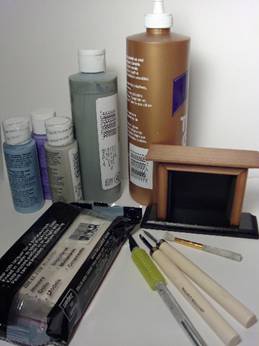
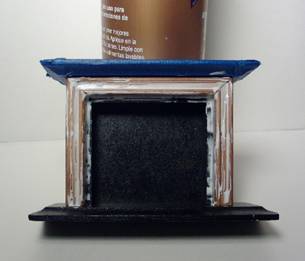
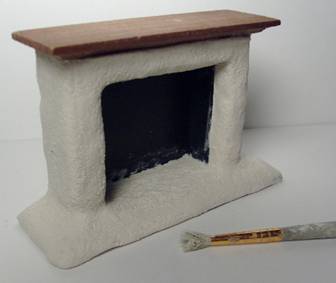
A pre-made fireplace (the one I used is a small and very inexpensive model from the craft store)
Paperclay
Sharp tool to cut clean edges of the clay
Blunt tool for carving lines into the clay (a blunt pencil works just fine)
Stiff bristled paint brush for contouring the clay
Soft bristled brushes for paint
Shades of paint to coordinate with your room
Brick patterned wallpaper or printie
White glue
Bowl of water
Soft, clean rag
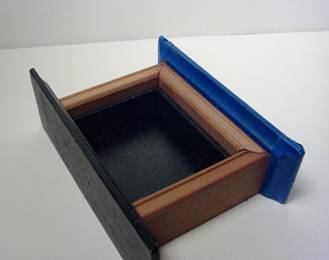
Begin with taping off the mantle of the fireplace to protect it from clay and paint.
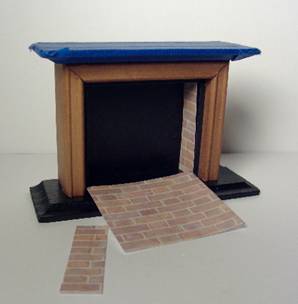
Measure and cut the brick paper to fit the top, sides and back of the fireplace interior. Set these pieces aside.
Working in small sections, smear glue on the fireplace with your finger so that the glue is applied evenly.
Knead a small piece of Paperclay into a smooth and workable texture, then roll it out onto a sheet of waxed paper about 1/16th of an inch thick. Lift the clay from the waxed paper and lay it over the glue on the fireplace. Press the Paperclay smoothly and firmly onto the fireplace, easing out any air bubbles under the clay. If the bubbles will not work their way to the edge of the clay, make a small slit in the clay with your knife, press out the air and use your fingers to reseal the hole.
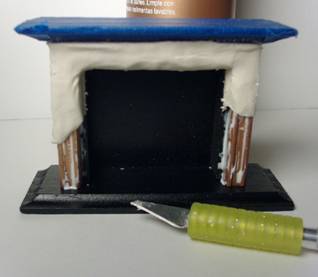
Continue to apply the Paperclay in portions over the fireplace, avoiding the interior. Dip your fingers in water and smooth down the edges where the Paperclay meets to hide any joining lines.
Apply Paperclay to the hearth in the same manner.
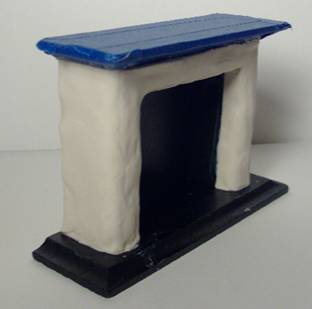
Use the stiff bristle brush to create the pebble texture of stone in the clay. I cut off the handle of my brush so that I can hold it in a tripod grip and “tap” the surface of the clay in a straight up and down motion. You want tiny little pin-point depressions in the clay without any sign of angled lines.
The next step is to carve the stones into the Paperclay. This is the step that most people find to be the hardest... until they’ve done it once or twice. The great Paperclay master, Tracy Topps, has advised novices to experiment with carving the shapes of stones and use a picture as a visual guide to help you define the shapes.
You can use a carving tool, but my favorite device for carving Paperclay is a blunt pencil. It doesn’t matter if you leave lead marks in the clay since you’re going to be painting it anyway. To avoid ‘crumbs’ on the edges, press down into the clay to make a depression rather than trying to cut the clay. If you do have ragged edges, simply smooth them down with your finger and then re-define the depression if needed.
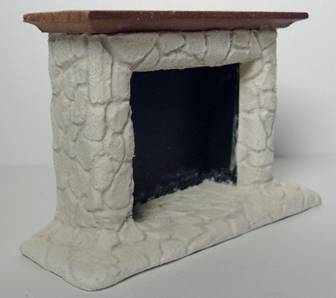
Allow the Paperclay to dry overnight and be sure that it is completely dry before painting it. If you find that you have cracks in the clay after it’s dried, place a small amount of wet clay into the crack, then dip your finger into water and smooth the clay down until it blends in. Allow any patches to dry overnight.
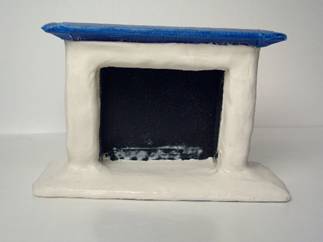
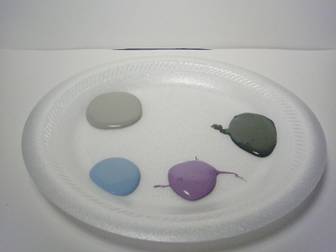
After the clay has dried completely, you’re ready to paint. Since painting Paperclay is all about blending the colors, it’s helpful to pour small amounts of your paints onto a paper plate and have a small bowl of water at hand as well as a soft, clean rag.
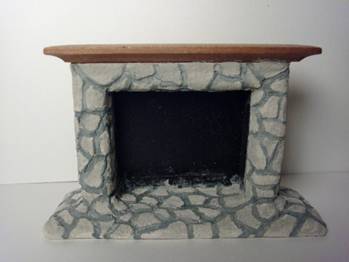
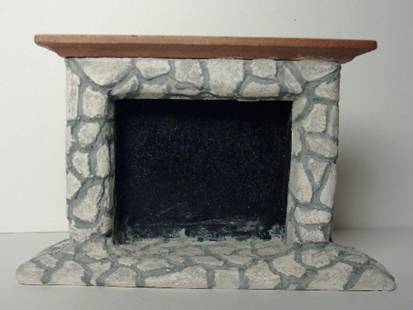
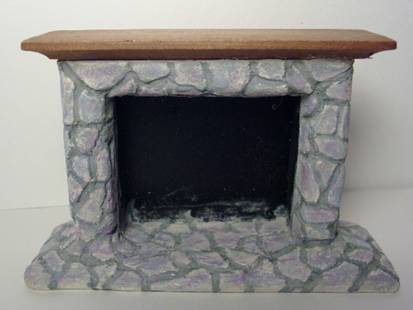
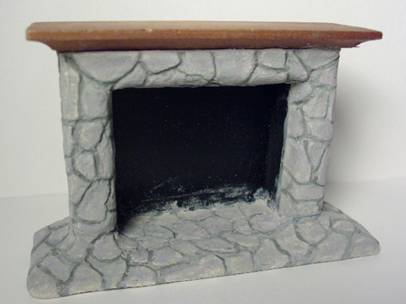
Your choice of colors depends on the type of stone you want to use and the colors in your room. You’ll use two shades of your dominant color and two accent colors. This fireplace is made of river stones and will be place in a room with pastel wallpaper. Therefore, I used two shades of grey for the base and used lavender and light blue as my accent colors. If you’re in doubt about what colors to use, search for images of stones online. Look closely at the contours in the stones and you’ll soon see that Mother Nature makes rocks in lots of colors!
Use the darkest shade of your dominant color to fill in the lines between your stones. This will be your mortar.
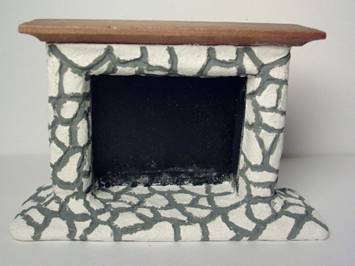
Dip your brush into your lighter shade of your dominant color and then into a bowl of water to thin the paint. Lightly brush over the clay, including over the grout lines.
Wipe the brush dry, then dip it into the water and go over the entire surface to wash the colors and soften the mortar lines. While the paint is still wet, use a dry, soft cloth to gently rub over the surface of the clay. This will lift part of the color from the highest surfaces of the stones, creating the realistic look of an uneven surface. Touch up with your brush to add more color or rub harder with the rag to lighten it.
Dip your brush into the first of your accent colors and then dab the brush into your rag to remove most of the paint. Dry brush the color onto the stones in a random pattern. Darker accent colors should go on first and lighter accent colors on top to give the appearance of shadows and contours.
Mix a few drops of your lighter dominant color into water to create a wash and brush it over the surface to blend all the colors.
Touch up any colors if needed until you are satisfied with the appearance of your stones. All the paint to dry.
Glue the brick paper into the interior of the fireplace.
Dip your brush into a dark grey paint and wipe it off on a rag, then dry brush over the stones on the hearth and the sides and back of the interior to simulate the natural look of soot.
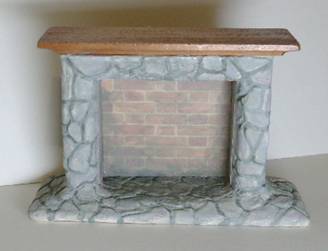
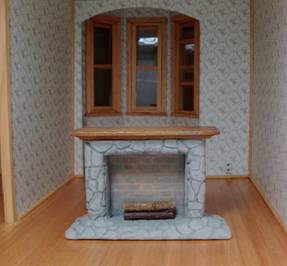
Allow the paint to dry completely. I added a coat of varnish to the mantel as a finishing touch and then my fireplace was ready to take up residence in its new home. Not every room calls for a coordinating fireplace, but isn’t it pretty when they do!
Return to Newsletter Home Page...
|