|
Diary of a Polymer Clay Novice Part 3:
Finishing and Painting Polymer Clay Elements
By Deb Roberts

I must admit that whether it’s clay or wood, painting details is one of my favorite things. Actually, I’m not that great when it comes to fine detailing which is why I can’t do doll faces unless they’re clowns, but there are ways to add plenty of detailing without making perfectly straight fine lines. This is a discovery I’ve made out of necessity because even though my hands don’t work as well as they used to I’ve refused to give up painting details. There is always a work around to every challenge.
After my embellishments came out of the oven I used a magnifying glass to examine every little detail. (Magnifiers have become a way of life for me lately because my eyes aren’t as good as they used to be, but even if your eyes are young and strong I’d still recommend using a magnifier when you’re working with fine detail. There’s no point of straining your eyes needlessly when you’ll want to use them more in the future.)
The first thing I wanted to check were all the edges where I’d cut off excess clay before baking. Even though I’d tried to get them as smooth as possible I still found some rough edges under the magnifier, especially on the white roses after having some difficulty getting the mixture of clay and conditioner just right. I tried three different ways of sanding the edges. The first was to use the fine side of an emery board which worked but wasn’t as smooth as I’d like. The second was to add a small bead of water to the edge and then wet sand it which worked a little better but still wasn’t as smooth as I wanted. The third was to use one of my favorite secret weapons from my tool box—my glass emery board.
If you’ve never used a glass emery board for sanding you’re really missing out on a great finishing tool. I started using mine for the edges of wood trim and discovered that not only does it sand quite well but it also seals the wood almost like a laser cut. That gives a beautiful finish and helps it take paint very well. I was delighted to find that the glass emery board worked just as well on the baked polymer clay so it will become my finishing tool of choice for more than just wood. I found my glass emery boards at a quilting show but I’ve seen them in hair and nail salons lately. They’re a little pricy but well worth every penny. I’ve been using mine for almost two years and they’re still working as well as the first day. The additional perk is that you can use them to do your nails while you wait for glue to dry.
But back to the clay! With the edges nicely finished my next task was to begin painting. The clay instructions said that regular acrylic paint works well on polymer if applied in thin coats. That sounded good to me so I got started right away. I immediately checked to see if the clay was soft enough for me to insert the tip of a push pin in the back and was delighted to find that it was! Push pins are my favorite way to hold a small item while I’m painting it. They make a really nifty handle.
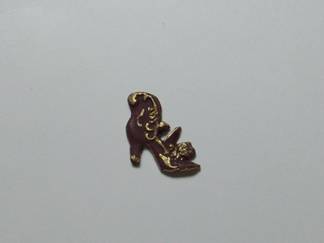
I decided to start with the Victorian boot since the only paint that it needed was a touch of gold here and there to bring up the details. The boot is just about a half inch tall and with something that small it’s easier to use a toothpick instead of a paint brush; dipping it into the paint and lightly touching it to the clay. While I was doing that it occurred to me that a brighter color of clay would have been a better choice for the boot but done is done and I sort of like the brown leather look with the gold accent. Since I’ll probably add this to a shelf, armoire or even a shoemaker’s sign, the brown will work this time.
The fan was the next piece to play with and since I’ve just finished a set of drapes with a fan valance to go in the Rosedale I’m building, it’s natural that I’d follow the same colors and design in this piece. So using a toothpick, I traced the bones of the fan with black paint. There is a delicate fern design on the fan that I traced out in gold paint and then let the paint dry.
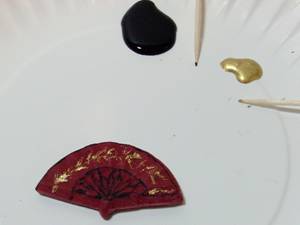
Mixing a bit of water with the gold paint gave me a nice wash that I brushed liberally over the entire fan.
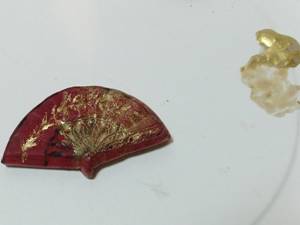
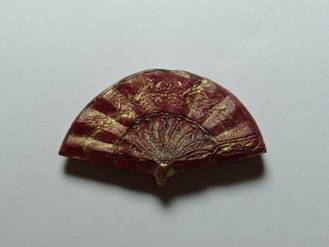
Quickly, before the paint could dry, I used a soft cloth to wipe off the excess gold paint. I like the way this piece came out with its subtle design and soft luster. I think it would make a nice piece of wall art or it could be used as a drapery accent at the top of half tester canopy bed.
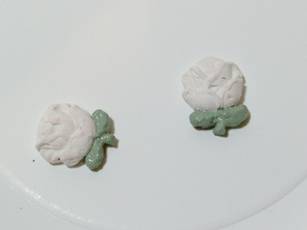
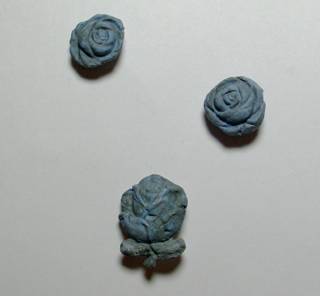
Finally it was time to turn the white roses into stone! These are the roses that gave me such fits because I added too much conditioner to the dry clay. I was able to smooth the edges but the surface was still a little rough. To be honest, if I weren’t planning on making them stone I’d probably have tossed them in the trash and started over. However, the rough texture works perfectly for stone so what could have been a total loss turned into a happy ending.

Admittedly blue is not the normal color for roses but these roses are going to be architectural details on a light gray house so they need to be in the same color range. I don’t want them to blend in to the walls but I don’t want them to stand out either.
I started with painting the leaves a nice sage green and then painted the rose a light blue.
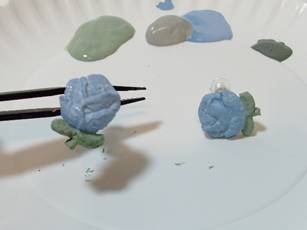
Since I’m shading the colors the paint didn’t have to dry completely before I moved onto the next color, however I noticed that the semi-dry paint had a tendency to roll so it appears it’s best to allow the paint to dry thoroughly between each coat.
The next shade was a light gray wash over the blue. This creates a bit of contrast on the petals of the rose. I used the same gray wash over the leaves for continuity.
The final shade is a darker gray applied as a dry brush into the crevices and valleys of the rose petals. This puts shadows in all the right places and makes the rose more realistic. The rose on the left has just the light gray wash, the rose on the right has had the dark gray dry brush added to it. I put them side by side so you can see what a difference the antiquing can make.
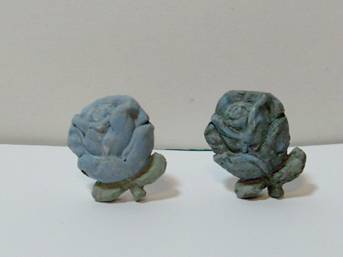
After one last check to see if I needed to use a subtle touch of the light gray wash to blend any harsh lines, I was satisfied with the final product. To my eye they have the right look for a carved stone rose.
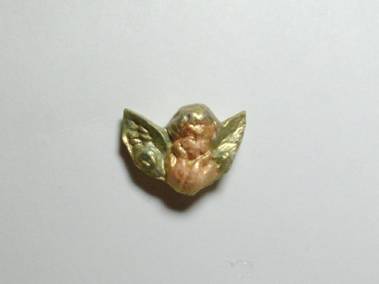
The smaller roses and the cherub that I made with dark red clay were in for a change. I firmly believe that it’s the prerogative of women and artists to change their minds on a whim and after looking at the roses and cherub, I decided that I’d rather use them as architectural features on the exterior rather than accent pieces in the burgundy bedroom so the color had to change. In a way that was a fortunate turn of events since it gave me the opportunity to see if I transform dark clay into a lighter color with paint. (I tend to change my mind a lot so this is valuable information for me.)
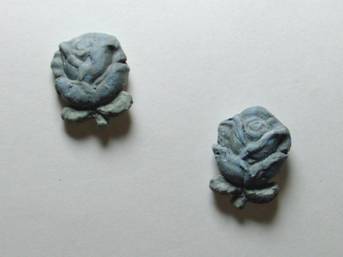
The small roses were fairly easy since I wanted them to match the larger ones. The blue paint covered the red clay in two coats and I proceeded with the same process I’d used on the other roses.
I gave some thought to the cherub and decided that it will probably be an accent piece on the bay wall overlooking the garden. I do want this piece to stand out more than the roses so I started with two thin coats of French ivory paint to cover the red clay. Actually that worked better than I thought it would!
After the ivory paint had dried completely, I started working in the color. I want the cherub to look aged and weathered since it will have been outside for a very long time so the touches of color are very subtle. Instead of stroking the paint onto the surface, I used a dabbing motion with the brush to ensure that the ivory showed thru just a bit. It makes the paint appear faded and worn.
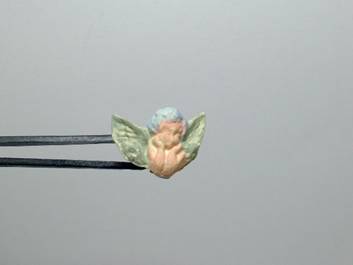
After the paint had dried, I used a gold luster paint and thinned it with water to a wash. Giving the cherub a thin antiquing with the gold not only aged the piece nicely but it took the slightly shabby chic appearance to a more refined look. This cherub will be going on an exterior wall but I’ll remember the technique in case I decide to do a shabby chic or French interior.
I set the cherub down to let the paint dry and reached over to my tray to pick up the next piece. It was a real surprise to discover that I’d already finished all the pieces I’d made! I was so involved in what I was doing that I didn’t even notice I was at the end of my project. You know that you’ve found a new passion when you feel that disappointment because your project has come to an end.
I’ve gone back and read thru my journal of the past two days and feel pretty good about my first experience with polymer clay. It’s been a little bit of a challenge to learn a new skill using only the manufacturer’s instructions for handling the clay but I liked it. I’ve always worked best when I learned the basics of a skill before I do anything else. It gives me a firm foundation on which to build.
As with my other learning experiences, I know that someday I’ll look back at this diary and laugh at how simplistic and rough my work was as a novice. My goal now is to delve into research and learn the proper techniques and finessing tips from the clay masters. Polymer clay is such a vital part of the miniature world because we can use it to create so many, many things. My experience with making molds and these little architectural features is a mere dust spec in the great universe of mini clay creations. Hopefully I’ll be back to share more polymer clay experiences with you—or maybe even convince some of those clay masters to visit the Gazette and share their expertise with us.
But for now I hope that you’ve enjoyed taking the journey into a new experience with me. If you’re an accomplished clay artisan you may have laughed a little or remembered your first experiences with clay—and if you’ve never worked with clay I hope that it encourages you to give it a try! Mostly, I hope that it motivates you to try something new. It doesn’t matter what you do. What matters is that you’re taking another step to explore all the wonderful things in our miniature world.
Newsletter Home Page...
|