|
Head's Up!
Sculpting and Painting Realistic Faces In Polymer Clay
By Sherri Colvin

When it comes to miniatures, I have an unreal fascination with realism. I love to make dolls that are highly believable in proportion, character and detail. I admit a degree in sculpture has given me an advantage, but it isn't necessary to spend four years talking about Rodin and Bernini to achieve a sense of realism in your miniature figures. A few basic tips can help you make more life-like miniature dolls.
Clay Preparation
Sculpting in miniature requires the right clay mixture. Its a make or break detail. Polymer clay is great to work with but environmentally sensitive. I live in the Southeast where the heat in summer makes clay stringy and sticky. I might as well be using taffy. At least, if the piece fails, I could bite off a chunk and drown my sorrows in the sugar. Here are a few suggestions to make the clay friendlier to manipulate:
- Mix it up! When working at such a small scale, the firmer the clay the better. Often making a cocktail of two or three different brands will make a more durable and workable medium.
- Leach it. If the clay is too new it can be too soft. If you need to firm, put a couple of pieces of white paper underneath to absorb excess plasticizer. You should see a nice oily spot on the paper after a day.
- Refrigerate it. Polymer clay can lose it's firmness as you handle it. A few minutes in the fridge will work wonders. Be on the lookout for condensation. Smoothly stroke away any "sweat" with a small paint brush.
Anatomy 101
Understanding basic skeletal forms play a critical role in creating believable faces. In order for the doll to look real from any angle, you must think in three dimensions. Every face is a play of push and pull.
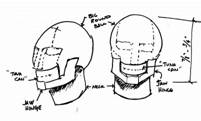
- Remember the skeleton! It must appear to be under the flesh. When sculpting the basic head shape, think of the skull as a big round ball, with a hinge (jaw) hanging off of it, sitting atop a tube (neck)
- Understand the mouth as more than big red painted lips! The mouth turns in space. Think of the curve of a tuna can. Visualize that shape sitting above the chin before you sculpt.
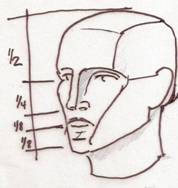
- Position eye sockets in the middle of the head and the tip of the nose halfway between the eye and the bottom of the chin. Position the part of the lips halfway between the tip of the nose and the bottom of the chin.
Your Best Features
Seeing features as parts of a whole is very important. Most people starting out want to work each individual part until it is completely detailed. Instead, work each feature equally.
- Avoid making eyes too big! Overly large eyes are perfect for Disney but not realism.
- Line up the top of the ear with the center of the eye. Most people get them too high.
- Think of the lower part of the nose as three balls. Make one center ball flanked by two smaller balls that shape the nostrils.
- Don’t overdo the wrinkles. If you get them too prominent, soften them with a light brushing of baby oil.
Color and Painting

Painting in miniature requires a delicate touch and a lot less paint than you think. The right choice of color and its application help keep it real.
- Try this before you paint. Buff the baked clay with an electric toothbrush, first with soap and water then just water. It cleans the excess oil and leaves a nice matte sheen.
- Paint the upper lip a shade darker than the lower.
- Be mindful of stark white teeth and eyeballs. Add the slightest touch of raw sienna in the white to tone it down.
- For freckles or blotchy skin, thin down Vaseline and blot the smallest amount of terra cotta color to the clay at cheeks and forehead.
- Put the tiniest dot of white on the iris of each eye to add sparkle and life.
Sherri has recently started making dolls for sale and commission. You can see more of her work in her gallery on the Greenleaf forum or visit her website for more information.
Return to Newsletter...
|