 So You Want to Build a Dollhouse
Part 3
So You Want to Build a Dollhouse
Part 3
Tools and tips to get you started
By Deb Roberts
First of all, find a workspace where you can spread out your tools and materials and leave them undisturbed for the duration of your project. When building a house, you don’t want to spend precious time moving things out of the way and then setting up again. After all, that’s time that could be spent working on minis instead of gathering up your supplies repeatedly. Keeping your work in one area also decreases the chance of losing a tiny piece of trim.
Be sure your workspace is well lit and that the work surface is flat and even. An uneven work surface can lead to problems with your house being square and level as you build. Also be sure that your workspace is ergonomic for your body and for your work habits. Having a table and chair at appropriate heights and angles is important so that you are comfortable sitting there for long periods of time. If you can, organize your supplies and materials so they are easy to see from a central location and within reach without straining. This all seems like obvious advice, but many miniaturists find themselves with aches and pains after an extended work period and may not realize that the aching back could be caused from repeatedly reaching for supplies that are just one inch too far away.
When you begin building, review the instructions and schematics sheets first. Remove the individual pieces from the sheets and, with a light pencil, label each piece with its name and the sheet number. That might seem like quite a lot of extra work, but it’s helpful for a couple of reasons. One is that there won’t be any guesswork as you progress with building, and the other is that it’s a good way to become familiar with each piece before you start building. It’s also very helpful to organize the pieces as you remove and label them. Create stacks of pieces categorized as “walls”, “roof “, “porch”, “windows”, etc. Small pieces can be put into envelopes or zipper baggies with a label included so that they are easily found when you need them.
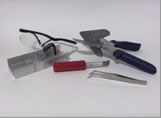
There’s always a lot of discussion about what tools are needed when someone new to the hobby begins building. Members of the Greenleaf forum have contributed a lengthy list composed of “must have”, “nice to have” and “if I won the lottery” tools. It’s been suggested that a list categorizing the tools would be helpful to have, so here we go.
The Basics:
Masking tape—painters quick release tape is recommended.
Wood Glue—A good quality wood glue such as Elmer’s ProBond or Elmer’s Stainable.
Tacky Glue—Tacky glue works for more delicate items such as windows.
Toothpicks or cocktail straws used to apply glue.
Wallpaper paste—Regular wallpaper paste works best and is quite affordable.
Sandpaper—An assortment of sandpaper in varying grits. A medium grit for beginning work, a smaller grit for finishing and smoothing.
Emery boards—Emery boards work well for small spaces and have two grits on each board.
Paint brushes—An assortment of sizes and bristle types.
Ruler or measuring tape
Sharp utility knife—Keep plenty of sharp replacement blades on hand. Never use a dull blade.
Pencil with eraser
Scissors
Your color choice of paint and stain for interior and exterior; wallpaper if you’ll be using it.
Primer to seal the wood.
Spackling compound or wood putty for gaps.
Eye protection.
Nice to Have:
Clamps—Clamps can be a variety of materials. Masking tape is used as a clamp and you can also use pinch clothespins or regular clamps from the hardware store. If you’re using clamps, be sure they are the correct size for your project.
Latex gloves—These are especially helpful when applying stain and paint.
Needlenose pliers
Tweezers
Baby wipes for your hands
EZ Cutter
Dremel or other rotary tool
Miter box and saw
Carpenter’s square
Rubberbands
Zipper baggies
Waxed paper or freezer paper
Glue gun for shingles (do not use a glue gun for assembling the house)
Luxury items:
Mini jigsaw
Mini bench sander
Mini table saw (the above tools are also great in real life size)
Scroll saw
Drill press
Plunge router
Any and all accessories for the Dremel
Dremel Stylus
Storage and shelving units to store supplies
Lathe
Vise bench with clamps
Soldering iron
Mitre saw
Palm sander
If you’ll be wiring your house for electricity, our Electric Guru, Darrell, has created the world’s best guide to wiring a house. You can find that guide and pictorial here.
Some specialty tools for wiring include:
Pilot hole punch
Test probe
Brad holder
Every builder has their own list of tools and that varies with each individual’s building style. This list doesn’t contain every tool that might be used for building and decorating, but it will get you started. As you gain experience, you’ll find the tools that are just perfect for your individual style.
Back to the March Newsletter...
|