|
No-Sew Witch's Hat
By Deb Roberts
This is a fast and fun way to make a witch’s hat from fabric without threading a needle! The uncomplicated design makes it simple to create with no fussing over hems or turning fabric inside out. It’s as easy as 1-2-3 to make your witch the most fashionable in the neighborhood!
Here’s what you’ll need:
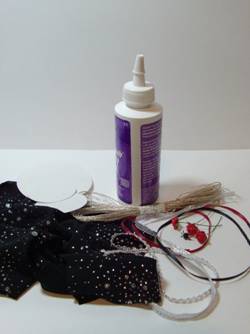
Fast dry tacky glue (must dry clear)
Fabric
Posterboard
Ribbon (2 or 3mm)
Small, sharp scissors to cut the fabric
Embellishments (flowers, feathers, beads, etc)
Before we begin, let’s talk about fabric for a minute. When you select your fabric for this project, look for the thinnest possible fabric you can find. The best choices are silk or a thin polyester blend, although you can find some quilter’s cottons that are a soft weave and thin enough to tuck under nicely. The softer the fabric, the better it will drape and fold. I’m using a semi-sheer polyester blend in black with silver glitter dots scattered over the fabric. Glittered fabric are easy to find in almost any fabric store that carries fantasy fabrics (silks, velvets, satins, and sheers). In miniature, the glitter looks like sequins which will make your mini witch very, very happy!
If you can’t find a glitter fabric and want to have a sequined look, you can use glue and glitter to apply your own. Use a toothpick to apply the glue in small, thin dots and carefully apply the glitter with tweezers directly onto the glue. If you’re going to glitter the fabric for your hat, wait until after it’s completely assembled before you do.
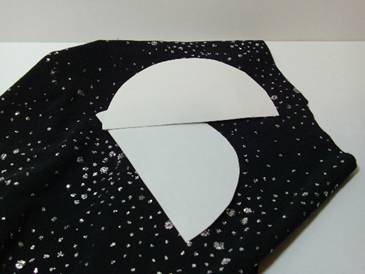
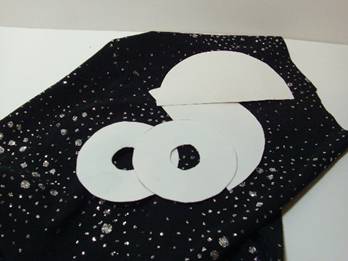
Let’s make a hat!! You’ll need to cut three circles from the posterboard. The first circle will be 3 ¼ inch across. Cut the circle in half and set one half aside.
The other two circles need to be 1 ¾ inch across. After they are cut out, cut a smaller circle (1/2 inch) directly in the middle of each one.
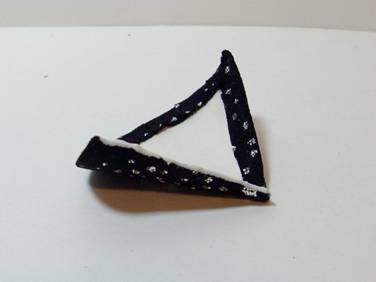
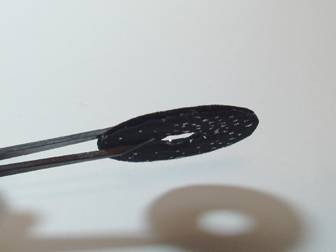
Take your half circle and cut it in half just over the middle so you have one piece that is slightly bigger than the other. Take the biggest piece and curl it around the tip of your finger in a cone shape until the bottom edges are even. Mark and cut off the edge so that you have no more than 1/16th overlap.
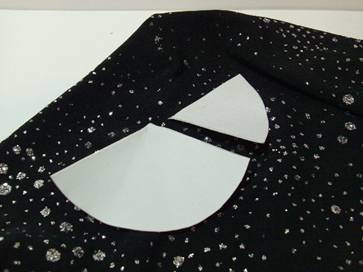
Lay the posterboard shape on top of your fabric to mark the size and cut the fabric ¼” larger than the posterboard.
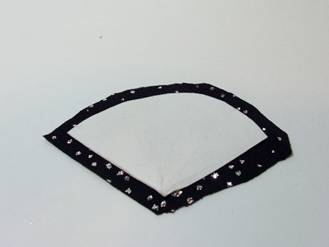
Lay the posterboard on the back of the fabric and hold in place. Using a small pair of scissors, cut a ‘fringe’ into the fabric around the curved edge of the posterboard. Make the cuts no more than ¼ inch wide and cut only to the edge of the posterboard. Put a layer of glue 1/4 wide around the edges of the posterboard and begin folding down the fringe, one piece at a time, into the glue. If you allow the fabric to follow its natural fold, each piece of the fringe will overlap the other so that your curved edge comes out smooth and nicely tailored.
Continue gluing the edges down, pressing hard with your fingertip to makes sure there are no bulges or bumps. When you get to the corners, press each edge right up to the tip where it will leave a fold sticking up. Cut off the fold as close to the bottom as you can to create a clean and tight corner.
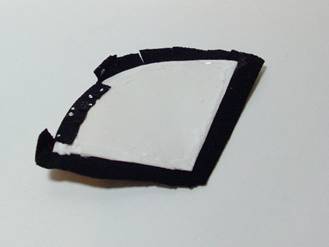
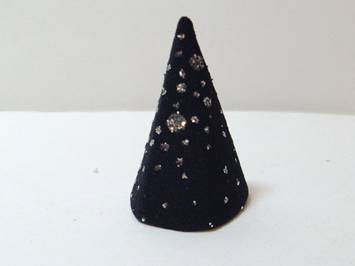
Place a bead of glue on one edge, then bend the posterboard into a cone shape around the tip of your finger, keeping the glue edge under the slight overlap.
Hold it firmly until the glue sets.
This is the point where you realize that you have a really cool wizard’s hat if you just bend the top down a little bit. The good news is that there were two halves to that circle we cut out earlier, so you can go back and repeat the first few steps with the other circle half and have a matching wizard’s hat to go with your witch’s hat!

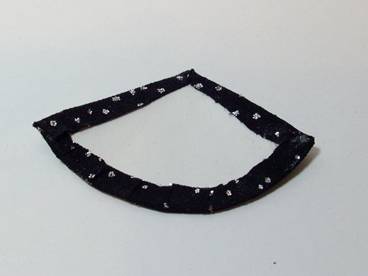
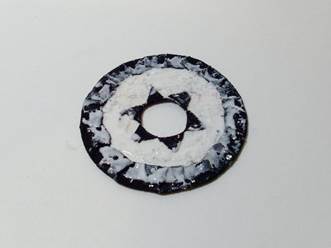
Moving on with the witch’s hat, take the first circle with a hole in it and cut a piece of fabric ¼ inch bigger than the circle, then repeat the same process of cutting a fringe into the fabric just as you did for the curved edge of the first piece. For the circle, you’ll cut the fringe all the way around. Poke a hole with your scissors in the center of the fabric in the middle of the circle and cut the same type of fringe there. (it will be like cutting pieces of a pie) Glue down the center piece first, then glue down the outer fringe, overlapping the pieces smoothly so you don’t have any bumps.
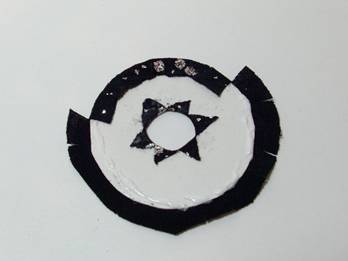
Repeat with the second circle.
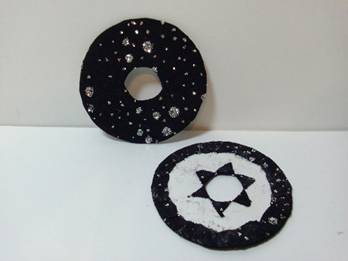
Using your finger, apply a thin layer of glue to the back side of one circle, smoothing it into an even layer with no excess around the edge or center.
Glue the two pieces together and press firmly and evenly across the entire piece until the glue sets.
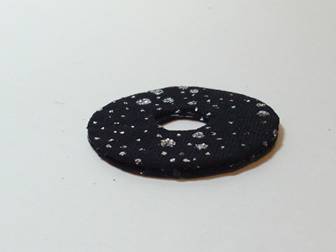
If you glued the fringe down smoothly around the edges and have no bumps or lumps, your two circles will glue together snuggly and evenly with no gaps and no glue smears. If you do have some gaps, don’t give up! You can put a bead of glue around the edges and cover the gap with ribbon or crewel thread.
Glue the cone to the top directly over the hole and allow the glue to set until you can safely handle it. (if you’ve decided to add sparkle to your plain fabric, this is the time to add the glitter)
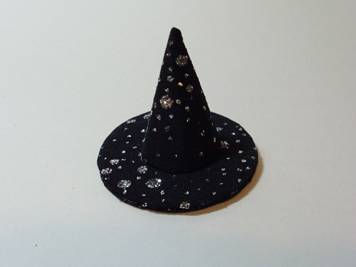
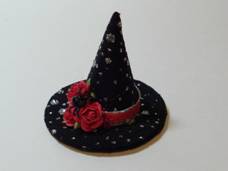
Add a hat band! Glue ribbon around the bottom edge of the cone, matching up the ends of the ribbon with the seam on the cone. The smaller the ribbon, the better it will fit the curved edges of the cone. If you have a little gap, pull the slack into one place and tuck it into a fold with a touch of glue to hold it in place. You can put your embellishments over the fold and it won’t be noticeable at all. I created a layered look, using a 3mm silver ribbon first and adding a 2mm red ribbon centered over the top of it.
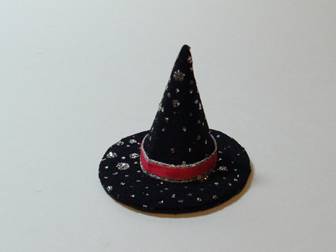
Add your embellishments to the hat band. I used a simple look with a touch of twisted red fibers glued onto the hat band first and then glued on three red roses and a black spider. You can add feathers, ribbons, bows, beads, etc to create the perfect style for your witch.

This project is so fast and fun that you can easily make several hats all at once and give each one a different look. Experiment with different fabrics and various embellishments to find new looks!
Happy Halloween!!!
Back to Newsletter Home...
|